Belkin F1DP216G User Manual - Page 31
REMOTE ACCESS, Accessing a Target Server
 |
View all Belkin F1DP216G manuals
Add to My Manuals
Save this manual to your list of manuals |
Page 31 highlights
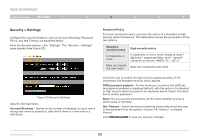
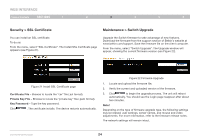
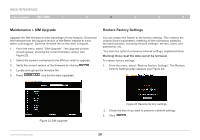
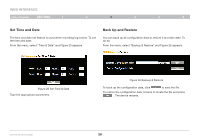
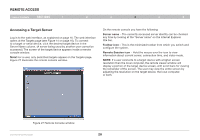
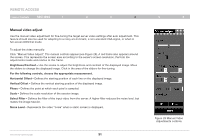
Remote Access Table of Contents sections 1 2 3 4 5 6 Accessing a Target Server Log in to the web interface, as explained on page 16. The web interface opens at the Targets page (see Figure 14 on page 16). To connect to a target or serial device, click the desired target/device in the Server Name column. (A server being used by another user cannot be accessed.) The screen of the target/device appears inside a remote console window. Note! For a user, only permitted targets appear on the Targets page. Figure 27 illustrates the remote console window. On the remote console you have the following: Server name - The currently accessed server identity can be checked any time by looking at the "Server name" on the Internet Explorer title bar. Toolbar icon - This is the minimized toolbar from which you switch and configure the system. Remote Session icon - Hold the mouse over the icon to view information about current server, connection time, and video mode. NOTE: If a user connects to a target device with a higher screen resolution than the local computer, the remote viewer window will display a portion of the target device screen, with scroll bars for viewing the remainder of the screen. The user may view the entire screen by adjusting the resolution on the target device, the local computer, or both. Figure 27 Remote Console window OmniViewIP 5216K/5232K 28
-
 1
1 -
2
-
3
-
4
-
5
-
6
-
7
-
8
-
9
-
10
-
11
-
12
-
13
-
14
-
15
-
16
-
17
-
18
-
19
-
20
-
21
-
22
-
23
-
24
-
25
-
 26
26 -
 27
27 -
 28
28 -
 29
29 -
 30
30 -
 31
31 -
 32
32 -
 33
33 -
 34
34 -
 35
35 -
 36
36 -
37
-
38
-
39
-
40
-
41
-
42
-
43
-
44
-
45
-
46
-
47
-
48
-
49
-
50
-
51
-
52
-
53
-
54
-
55
-
56
-
57
 |
 |
