Brother International GT-361 Instruction Manual - English - Page 127
Fitting, Tube Connector, Lever, V-shaped groove, Surface of Print Head Nozzl, Positioning Pin
 |
View all Brother International GT-361 manuals
Add to My Manuals
Save this manual to your list of manuals |
Page 127 highlights
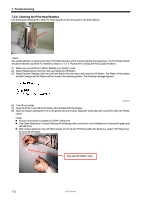
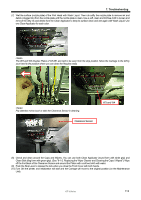
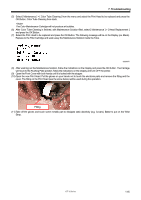
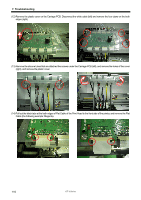
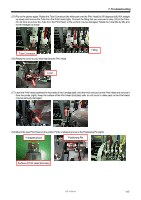
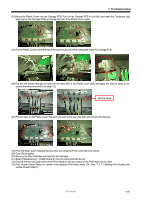
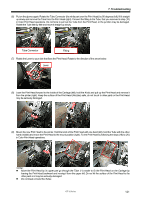
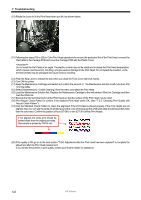
7. Troubleshooting (15) Put on the gloves again. Rotate the Tube Connector (the white part over the Print Head) by 90 degrees (left), lift it straight up slowly and remove the Tube from the Print Head (right). Connect the fitting that you removed in step (10) to the Tube. Do not force to pull out the Tube from the Print Head, or the junction may be damaged. Rotate the Tube little by little and move it straight up slowly. Tube Connector (16) Rotate the Lever to your side that fixes the Print Head. Lever Fitting (17) Lean the Print Head backward to the inside of the Carriage (left), hold the Knob and pull up the Print Head and remove it from the printer (right). Keep the surface of the Print Head (Nozzles) safe, do not touch to other parts or the Print Head may be seriously damaged. (18) Mount the new Print Head on the printer. Fit the V-shaped groove to the Positioning Pin (right). V-shaped groove Positioning Pin Surface of Print Head (Nozzles) GT-3 Series 117
-
 1
1 -
2
-
3
-
4
-
5
-
6
-
7
-
8
-
9
-
10
-
11
-
12
-
13
-
14
-
15
-
16
-
17
-
18
-
19
-
20
-
21
-
22
-
23
-
24
-
25
-
26
-
27
-
28
-
29
-
30
-
31
-
32
-
33
-
34
-
35
-
36
-
37
-
38
-
39
-
40
-
41
-
42
-
43
-
44
-
45
-
46
-
47
-
48
-
49
-
50
-
51
-
52
-
53
-
54
-
55
-
56
-
57
-
58
-
59
-
60
-
61
-
62
-
63
-
64
-
65
-
66
-
67
-
68
-
69
-
70
-
71
-
72
-
73
-
74
-
75
-
76
-
77
-
78
-
79
-
80
-
81
-
82
-
83
-
84
-
85
-
86
-
87
-
88
-
89
-
90
-
91
-
92
-
93
-
94
-
95
-
96
-
97
-
98
-
99
-
100
-
101
-
102
-
103
-
104
-
105
-
106
-
107
-
108
-
109
-
110
-
111
-
112
-
113
-
114
-
115
-
116
-
117
-
118
-
119
-
120
-
121
-
 122
122 -
 123
123 -
 124
124 -
 125
125 -
 126
126 -
 127
127 -
 128
128 -
 129
129 -
 130
130 -
 131
131 -
 132
132 -
133
-
134
-
135
-
136
-
137
-
138
-
139
-
140
-
141
-
142
-
143
-
144
-
145
-
146
-
147
-
148
 |
 |
