Brother International GT-361 Instruction Manual - English - Page 25
Menu List, Push either one of the OK Button, Up Button
 |
View all Brother International GT-361 manuals
Add to My Manuals
Save this manual to your list of manuals |
Page 25 highlights
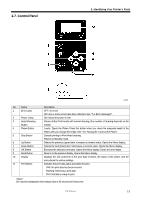
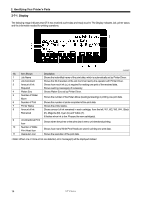
2-7-2. Menu List 2. Identifying Your Printer's Parts Push either one of the OK Button, Up Button, Down Button and Back Button to go into the Menu. Menu Head Cleaning Test Print Daily Cleaning White Print Data Load Print Direction Maintenance Printer Setting Content Executes Head Cleaning of either one by one or of all four Print Heads. See "7-2-2. Cleaning the Print Heads" Normal: normal mis-firing Powerful: After cleaning the Print Head nozzles, when normal head cleaning does not work. Prints to check mis-firing and print quality. Nozzle Check CMYK / W: shows mis-firing Standard Check CMYK / W: shows general print quality Whiteness: confirms the white quality Head Test CMYK / W: confirms which print head is broken Flushes the " thinner and white-less" dull White Ink caused by sinking white pigment. See "6-2-1. Daily Cleaning White for replacing dull White Ink". Reads a print data (AR3 file) in USB flash drive. The inside folder shows with [...]. Sets the print direction. This setting is prior to Printer Driver setting. Auto: Default Bi-directional, Printer Driver setting is available. Always Uni-Directional: always prints uni-directionally. Always Bi-Directional: always prints bi-directionally. See "7-2-4. Changing the Print Direction". Goes into the Maintenance submenu. White Tube Cleaning: Cleans the pigment in White Print Heads and Tubes. See "6-2-2. White Tube Cleaning." Load White: Loads White Ink into the Tubes filled with Maintenance Solution after White Tube Cleaning. See "6-2-2. White Tube Cleaning" Initial Cleaning: Loads ink into the empty new Tubes and Print Heads. CMYK ink is loaded directly into Tubes. Maintenance Solution is required before White ink. Maintenance Parts Exchange: See "6-1-2" to "6-1-7". Nozzle Cleaning: Select this menu when you cannot solve mis-firing. See "7-2-6. Cleaning the Print Head Nozzles" CR Encoder Strip Cleaning: See "6-1-7. Cleaning the Encoder Strip". Head Replacement: See "7-2-7. Replacing the Print Head" Color Tube Cleaning: See "7-2-7. Replacing the Print Head" Log Copy to USB: See "7-2-13. Copy Log file to USB flash drive" Goes into the Printer Setting. LCD Contrast: Adjusts the Display contrast. See "3-4-1. Adjusting the Display Contrast" Speaker Volume: Adjusts the speaker volume. See "3-4-2. Adjusting the Speaker Volume". Temperature: Sets Fahrenheit / Centigrade. See "3-4-3. Temperature". Auto Cleaning Interval: See "7-2-5. Changing the Auto Cleaning Setting ". CR Speed Adjustment: Adjusts the increase/decrease of the Carriage speed. See "7-2-9. Adjusting the CR Speed". Flushing Interval: Adjusts the number of lines (interval) to flush ink in printing. See "7-2-10. Adjusting the Flushing Interval". Flushing Volume: Adjusts the ink volume in flushing. See "7-2-11. Adjusting the Flushing Volume". (Continued on the next page) GT-3 Series 15
-
 1
1 -
2
-
3
-
4
-
5
-
6
-
7
-
8
-
9
-
10
-
11
-
12
-
13
-
14
-
15
-
16
-
17
-
18
-
19
-
 20
20 -
 21
21 -
 22
22 -
 23
23 -
 24
24 -
 25
25 -
 26
26 -
 27
27 -
 28
28 -
 29
29 -
 30
30 -
31
-
32
-
33
-
34
-
35
-
36
-
37
-
38
-
39
-
40
-
41
-
42
-
43
-
44
-
45
-
46
-
47
-
48
-
49
-
50
-
51
-
52
-
53
-
54
-
55
-
56
-
57
-
58
-
59
-
60
-
61
-
62
-
63
-
64
-
65
-
66
-
67
-
68
-
69
-
70
-
71
-
72
-
73
-
74
-
75
-
76
-
77
-
78
-
79
-
80
-
81
-
82
-
83
-
84
-
85
-
86
-
87
-
88
-
89
-
90
-
91
-
92
-
93
-
94
-
95
-
96
-
97
-
98
-
99
-
100
-
101
-
102
-
103
-
104
-
105
-
106
-
107
-
108
-
109
-
110
-
111
-
112
-
113
-
114
-
115
-
116
-
117
-
118
-
119
-
120
-
121
-
122
-
123
-
124
-
125
-
126
-
127
-
128
-
129
-
130
-
131
-
132
-
133
-
134
-
135
-
136
-
137
-
138
-
139
-
140
-
141
-
142
-
143
-
144
-
145
-
146
-
147
-
148
 |
 |