Brother International HL-3400CN Users Manual - English - Page 170
Insert the new Waste Toner Pack into the Waste Toner Pack, Open the Front Cover.
 |
UPC - 012502526223
View all Brother International HL-3400CN manuals
Add to My Manuals
Save this manual to your list of manuals |
Page 170 highlights
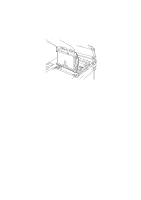
CHAPTER 5 MAINTENANCE 1. Open the Front Cover. 2. Remove the Waste Toner Pack from the holder located at the lower right side of the printer. Be careful not to spill the toner. Fig. 5-11 Take the Waste Toner Pack out 3. Peel off the sealing sticker on the right side of the Waste Toner Pack. Seal the opening with the sealing sticker. See Fig. 5-12 for the correct placement of the sticker. When you dispose of the used Waste Toner Pack, place it in the plastic bag included with the replacement Waste Toner Pack. Please dispose of the Waste Toner Pack in accordance with local regulations. Fig. 5-12 Seal the Sealing Sticker 4. Insert the new Waste Toner Pack into the Waste Toner Pack Holder. 5. Close the Front Cover. 5-13
-
 1
1 -
2
-
3
-
4
-
5
-
6
-
7
-
8
-
9
-
10
-
11
-
12
-
13
-
14
-
15
-
16
-
17
-
18
-
19
-
20
-
21
-
22
-
23
-
24
-
25
-
26
-
27
-
28
-
29
-
30
-
31
-
32
-
33
-
34
-
35
-
36
-
37
-
38
-
39
-
40
-
41
-
42
-
43
-
44
-
45
-
46
-
47
-
48
-
49
-
50
-
51
-
52
-
53
-
54
-
55
-
56
-
57
-
58
-
59
-
60
-
61
-
62
-
63
-
64
-
65
-
66
-
67
-
68
-
69
-
70
-
71
-
72
-
73
-
74
-
75
-
76
-
77
-
78
-
79
-
80
-
81
-
82
-
83
-
84
-
85
-
86
-
87
-
88
-
89
-
90
-
91
-
92
-
93
-
94
-
95
-
96
-
97
-
98
-
99
-
100
-
101
-
102
-
103
-
104
-
105
-
106
-
107
-
108
-
109
-
110
-
111
-
112
-
113
-
114
-
115
-
116
-
117
-
118
-
119
-
120
-
121
-
122
-
123
-
124
-
125
-
126
-
127
-
128
-
129
-
130
-
131
-
132
-
133
-
134
-
135
-
136
-
137
-
138
-
139
-
140
-
141
-
142
-
143
-
144
-
145
-
146
-
147
-
148
-
149
-
150
-
151
-
152
-
153
-
154
-
155
-
156
-
157
-
158
-
159
-
160
-
161
-
162
-
163
-
164
-
 165
165 -
 166
166 -
 167
167 -
 168
168 -
 169
169 -
 170
170 -
 171
171 -
 172
172 -
 173
173 -
 174
174 -
 175
175 -
176
-
177
-
178
-
179
-
180
-
181
-
182
-
183
-
184
-
185
-
186
-
187
-
188
-
189
-
190
-
191
-
192
-
193
-
194
-
195
-
196
-
197
-
198
-
199
-
200
-
201
-
202
-
203
-
204
-
205
-
206
-
207
-
208
-
209
-
210
-
211
-
212
-
213
-
214
-
215
-
216
-
217
-
218
-
219
-
220
-
221
-
222
-
223
-
224
-
225
-
226
-
227
-
228
-
229
-
230
-
231
-
232
-
233
-
234
-
235
-
236
-
237
-
238
-
239
-
240
-
241
-
242
-
243
-
244
-
245
-
246
-
247
-
248
-
249
-
250
-
251
-
252
-
253
-
254
-
255
-
256
-
257
-
258
-
259
-
260
-
261
-
262
-
263
-
264
-
265
-
266
-
267
-
268
-
269
-
270
-
271
-
272
-
273
-
274
-
275
-
276
-
277
-
278
-
279
-
280
 |
 |

CHAPTER 5 MAINTENANCE
5-13
1.
Open the Front Cover.
2.
Remove the Waste Toner Pack from the holder located at the
lower right side of the printer. Be careful not to spill the toner.
Fig. 5-11
Take the Waste Toner Pack out
3.
Peel off the sealing sticker on the right side of the Waste Toner
Pack. Seal the opening with the sealing sticker. See Fig. 5-12 for
the correct placement of the sticker.
When you dispose of the used Waste Toner Pack, place it in
the plastic bag included with the replacement Waste Toner
Pack. Please dispose of the Waste Toner Pack in accordance
with local regulations.
Fig. 5-12
Seal the Sealing Sticker
4.
Insert the new Waste Toner Pack into the Waste Toner Pack
Holder.
5.
Close the Front Cover.