Brother International MFC-8710DW Basic User's Guide - English - Page 66
Making copies, How to copy, Stop copying, Copy settings
 |
View all Brother International MFC-8710DW manuals
Add to My Manuals
Save this manual to your list of manuals |
Page 66 highlights
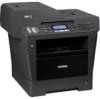
9 Making copies 9 How to copy 9 The following steps show the basic copy operation. (See Advanced User's Guide.) a When you want to make a copy, press (COPY) to illuminate it in blue. Make sure you are in COPY mode. The LCD shows: Contrast:- + Quality :Auto Enlg/Red:100% Tray :MP>T1 Pressab or Start 01 1 1 No. of Copies Use the dial pad to enter the number of copies you want. Note The default setting is FAX mode. You can change the amount of time that the machine stays in COPY mode after the last copy operation. (See Advanced User's Guide: Mode Timer.) b Do one of the following to load your document: Place the document face up in the ADF. (See Using the automatic document feeder (ADF) uu page 24.) Load your document face down on the scanner glass. (See Using the scanner glass uu page 25.) c Press Start. Stop copying 9 To stop copying, press Stop/Exit. Copy settings 9 Press COPY and then press a or b to scroll through the copy settings. When the setting you want is highlighted, press c repeatedly until you see the option you want, and then press OK. (BASIC USER'S GUIDE) For details about changing the following settings, see pages 16 - 17: Paper Type Paper Size Tray Use (Tray Use in COPY mode) (ADVANCED USER'S GUIDE) For details about changing the following settings uu Advanced User's Guide: Copy settings) Enlg/Red (Enlarge/Reduce) Stack/Sort Quality Brightness Contrast Page Layout Tray Select (Tray Selection) Duplex 54
-
 1
1 -
2
-
3
-
4
-
5
-
6
-
7
-
8
-
9
-
10
-
11
-
12
-
13
-
14
-
15
-
16
-
17
-
18
-
19
-
20
-
21
-
22
-
23
-
24
-
25
-
26
-
27
-
28
-
29
-
30
-
31
-
32
-
33
-
34
-
35
-
36
-
37
-
38
-
39
-
40
-
41
-
42
-
43
-
44
-
45
-
46
-
47
-
48
-
49
-
50
-
51
-
52
-
53
-
54
-
55
-
56
-
57
-
58
-
59
-
60
-
 61
61 -
 62
62 -
 63
63 -
 64
64 -
 65
65 -
 66
66 -
 67
67 -
 68
68 -
 69
69 -
 70
70 -
 71
71 -
72
-
73
-
74
-
75
-
76
-
77
-
78
-
79
-
80
-
81
-
82
-
83
-
84
-
85
-
86
-
87
-
88
-
89
-
90
-
91
-
92
-
93
-
94
-
95
-
96
-
97
-
98
-
99
-
100
-
101
-
102
-
103
-
104
-
105
-
106
-
107
-
108
-
109
-
110
-
111
-
112
-
113
-
114
-
115
-
116
-
117
-
118
-
119
-
120
-
121
-
122
-
123
-
124
-
125
-
126
-
127
-
128
-
129
-
130
-
131
-
132
-
133
-
134
-
135
-
136
-
137
-
138
-
139
-
140
-
141
-
142
-
143
-
144
-
145
-
146
-
147
-
148
-
149
-
150
-
151
-
152
-
153
-
154
-
155
-
156
-
157
-
158
-
159
-
160
-
161
-
162
-
163
-
164
-
165
-
166
-
167
-
168
-
169
-
170
-
171
-
172
-
173
-
174
-
175
-
176
-
177
-
178
-
179
-
180
-
181
-
182
-
183
-
184
-
185
-
186
-
187
-
188
-
189
-
190
-
191
-
192
-
193
-
194
-
195
-
196
-
197
-
198
-
199
-
200
-
201
-
202
 |
 |