Brother International MFC-8710DW Basic User's Guide - English - Page 89
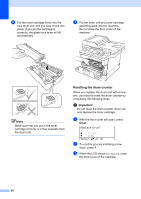
Replacing the drum unit - replace drum
 |
View all Brother International MFC-8710DW manuals
Add to My Manuals
Save this manual to your list of manuals |
Page 89 highlights
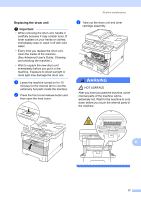
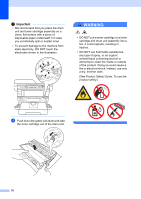
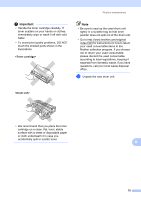
Replacing the drum unit A Important • While removing the drum unit, handle it carefully because it may contain toner. If toner scatters on your hands or clothes, immediately wipe or wash it off with cold water. • Every time you replace the drum unit, clean the inside of the machine. (See Advanced User's Guide: Cleaning and checking the machine.) • Wait to unpack the new drum unit immediately before you put it in the machine. Exposure to direct sunlight or room light may damage the drum unit. a Leave the machine turned on for 10 minutes for the internal fan to cool the extremely hot parts inside the machine. b Press the front cover release button and then open the front cover. Routine maintenance c Take out the drum unit and toner cartridge assembly. WARNING HOT SURFACE After you have just used the machine, some internal parts of the machine will be extremely hot. Wait for the machine to cool down before you touch the internal parts of the machine. A 77
-
 1
1 -
2
-
3
-
4
-
5
-
6
-
7
-
8
-
9
-
10
-
11
-
12
-
13
-
14
-
15
-
16
-
17
-
18
-
19
-
20
-
21
-
22
-
23
-
24
-
25
-
26
-
27
-
28
-
29
-
30
-
31
-
32
-
33
-
34
-
35
-
36
-
37
-
38
-
39
-
40
-
41
-
42
-
43
-
44
-
45
-
46
-
47
-
48
-
49
-
50
-
51
-
52
-
53
-
54
-
55
-
56
-
57
-
58
-
59
-
60
-
61
-
62
-
63
-
64
-
65
-
66
-
67
-
68
-
69
-
70
-
71
-
72
-
73
-
74
-
75
-
76
-
77
-
78
-
79
-
80
-
81
-
82
-
83
-
 84
84 -
 85
85 -
 86
86 -
 87
87 -
 88
88 -
 89
89 -
 90
90 -
 91
91 -
 92
92 -
 93
93 -
 94
94 -
95
-
96
-
97
-
98
-
99
-
100
-
101
-
102
-
103
-
104
-
105
-
106
-
107
-
108
-
109
-
110
-
111
-
112
-
113
-
114
-
115
-
116
-
117
-
118
-
119
-
120
-
121
-
122
-
123
-
124
-
125
-
126
-
127
-
128
-
129
-
130
-
131
-
132
-
133
-
134
-
135
-
136
-
137
-
138
-
139
-
140
-
141
-
142
-
143
-
144
-
145
-
146
-
147
-
148
-
149
-
150
-
151
-
152
-
153
-
154
-
155
-
156
-
157
-
158
-
159
-
160
-
161
-
162
-
163
-
164
-
165
-
166
-
167
-
168
-
169
-
170
-
171
-
172
-
173
-
174
-
175
-
176
-
177
-
178
-
179
-
180
-
181
-
182
-
183
-
184
-
185
-
186
-
187
-
188
-
189
-
190
-
191
-
192
-
193
-
194
-
195
-
196
-
197
-
198
-
199
-
200
-
201
-
202
 |
 |
