Canon CanoScan D1250U2F CanoScan D1250U2 ScanGear CS-U 6.3 for Win Guide - Page 51
Setting in the, Windows, Control Panel
 |
View all Canon CanoScan D1250U2F manuals
Add to My Manuals
Save this manual to your list of manuals |
Page 51 highlights
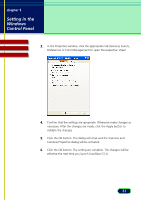
chapter 5 Setting in the Windows Control Panel Contents Glossary Index 3. In the Properties window, click the appropriate tab (General, Events, Preferences or Color Management) to open the respective sheet. 4. Confirm that the settings are apropriate. Otherwise make changes as necessary. After the changes are made, click the Apply button to validate the changes. 5. Click the OK button. The dialog will close and the Scanners and Cameras Properties dialog will be activated. 6. Click the OK button. The setting are complete. The changes will be effective the next time you launch ScanGear CS-U. 51
-
 1
1 -
2
-
3
-
4
-
5
-
6
-
7
-
8
-
9
-
10
-
11
-
12
-
13
-
14
-
15
-
16
-
17
-
18
-
19
-
20
-
21
-
22
-
23
-
24
-
25
-
26
-
27
-
28
-
29
-
30
-
31
-
32
-
33
-
34
-
35
-
36
-
37
-
38
-
39
-
40
-
41
-
42
-
43
-
44
-
45
-
 46
46 -
 47
47 -
 48
48 -
 49
49 -
 50
50 -
 51
51 -
 52
52 -
 53
53 -
 54
54 -
 55
55 -
 56
56 -
57
-
58
-
59
-
60
-
61
-
62
-
63
-
64
-
65
-
66
-
67
-
68
-
69
 |
 |

51
chapter 5
Setting in the
Windows
Control Panel
Glossary
Contents
Index
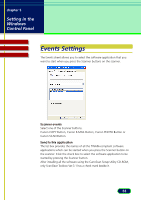
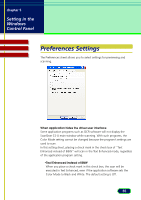
3.
In the Properties window, click the appropriate tab (General, Events,
Preferences or Color Management) to open the respective
sheet.
4.
Confirm that the settings are apropriate. Otherwise make changes as
necessary. After the changes are made, click the Apply button to
validate the changes.
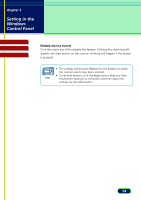
5.
Click the OK button. The dialog will close and the Scanners and
Cameras Properties dialog will be activated.
6.
Click the OK button. The setting are complete. The changes will be
effective the next time you launch ScanGear CS-U.