Canon MAXIFY MB5420 MB5400 series PDF User Manual Windows - Page 1011
Forwarding Received Faxes Automatically to Shared Folder on, Computer
 |
View all Canon MAXIFY MB5420 manuals
Add to My Manuals
Save this manual to your list of manuals |
Page 1011 highlights
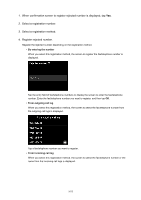
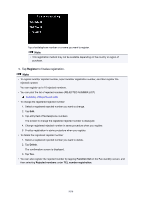
Forwarding Received Faxes Automatically to Shared Folder on Computer You can forward received faxes to the shared folder on the computer as PDF files automatically. This section describes the procedure to enable the printer to forward received faxes to the shared folder on the computer automatically. Important • Do not disconnect the printer with the computer when the printer is set to forward received faxes to the shared folder on the computer automatically. • We assume no responsibility for damage to or loss of data for whatever reason even within the warranty period. • Awaiting document processing. is displayed on the Fax standby screen and the faxes are stored in the printer's memory when the received faxes are not forward to the shared folder because the printer is not connected with the computer or because the shared folder setting is changed. • You can forward the faxes stored in the printer's memory to the shared folder on the computer manually. Delete the unnecessary fax from printer's memory after forwarding to the shared folder. Forwarding Document in Printer's Memory to Shared Folder on Computer Deleting Document in Printer's Memory Note • Register the destination folder using Quick Utility Toolbox in advance. For details on how to register the destination folder: • For Windows: Destination Folder Settings • For Mac OS: Destination Folder Settings 1. Make sure that printer is turned on. 2. Make sure that printer is connected with destination computer. 3. Flick HOME screen, and then tap Using the Operation Panel Setup. 4. Tap Device settings. 5. Tap FAX settings. 6. Tap Auto save setting. 1011
-
 1
1 -
2
-
3
-
4
-
5
-
6
-
7
-
8
-
9
-
10
-
11
-
12
-
13
-
14
-
15
-
16
-
17
-
18
-
19
-
20
-
21
-
22
-
23
-
24
-
25
-
26
-
27
-
28
-
29
-
30
-
31
-
32
-
33
-
34
-
35
-
36
-
37
-
38
-
39
-
40
-
41
-
42
-
43
-
44
-
45
-
46
-
47
-
48
-
49
-
50
-
51
-
52
-
53
-
54
-
55
-
56
-
57
-
58
-
59
-
60
-
61
-
62
-
63
-
64
-
65
-
66
-
67
-
68
-
69
-
70
-
71
-
72
-
73
-
74
-
75
-
76
-
77
-
78
-
79
-
80
-
81
-
82
-
83
-
84
-
85
-
86
-
87
-
88
-
89
-
90
-
91
-
92
-
93
-
94
-
95
-
96
-
97
-
98
-
99
-
100
-
101
-
102
-
103
-
104
-
105
-
106
-
107
-
108
-
109
-
110
-
111
-
112
-
113
-
114
-
115
-
116
-
117
-
118
-
119
-
120
-
121
-
122
-
123
-
124
-
125
-
126
-
127
-
128
-
129
-
130
-
131
-
132
-
133
-
134
-
135
-
136
-
137
-
138
-
139
-
140
-
141
-
142
-
143
-
144
-
145
-
146
-
147
-
148
-
149
-
150
-
151
-
152
-
153
-
154
-
155
-
156
-
157
-
158
-
159
-
160
-
161
-
162
-
163
-
164
-
165
-
166
-
167
-
168
-
169
-
170
-
171
-
172
-
173
-
174
-
175
-
176
-
177
-
178
-
179
-
180
-
181
-
182
-
183
-
184
-
185
-
186
-
187
-
188
-
189
-
190
-
191
-
192
-
193
-
194
-
195
-
196
-
197
-
198
-
199
-
200
-
201
-
202
-
203
-
204
-
205
-
206
-
207
-
208
-
209
-
210
-
211
-
212
-
213
-
214
-
215
-
216
-
217
-
218
-
219
-
220
-
221
-
222
-
223
-
224
-
225
-
226
-
227
-
228
-
229
-
230
-
231
-
232
-
233
-
234
-
235
-
236
-
237
-
238
-
239
-
240
-
241
-
242
-
243
-
244
-
245
-
246
-
247
-
248
-
249
-
250
-
251
-
252
-
253
-
254
-
255
-
256
-
257
-
258
-
259
-
260
-
261
-
262
-
263
-
264
-
265
-
266
-
267
-
268
-
269
-
270
-
271
-
272
-
273
-
274
-
275
-
276
-
277
-
278
-
279
-
280
-
281
-
282
-
283
-
284
-
285
-
286
-
287
-
288
-
289
-
290
-
291
-
292
-
293
-
294
-
295
-
296
-
297
-
298
-
299
-
300
-
301
-
302
-
303
-
304
-
305
-
306
-
307
-
308
-
309
-
310
-
311
-
312
-
313
-
314
-
315
-
316
-
317
-
318
-
319
-
320
-
321
-
322
-
323
-
324
-
325
-
326
-
327
-
328
-
329
-
330
-
331
-
332
-
333
-
334
-
335
-
336
-
337
-
338
-
339
-
340
-
341
-
342
-
343
-
344
-
345
-
346
-
347
-
348
-
349
-
350
-
351
-
352
-
353
-
354
-
355
-
356
-
357
-
358
-
359
-
360
-
361
-
362
-
363
-
364
-
365
-
366
-
367
-
368
-
369
-
370
-
371
-
372
-
373
-
374
-
375
-
376
-
377
-
378
-
379
-
380
-
381
-
382
-
383
-
384
-
385
-
386
-
387
-
388
-
389
-
390
-
391
-
392
-
393
-
394
-
395
-
396
-
397
-
398
-
399
-
400
-
401
-
402
-
403
-
404
-
405
-
406
-
407
-
408
-
409
-
410
-
411
-
412
-
413
-
414
-
415
-
416
-
417
-
418
-
419
-
420
-
421
-
422
-
423
-
424
-
425
-
426
-
427
-
428
-
429
-
430
-
431
-
432
-
433
-
434
-
435
-
436
-
437
-
438
-
439
-
440
-
441
-
442
-
443
-
444
-
445
-
446
-
447
-
448
-
449
-
450
-
451
-
452
-
453
-
454
-
455
-
456
-
457
-
458
-
459
-
460
-
461
-
462
-
463
-
464
-
465
-
466
-
467
-
468
-
469
-
470
-
471
-
472
-
473
-
474
-
475
-
476
-
477
-
478
-
479
-
480
-
481
-
482
-
483
-
484
-
485
-
486
-
487
-
488
-
489
-
490
-
491
-
492
-
493
-
494
-
495
-
496
-
497
-
498
-
499
-
500
-
501
-
502
-
503
-
504
-
505
-
506
-
507
-
508
-
509
-
510
-
511
-
512
-
513
-
514
-
515
-
516
-
517
-
518
-
519
-
520
-
521
-
522
-
523
-
524
-
525
-
526
-
527
-
528
-
529
-
530
-
531
-
532
-
533
-
534
-
535
-
536
-
537
-
538
-
539
-
540
-
541
-
542
-
543
-
544
-
545
-
546
-
547
-
548
-
549
-
550
-
551
-
552
-
553
-
554
-
555
-
556
-
557
-
558
-
559
-
560
-
561
-
562
-
563
-
564
-
565
-
566
-
567
-
568
-
569
-
570
-
571
-
572
-
573
-
574
-
575
-
576
-
577
-
578
-
579
-
580
-
581
-
582
-
583
-
584
-
585
-
586
-
587
-
588
-
589
-
590
-
591
-
592
-
593
-
594
-
595
-
596
-
597
-
598
-
599
-
600
-
601
-
602
-
603
-
604
-
605
-
606
-
607
-
608
-
609
-
610
-
611
-
612
-
613
-
614
-
615
-
616
-
617
-
618
-
619
-
620
-
621
-
622
-
623
-
624
-
625
-
626
-
627
-
628
-
629
-
630
-
631
-
632
-
633
-
634
-
635
-
636
-
637
-
638
-
639
-
640
-
641
-
642
-
643
-
644
-
645
-
646
-
647
-
648
-
649
-
650
-
651
-
652
-
653
-
654
-
655
-
656
-
657
-
658
-
659
-
660
-
661
-
662
-
663
-
664
-
665
-
666
-
667
-
668
-
669
-
670
-
671
-
672
-
673
-
674
-
675
-
676
-
677
-
678
-
679
-
680
-
681
-
682
-
683
-
684
-
685
-
686
-
687
-
688
-
689
-
690
-
691
-
692
-
693
-
694
-
695
-
696
-
697
-
698
-
699
-
700
-
701
-
702
-
703
-
704
-
705
-
706
-
707
-
708
-
709
-
710
-
711
-
712
-
713
-
714
-
715
-
716
-
717
-
718
-
719
-
720
-
721
-
722
-
723
-
724
-
725
-
726
-
727
-
728
-
729
-
730
-
731
-
732
-
733
-
734
-
735
-
736
-
737
-
738
-
739
-
740
-
741
-
742
-
743
-
744
-
745
-
746
-
747
-
748
-
749
-
750
-
751
-
752
-
753
-
754
-
755
-
756
-
757
-
758
-
759
-
760
-
761
-
762
-
763
-
764
-
765
-
766
-
767
-
768
-
769
-
770
-
771
-
772
-
773
-
774
-
775
-
776
-
777
-
778
-
779
-
780
-
781
-
782
-
783
-
784
-
785
-
786
-
787
-
788
-
789
-
790
-
791
-
792
-
793
-
794
-
795
-
796
-
797
-
798
-
799
-
800
-
801
-
802
-
803
-
804
-
805
-
806
-
807
-
808
-
809
-
810
-
811
-
812
-
813
-
814
-
815
-
816
-
817
-
818
-
819
-
820
-
821
-
822
-
823
-
824
-
825
-
826
-
827
-
828
-
829
-
830
-
831
-
832
-
833
-
834
-
835
-
836
-
837
-
838
-
839
-
840
-
841
-
842
-
843
-
844
-
845
-
846
-
847
-
848
-
849
-
850
-
851
-
852
-
853
-
854
-
855
-
856
-
857
-
858
-
859
-
860
-
861
-
862
-
863
-
864
-
865
-
866
-
867
-
868
-
869
-
870
-
871
-
872
-
873
-
874
-
875
-
876
-
877
-
878
-
879
-
880
-
881
-
882
-
883
-
884
-
885
-
886
-
887
-
888
-
889
-
890
-
891
-
892
-
893
-
894
-
895
-
896
-
897
-
898
-
899
-
900
-
901
-
902
-
903
-
904
-
905
-
906
-
907
-
908
-
909
-
910
-
911
-
912
-
913
-
914
-
915
-
916
-
917
-
918
-
919
-
920
-
921
-
922
-
923
-
924
-
925
-
926
-
927
-
928
-
929
-
930
-
931
-
932
-
933
-
934
-
935
-
936
-
937
-
938
-
939
-
940
-
941
-
942
-
943
-
944
-
945
-
946
-
947
-
948
-
949
-
950
-
951
-
952
-
953
-
954
-
955
-
956
-
957
-
958
-
959
-
960
-
961
-
962
-
963
-
964
-
965
-
966
-
967
-
968
-
969
-
970
-
971
-
972
-
973
-
974
-
975
-
976
-
977
-
978
-
979
-
980
-
981
-
982
-
983
-
984
-
985
-
986
-
987
-
988
-
989
-
990
-
991
-
992
-
993
-
994
-
995
-
996
-
997
-
998
-
999
-
1,000
-
1,001
-
1,002
-
1,003
-
1,004
-
1,005
-
 1,006
1,006 -
 1,007
1,007 -
 1,008
1,008 -
 1,009
1,009 -
 1,010
1,010 -
 1,011
1,011 -
 1,012
1,012 -
 1,013
1,013 -
 1,014
1,014 -
 1,015
1,015 -
 1,016
1,016 -
1,017
-
1,018
-
1,019
-
1,020
-
1,021
-
1,022
-
1,023
-
1,024
-
1,025
-
1,026
-
1,027
-
1,028
-
1,029
-
1,030
-
1,031
-
1,032
-
1,033
-
1,034
-
1,035
-
1,036
-
1,037
-
1,038
-
1,039
-
1,040
-
1,041
-
1,042
-
1,043
-
1,044
-
1,045
-
1,046
-
1,047
-
1,048
-
1,049
-
1,050
-
1,051
-
1,052
-
1,053
-
1,054
-
1,055
-
1,056
-
1,057
-
1,058
-
1,059
-
1,060
-
1,061
-
1,062
-
1,063
-
1,064
-
1,065
-
1,066
-
1,067
-
1,068
-
1,069
-
1,070
-
1,071
-
1,072
-
1,073
-
1,074
-
1,075
-
1,076
-
1,077
-
1,078
-
1,079
-
1,080
-
1,081
-
1,082
-
1,083
-
1,084
-
1,085
-
1,086
-
1,087
-
1,088
-
1,089
-
1,090
-
1,091
-
1,092
-
1,093
-
1,094
-
1,095
-
1,096
-
1,097
-
1,098
-
1,099
-
1,100
-
1,101
-
1,102
-
1,103
-
1,104
-
1,105
-
1,106
-
1,107
-
1,108
-
1,109
-
1,110
-
1,111
-
1,112
-
1,113
-
1,114
-
1,115
-
1,116
-
1,117
-
1,118
-
1,119
-
1,120
-
1,121
-
1,122
-
1,123
-
1,124
-
1,125
-
1,126
-
1,127
-
1,128
-
1,129
-
1,130
-
1,131
-
1,132
-
1,133
-
1,134
-
1,135
-
1,136
-
1,137
-
1,138
-
1,139
-
1,140
-
1,141
-
1,142
-
1,143
-
1,144
-
1,145
-
1,146
-
1,147
-
1,148
-
1,149
-
1,150
-
1,151
-
1,152
-
1,153
-
1,154
-
1,155
-
1,156
-
1,157
-
1,158
-
1,159
-
1,160
-
1,161
-
1,162
-
1,163
-
1,164
-
1,165
-
1,166
-
1,167
-
1,168
-
1,169
-
1,170
-
1,171
-
1,172
-
1,173
-
1,174
-
1,175
-
1,176
-
1,177
-
1,178
-
1,179
-
1,180
-
1,181
-
1,182
-
1,183
-
1,184
-
1,185
-
1,186
-
1,187
-
1,188
-
1,189
-
1,190
-
1,191
-
1,192
-
1,193
-
1,194
-
1,195
-
1,196
-
1,197
-
1,198
-
1,199
-
1,200
-
1,201
-
1,202
-
1,203
-
1,204
-
1,205
-
1,206
-
1,207
-
1,208
-
1,209
-
1,210
-
1,211
-
1,212
-
1,213
-
1,214
-
1,215
-
1,216
-
1,217
-
1,218
-
1,219
-
1,220
-
1,221
-
1,222
-
1,223
-
1,224
-
1,225
-
1,226
-
1,227
-
1,228
-
1,229
-
1,230
-
1,231
-
1,232
-
1,233
-
1,234
-
1,235
-
1,236
-
1,237
-
1,238
-
1,239
-
1,240
-
1,241
-
1,242
-
1,243
-
1,244
-
1,245
-
1,246
-
1,247
-
1,248
-
1,249
-
1,250
-
1,251
-
1,252
-
1,253
-
1,254
-
1,255
-
1,256
-
1,257
-
1,258
-
1,259
-
1,260
-
1,261
-
1,262
-
1,263
-
1,264
-
1,265
-
1,266
-
1,267
-
1,268
-
1,269
-
1,270
-
1,271
-
1,272
-
1,273
-
1,274
-
1,275
-
1,276
-
1,277
-
1,278
-
1,279
-
1,280
-
1,281
-
1,282
-
1,283
-
1,284
-
1,285
-
1,286
-
1,287
-
1,288
-
1,289
-
1,290
-
1,291
-
1,292
-
1,293
-
1,294
-
1,295
-
1,296
-
1,297
-
1,298
-
1,299
-
1,300
-
1,301
-
1,302
-
1,303
-
1,304
-
1,305
-
1,306
-
1,307
-
1,308
-
1,309
-
1,310
-
1,311
-
1,312
-
1,313
-
1,314
-
1,315
-
1,316
-
1,317
-
1,318
-
1,319
-
1,320
-
1,321
-
1,322
-
1,323
-
1,324
-
1,325
-
1,326
-
1,327
-
1,328
-
1,329
-
1,330
-
1,331
-
1,332
-
1,333
-
1,334
-
1,335
-
1,336
-
1,337
-
1,338
-
1,339
-
1,340
-
1,341
-
1,342
-
1,343
-
1,344
-
1,345
-
1,346
-
1,347
-
1,348
-
1,349
-
1,350
-
1,351
-
1,352
-
1,353
-
1,354
-
1,355
-
1,356
-
1,357
-
1,358
-
1,359
-
1,360
-
1,361
-
1,362
-
1,363
-
1,364
-
1,365
-
1,366
-
1,367
-
1,368
-
1,369
-
1,370
-
1,371
-
1,372
-
1,373
-
1,374
-
1,375
-
1,376
-
1,377
-
1,378
-
1,379
-
1,380
-
1,381
-
1,382
-
1,383
-
1,384
 |
 |