Canon PIXMA MX532 Scanning Guide - Page 176
Preview
 |
View all Canon PIXMA MX532 manuals
Add to My Manuals
Save this manual to your list of manuals |
Page 176 highlights
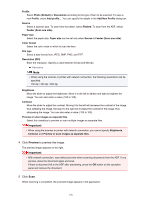
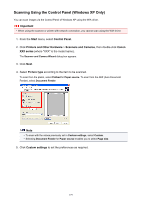
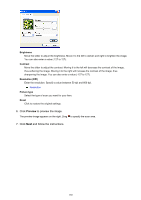
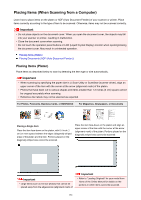
Profile Select Photo (Default) or Documents according to the type of item to be scanned. To save a new Profile, select Add profile.... You can specify the details in the Add New Profile dialog box. Source Select a scanner type. To scan from the platen, select Flatbed. To scan from the ADF, select Feeder (Scan one side). Paper size Select the paper size. Paper size can be set only when Source is Feeder (Scan one side). Color format Select the color mode in which to scan the item. File type Select a data format from JPEG, BMP, PNG, and TIFF. Resolution (DPI) Enter the resolution. Specify a value between 50 dpi and 600 dpi. Resolution Note • When using the scanner or printer with network connection, the following resolutions can be specified. 150 dpi / 300 dpi / 600 dpi Brightness Move the slider to adjust the brightness. Move it to the left to darken and right to brighten the image. You can also enter a value (-100 to 100). Contrast Move the slider to adjust the contrast. Moving it to the left will decrease the contrast of the image, thus softening the image. Moving it to the right will increase the contrast of the image, thus sharpening the image. You can also enter a value (-100 to 100). Preview or scan images as separate files Select this checkbox to preview or scan multiple images as separate files. Important • When using the scanner or printer with network connection, you cannot specify Brightness, Contrast, and Preview or scan images as separate files. 4. Click Preview to preview the image. The preview image appears on the right. Important • With network connection, scan without preview when scanning documents from the ADF. If you preview, place the document again and scan. If there is document left in the ADF after previewing, press the OK button on the operation panel and remove the document. 5. Click Scan. When scanning is completed, the scanned image appears in the application. 176
-
 1
1 -
2
-
3
-
4
-
5
-
6
-
7
-
8
-
9
-
10
-
11
-
12
-
13
-
14
-
15
-
16
-
17
-
18
-
19
-
20
-
21
-
22
-
23
-
24
-
25
-
26
-
27
-
28
-
29
-
30
-
31
-
32
-
33
-
34
-
35
-
36
-
37
-
38
-
39
-
40
-
41
-
42
-
43
-
44
-
45
-
46
-
47
-
48
-
49
-
50
-
51
-
52
-
53
-
54
-
55
-
56
-
57
-
58
-
59
-
60
-
61
-
62
-
63
-
64
-
65
-
66
-
67
-
68
-
69
-
70
-
71
-
72
-
73
-
74
-
75
-
76
-
77
-
78
-
79
-
80
-
81
-
82
-
83
-
84
-
85
-
86
-
87
-
88
-
89
-
90
-
91
-
92
-
93
-
94
-
95
-
96
-
97
-
98
-
99
-
100
-
101
-
102
-
103
-
104
-
105
-
106
-
107
-
108
-
109
-
110
-
111
-
112
-
113
-
114
-
115
-
116
-
117
-
118
-
119
-
120
-
121
-
122
-
123
-
124
-
125
-
126
-
127
-
128
-
129
-
130
-
131
-
132
-
133
-
134
-
135
-
136
-
137
-
138
-
139
-
140
-
141
-
142
-
143
-
144
-
145
-
146
-
147
-
148
-
149
-
150
-
151
-
152
-
153
-
154
-
155
-
156
-
157
-
158
-
159
-
160
-
161
-
162
-
163
-
164
-
165
-
166
-
167
-
168
-
169
-
170
-
 171
171 -
 172
172 -
 173
173 -
 174
174 -
 175
175 -
 176
176 -
 177
177 -
 178
178 -
 179
179 -
 180
180 -
 181
181 -
182
-
183
-
184
-
185
-
186
-
187
-
188
-
189
-
190
-
191
-
192
-
193
-
194
-
195
-
196
-
197
-
198
-
199
-
200
-
201
-
202
 |
 |
