Canon PIXMA MX532 Scanning Guide - Page 93
Input Settings, Output Settings
 |
View all Canon PIXMA MX532 manuals
Add to My Manuals
Save this manual to your list of manuals |
Page 93 highlights
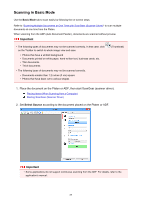
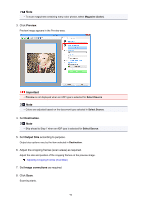
3. Set Input Settings according to the document or purpose. 4. Click Preview. Preview images appear in the Preview area. 5. Set Output Settings. 6. Adjust the cropping frame (scan area), correct image, and adjust colors as required. Adjusting Cropping Frames (ScanGear) Image Settings Color Adjustment Buttons 7. Click Scan. Scanning starts. Note • Click (Information) to open a dialog box in which you can check the current scan settings (document type, etc.). • A response of ScanGear after scanning can be specified in Status of ScanGear dialog after scanning on the Scan tab of the Preferences dialog box. Related Topic Advanced Mode Tab 93
-
 1
1 -
2
-
3
-
4
-
5
-
6
-
7
-
8
-
9
-
10
-
11
-
12
-
13
-
14
-
15
-
16
-
17
-
18
-
19
-
20
-
21
-
22
-
23
-
24
-
25
-
26
-
27
-
28
-
29
-
30
-
31
-
32
-
33
-
34
-
35
-
36
-
37
-
38
-
39
-
40
-
41
-
42
-
43
-
44
-
45
-
46
-
47
-
48
-
49
-
50
-
51
-
52
-
53
-
54
-
55
-
56
-
57
-
58
-
59
-
60
-
61
-
62
-
63
-
64
-
65
-
66
-
67
-
68
-
69
-
70
-
71
-
72
-
73
-
74
-
75
-
76
-
77
-
78
-
79
-
80
-
81
-
82
-
83
-
84
-
85
-
86
-
87
-
 88
88 -
 89
89 -
 90
90 -
 91
91 -
 92
92 -
 93
93 -
 94
94 -
 95
95 -
 96
96 -
 97
97 -
 98
98 -
99
-
100
-
101
-
102
-
103
-
104
-
105
-
106
-
107
-
108
-
109
-
110
-
111
-
112
-
113
-
114
-
115
-
116
-
117
-
118
-
119
-
120
-
121
-
122
-
123
-
124
-
125
-
126
-
127
-
128
-
129
-
130
-
131
-
132
-
133
-
134
-
135
-
136
-
137
-
138
-
139
-
140
-
141
-
142
-
143
-
144
-
145
-
146
-
147
-
148
-
149
-
150
-
151
-
152
-
153
-
154
-
155
-
156
-
157
-
158
-
159
-
160
-
161
-
162
-
163
-
164
-
165
-
166
-
167
-
168
-
169
-
170
-
171
-
172
-
173
-
174
-
175
-
176
-
177
-
178
-
179
-
180
-
181
-
182
-
183
-
184
-
185
-
186
-
187
-
188
-
189
-
190
-
191
-
192
-
193
-
194
-
195
-
196
-
197
-
198
-
199
-
200
-
201
-
202
 |
 |

3. Set
Input Settings
according to the document or purpose.
4. Click
Preview
.
Preview images appear in the Preview area.
5. Set
Output Settings
.
6.
Adjust the cropping frame (scan area), correct image, and adjust colors as required.
Adjusting Cropping Frames (ScanGear)
Image Settings
Color Adjustment Buttons
7. Click
Scan
.
Scanning starts.
Note
• Click
(Information) to open a dialog box in which you can check the current scan settings
(document type, etc.).
•
A response of ScanGear after scanning can be specified in
Status of ScanGear dialog after scanning
on the
Scan
tab
of the
Preferences
dialog box.
Related Topic
Advanced Mode Tab
93