Canon PIXMA MX532 Scanning Guide - Page 190
Load the original document on the platen glass or in the ADF., Press the, button for color scanning
 |
View all Canon PIXMA MX532 manuals
Add to My Manuals
Save this manual to your list of manuals |
Page 190 highlights
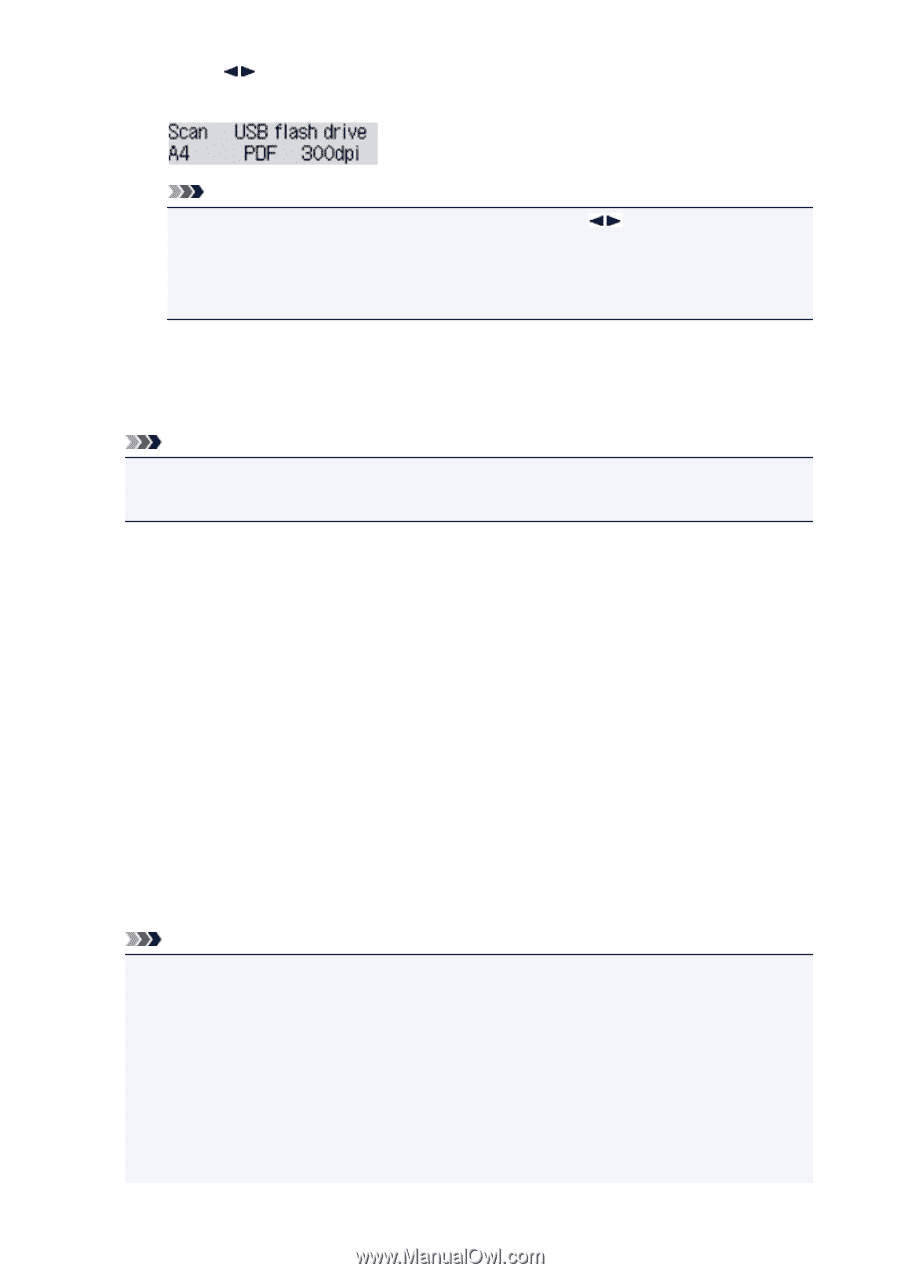
6. Use the button to select the scan resolution, then press the OK button. The Scan standby screen is displayed after all the settings have been specified. Note • When the Scan menu screen is displayed, you can use the item. button to select the setting • If you select Compact PDF for Data format and press the OK button, the Scan standby screen is displayed. 7. Load the original document on the platen glass or in the ADF. 8. Press the Color button for color scanning, or the Black button for black & white scanning. Note • If the original is not loaded properly, a message is displayed on the LCD. Load the original on the platen glass or in the ADF according to the scan settings. • If you load the original in the ADF: The machine starts scanning and scanned data is saved on the USB flash drive. • If you load the original on the platen glass: ◦ When you select JPEG for Data format, the machine starts scanning and scanned data is saved on the USB flash drive. ◦ When you select PDF or Compact PDF for Data format, the confirmation screen asking you if you continue scanning is displayed after scanning is complete. Selecting Yes and pressing the OK button allow you to scan the originals continuously. Load the next document on the platen glass and start scanning. By selecting No and pressing the OK button, scanning is complete and the data is saved on the USB flash drive in one PDF file. When you scan the originals continuously, you can save up to 100 pages of images in one PDF file. Remove the original on the platen glass or from the document output slot after scanning is complete. Note • If the USB flash drive becomes full while scanning images is in progress, only the images already scanned can be saved. • You can save up to 2000 files of scanned data in both PDF and JPEG data format. • The folder and file name of scanned data saved on the USB flash drive is as follows: • Folder name: (file extension: PDF): CANON_SC\DOCUMENT\0001 • Folder name: (file extension: JPG): CANON_SC\IMAGE\0001 • File name: Running numbers, starting from SCN_0001 • File date: The date and time of saving as set in the machine. 190
-
 1
1 -
2
-
3
-
4
-
5
-
6
-
7
-
8
-
9
-
10
-
11
-
12
-
13
-
14
-
15
-
16
-
17
-
18
-
19
-
20
-
21
-
22
-
23
-
24
-
25
-
26
-
27
-
28
-
29
-
30
-
31
-
32
-
33
-
34
-
35
-
36
-
37
-
38
-
39
-
40
-
41
-
42
-
43
-
44
-
45
-
46
-
47
-
48
-
49
-
50
-
51
-
52
-
53
-
54
-
55
-
56
-
57
-
58
-
59
-
60
-
61
-
62
-
63
-
64
-
65
-
66
-
67
-
68
-
69
-
70
-
71
-
72
-
73
-
74
-
75
-
76
-
77
-
78
-
79
-
80
-
81
-
82
-
83
-
84
-
85
-
86
-
87
-
88
-
89
-
90
-
91
-
92
-
93
-
94
-
95
-
96
-
97
-
98
-
99
-
100
-
101
-
102
-
103
-
104
-
105
-
106
-
107
-
108
-
109
-
110
-
111
-
112
-
113
-
114
-
115
-
116
-
117
-
118
-
119
-
120
-
121
-
122
-
123
-
124
-
125
-
126
-
127
-
128
-
129
-
130
-
131
-
132
-
133
-
134
-
135
-
136
-
137
-
138
-
139
-
140
-
141
-
142
-
143
-
144
-
145
-
146
-
147
-
148
-
149
-
150
-
151
-
152
-
153
-
154
-
155
-
156
-
157
-
158
-
159
-
160
-
161
-
162
-
163
-
164
-
165
-
166
-
167
-
168
-
169
-
170
-
171
-
172
-
173
-
174
-
175
-
176
-
177
-
178
-
179
-
180
-
181
-
182
-
183
-
184
-
 185
185 -
 186
186 -
 187
187 -
 188
188 -
 189
189 -
 190
190 -
 191
191 -
 192
192 -
 193
193 -
 194
194 -
 195
195 -
196
-
197
-
198
-
199
-
200
-
201
-
202
 |
 |