Canon PIXMA MX532 Scanning Guide - Page 189
Saving Scanned Data on the USB Flash Drive Using the Operation, Panel of the Machine
 |
View all Canon PIXMA MX532 manuals
Add to My Manuals
Save this manual to your list of manuals |
Page 189 highlights
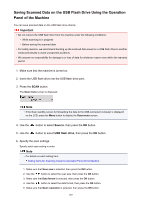
Saving Scanned Data on the USB Flash Drive Using the Operation Panel of the Machine You can save scanned data on the USB flash drive directly. Important • Do not remove the USB flash drive from the machine under the following conditions: • While scanning is in progress • Before saving the scanned data • For safety reasons, we recommend backing up the scanned data saved on a USB flash drive to another media periodically to avoid unexpected accidents. • We assume no responsibility for damage to or loss of data for whatever reason even within the warranty period. 1. Make sure that the machine is turned on. 2. Insert the USB flash drive into the USB flash drive port. 3. Press the SCAN button. The Scan menu screen is displayed. Note • If the Scan standby screen for forwarding the data to the USB-connected computer is displayed on the LCD, press the Menu button to display the Scan menu screen. 4. Use the button to select Save to, then press the OK button. 5. Use the button to select USB flash drive, then press the OK button. 6. Specify the scan settings. Specify each scan setting in order. Note • For details on each setting item: Setting Items for Scanning Using the Operation Panel of the Machine 1. Make sure that Scan size is selected, then press the OK button. 2. Use the button to select the scan size, then press the OK button. 3. Make sure that Data format is selected, then press the OK button. 4. Use the button to select the data format, then press the OK button. 5. Make sure that Scan resolution is selected, then press the OK button. 189
-
 1
1 -
2
-
3
-
4
-
5
-
6
-
7
-
8
-
9
-
10
-
11
-
12
-
13
-
14
-
15
-
16
-
17
-
18
-
19
-
20
-
21
-
22
-
23
-
24
-
25
-
26
-
27
-
28
-
29
-
30
-
31
-
32
-
33
-
34
-
35
-
36
-
37
-
38
-
39
-
40
-
41
-
42
-
43
-
44
-
45
-
46
-
47
-
48
-
49
-
50
-
51
-
52
-
53
-
54
-
55
-
56
-
57
-
58
-
59
-
60
-
61
-
62
-
63
-
64
-
65
-
66
-
67
-
68
-
69
-
70
-
71
-
72
-
73
-
74
-
75
-
76
-
77
-
78
-
79
-
80
-
81
-
82
-
83
-
84
-
85
-
86
-
87
-
88
-
89
-
90
-
91
-
92
-
93
-
94
-
95
-
96
-
97
-
98
-
99
-
100
-
101
-
102
-
103
-
104
-
105
-
106
-
107
-
108
-
109
-
110
-
111
-
112
-
113
-
114
-
115
-
116
-
117
-
118
-
119
-
120
-
121
-
122
-
123
-
124
-
125
-
126
-
127
-
128
-
129
-
130
-
131
-
132
-
133
-
134
-
135
-
136
-
137
-
138
-
139
-
140
-
141
-
142
-
143
-
144
-
145
-
146
-
147
-
148
-
149
-
150
-
151
-
152
-
153
-
154
-
155
-
156
-
157
-
158
-
159
-
160
-
161
-
162
-
163
-
164
-
165
-
166
-
167
-
168
-
169
-
170
-
171
-
172
-
173
-
174
-
175
-
176
-
177
-
178
-
179
-
180
-
181
-
182
-
183
-
 184
184 -
 185
185 -
 186
186 -
 187
187 -
 188
188 -
 189
189 -
 190
190 -
 191
191 -
 192
192 -
 193
193 -
 194
194 -
195
-
196
-
197
-
198
-
199
-
200
-
201
-
202
 |
 |
