Canon PIXMA MX532 Scanning Guide - Page 80
Scan Image 1, Start Scanning Image 1, Scan Image 2, Start Scanning Image 2, Adjust cropping frames,
 |
View all Canon PIXMA MX532 manuals
Add to My Manuals
Save this manual to your list of manuals |
Page 80 highlights
Scan Image 1 Start Scanning Image 1 Scans the first item. Scan Image 2 Start Scanning Image 2 Scans the second item. Adjust cropping frames You can adjust the scan area in preview. If no area is specified, the image of the size selected in Select Output Size will be saved. If an area is specified, only the image in the cropping frame will be scanned and saved. Adjusting Cropping Frames in the Image Stitch Window Save Save Saves the two scanned images as one image. 80
-
 1
1 -
2
-
3
-
4
-
5
-
6
-
7
-
8
-
9
-
10
-
11
-
12
-
13
-
14
-
15
-
16
-
17
-
18
-
19
-
20
-
21
-
22
-
23
-
24
-
25
-
26
-
27
-
28
-
29
-
30
-
31
-
32
-
33
-
34
-
35
-
36
-
37
-
38
-
39
-
40
-
41
-
42
-
43
-
44
-
45
-
46
-
47
-
48
-
49
-
50
-
51
-
52
-
53
-
54
-
55
-
56
-
57
-
58
-
59
-
60
-
61
-
62
-
63
-
64
-
65
-
66
-
67
-
68
-
69
-
70
-
71
-
72
-
73
-
74
-
 75
75 -
 76
76 -
 77
77 -
 78
78 -
 79
79 -
 80
80 -
 81
81 -
 82
82 -
 83
83 -
 84
84 -
 85
85 -
86
-
87
-
88
-
89
-
90
-
91
-
92
-
93
-
94
-
95
-
96
-
97
-
98
-
99
-
100
-
101
-
102
-
103
-
104
-
105
-
106
-
107
-
108
-
109
-
110
-
111
-
112
-
113
-
114
-
115
-
116
-
117
-
118
-
119
-
120
-
121
-
122
-
123
-
124
-
125
-
126
-
127
-
128
-
129
-
130
-
131
-
132
-
133
-
134
-
135
-
136
-
137
-
138
-
139
-
140
-
141
-
142
-
143
-
144
-
145
-
146
-
147
-
148
-
149
-
150
-
151
-
152
-
153
-
154
-
155
-
156
-
157
-
158
-
159
-
160
-
161
-
162
-
163
-
164
-
165
-
166
-
167
-
168
-
169
-
170
-
171
-
172
-
173
-
174
-
175
-
176
-
177
-
178
-
179
-
180
-
181
-
182
-
183
-
184
-
185
-
186
-
187
-
188
-
189
-
190
-
191
-
192
-
193
-
194
-
195
-
196
-
197
-
198
-
199
-
200
-
201
-
202
 |
 |

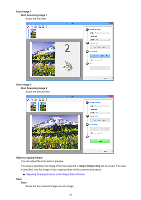
Scan Image 1
Start Scanning Image 1
Scans the first item.
Scan Image 2
Start Scanning Image 2
Scans the second item.
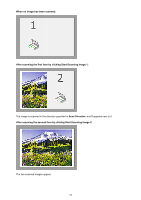
Adjust cropping frames
You can adjust the scan area in preview.
If no area is specified, the image of the size selected in
Select Output Size
will be saved. If an area
is specified, only the image in the cropping frame will be scanned and saved.
Adjusting Cropping Frames in the Image Stitch Window
Save
Save
Saves the two scanned images as one image.
80