Canon PIXMA MX532 Scanning Guide - Page 40
Scan Options Area, Save Settings Area
 |
View all Canon PIXMA MX532 manuals
Add to My Manuals
Save this manual to your list of manuals |
Page 40 highlights
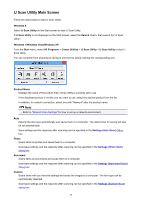
• When scanning two or more documents from the ADF (Auto Document Feeder), place documents of the same size. Note • To reduce moire in scans, set Select Source to Magazine in the Settings (Document Scan) dialog box or Settings (Custom Scan) dialog box, then click Document or Custom in the IJ Scan Utility main screen. (1) Scan Options Area Apply recommended image correction Applies suitable corrections automatically based on the item type. Important • The color tone may differ from the source image due to corrections. In that case, deselect the checkbox and scan. Note • Scanning takes longer than usual when you enable this function. (2) Save Settings Area File Name Enter the file name of the image to be saved. When you save a file, the date and four digits are appended to the set file name in the "_20XX0101_0001" format. Data Format Auto is selected. The following data formats are automatically applied according to the item type when saving. • Photos, postcards, BD/DVD/CD, and business cards: JPEG • Magazines, newspapers, and documents: PDF Important • The save format may differ depending on how you place the item. Placing Items (When Scanning from a Computer) Note • You can change the data format from Settings.... Settings... Click to display the Data Format Settings dialog box in which you can set the quality of the images to be saved, keyword search of PDF files and their compression type, and the data format in which to save images scanned with Auto Scan. Save in Displays the folder in which to save the scanned images. To change the folder, specify the destination folder in the Select Destination Folder dialog box displayed by selecting Add... from the pull-down menu. The default save folders are as follows. • Windows 8: My Documents folder 40
-
 1
1 -
2
-
3
-
4
-
5
-
6
-
7
-
8
-
9
-
10
-
11
-
12
-
13
-
14
-
15
-
16
-
17
-
18
-
19
-
20
-
21
-
22
-
23
-
24
-
25
-
26
-
27
-
28
-
29
-
30
-
31
-
32
-
33
-
34
-
 35
35 -
 36
36 -
 37
37 -
 38
38 -
 39
39 -
 40
40 -
 41
41 -
 42
42 -
 43
43 -
 44
44 -
 45
45 -
46
-
47
-
48
-
49
-
50
-
51
-
52
-
53
-
54
-
55
-
56
-
57
-
58
-
59
-
60
-
61
-
62
-
63
-
64
-
65
-
66
-
67
-
68
-
69
-
70
-
71
-
72
-
73
-
74
-
75
-
76
-
77
-
78
-
79
-
80
-
81
-
82
-
83
-
84
-
85
-
86
-
87
-
88
-
89
-
90
-
91
-
92
-
93
-
94
-
95
-
96
-
97
-
98
-
99
-
100
-
101
-
102
-
103
-
104
-
105
-
106
-
107
-
108
-
109
-
110
-
111
-
112
-
113
-
114
-
115
-
116
-
117
-
118
-
119
-
120
-
121
-
122
-
123
-
124
-
125
-
126
-
127
-
128
-
129
-
130
-
131
-
132
-
133
-
134
-
135
-
136
-
137
-
138
-
139
-
140
-
141
-
142
-
143
-
144
-
145
-
146
-
147
-
148
-
149
-
150
-
151
-
152
-
153
-
154
-
155
-
156
-
157
-
158
-
159
-
160
-
161
-
162
-
163
-
164
-
165
-
166
-
167
-
168
-
169
-
170
-
171
-
172
-
173
-
174
-
175
-
176
-
177
-
178
-
179
-
180
-
181
-
182
-
183
-
184
-
185
-
186
-
187
-
188
-
189
-
190
-
191
-
192
-
193
-
194
-
195
-
196
-
197
-
198
-
199
-
200
-
201
-
202
 |
 |
