Canon SELPHY ES3 SELPHY ES3 Printer User Guide - Page 25
Remove the Easy Photo Pack. - ink cartridge
 |
View all Canon SELPHY ES3 manuals
Add to My Manuals
Save this manual to your list of manuals |
Page 25 highlights
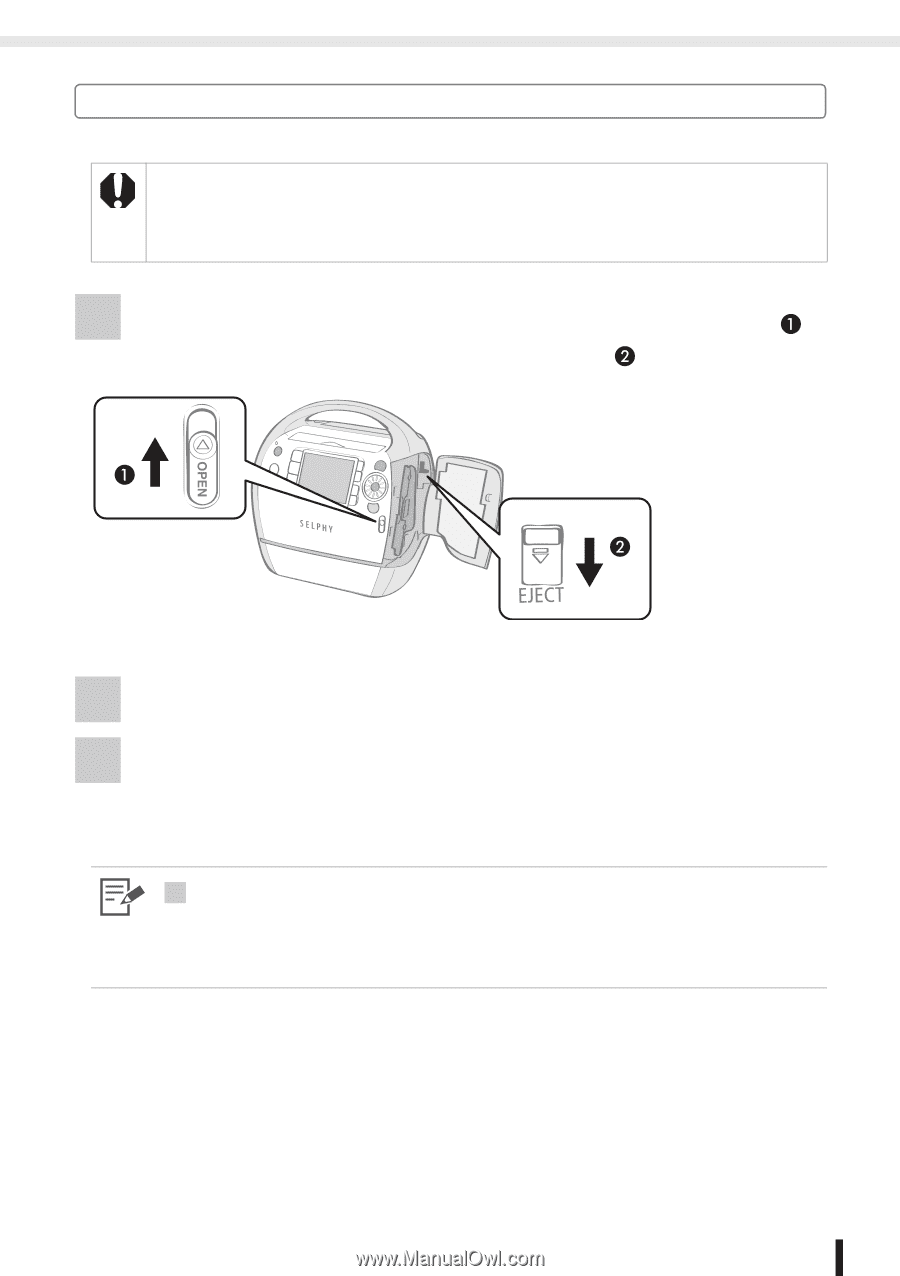
Preparing/Replacing/Storing the Easy Photo Pack Replacing the Easy Photo Pack Replace the Easy Photo Pack when paper has run out, or if another sheet size is required. • Do not remove the Easy Photo Pack while paper is being fed into or ejected from the printer, or while printing is in progress. • When replacing the Easy Photo Pack, remove all paper from the print output receptacle. • Do not reuse empty Easy Photo Packs. Attempting to reuse an empty Easy Photo Pack may result in malfunction or damage to the printer. 1 Push and slide the cover lever up to open the cartridge cover ( ), then push and slide the cartridge lever down ( ). • Eject the Easy Photo Pack. 2 Remove the Easy Photo Pack. 3 Replace the Easy Photo Pack following the procedures in inserting the Easy Photo Pack into the printer (p. 22). 3 • You can check the type of the Easy Photo Pack and the amount of remaining paper (ink) loaded in the printer, by the icons displayed in the print confirmation, printing or standby screens (p. 17). • After power is turned on, or immediately after the cartridge cover is opened or closed, the status icon is not displayed. This icon is displayed when one sheet has been printed. Getting Started 25
-
 1
1 -
2
-
3
-
4
-
5
-
6
-
7
-
8
-
9
-
10
-
11
-
12
-
13
-
14
-
15
-
16
-
17
-
18
-
19
-
 20
20 -
 21
21 -
 22
22 -
 23
23 -
 24
24 -
 25
25 -
 26
26 -
 27
27 -
 28
28 -
 29
29 -
 30
30 -
31
-
32
-
33
-
34
-
35
-
36
-
37
-
38
-
39
-
40
-
41
-
42
-
43
-
44
-
45
-
46
-
47
-
48
-
49
-
50
-
51
-
52
-
53
-
54
-
55
-
56
-
57
-
58
-
59
-
60
-
61
-
62
-
63
-
64
-
65
-
66
-
67
-
68
-
69
-
70
-
71
-
72
-
73
-
74
-
75
-
76
-
77
-
78
-
79
-
80
-
81
-
82
-
83
-
84
-
85
-
86
-
87
-
88
-
89
-
90
-
91
-
92
-
93
-
94
-
95
-
96
-
97
-
98
-
99
-
100
-
101
-
102
-
103
-
104
-
105
-
106
-
107
-
108
-
109
-
110
-
111
-
112
-
113
-
114
-
115
-
116
-
117
-
118
-
119
-
120
-
121
-
122
-
123
-
124
 |
 |