Canon SELPHY ES3 SELPHY ES3 Printer User Guide - Page 41
How to Use the Menu Creative Print
 |
View all Canon SELPHY ES3 manuals
Add to My Manuals
Save this manual to your list of manuals |
Page 41 highlights
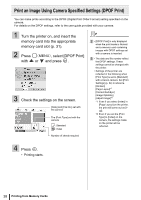
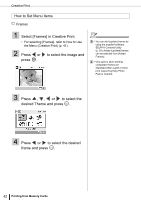
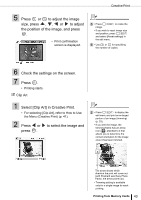
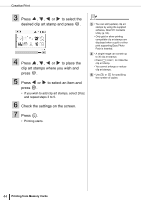
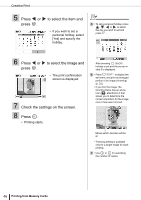
How to Use the Menu (Creative Print) Creative Print 1 Turn the printer on, and insert the memory card into the appropriate memory card slot (p. 31). 2 Press . • The Creative Print menu is displayed. 3 Press , , or to select the desired function and press . 4 Make settings and then print. • For detailed settings for each item, refer to pp. 42 - 53. 2 • When printing the favorite images added to the printer with the Creative Print function, press and change the print mode to Favorite with or (p. 18). • Creative Print is not available when the print mode is Reprint. 3 • Only [Image Effects], [ID Photo] and [Movie Print] are displayed when the black and white cartridge (Easy Photo Pack EP25BW) is inserted into the printer (p. 21). • Only [Frames] and [Clip Art] are displayed when the gold or silver print supporting cartridge (Easy Photo Pack E-P20G/EP20S) is inserted into the printer (p. 21). 4 • Multiple functions cannot be applied to an image at the same time. • Each function is available only for a single image for each printing. You can select several images up to frame number with [Multi Layout]. • If you change the cartridge while making settings, the settings, such as trimming or position, are automatically adjusted to fit the new cartridge. • If the new cartridge does not support the set function or setting, the screen will return to the Creative Print menu. • Print confirmation screen (the finished image) is displayed after finishing each setting. Press to start printing. Printing from Memory Cards 41
-
 1
1 -
2
-
3
-
4
-
5
-
6
-
7
-
8
-
9
-
10
-
11
-
12
-
13
-
14
-
15
-
16
-
17
-
18
-
19
-
20
-
21
-
22
-
23
-
24
-
25
-
26
-
27
-
28
-
29
-
30
-
31
-
32
-
33
-
34
-
35
-
 36
36 -
 37
37 -
 38
38 -
 39
39 -
 40
40 -
 41
41 -
 42
42 -
 43
43 -
 44
44 -
 45
45 -
 46
46 -
47
-
48
-
49
-
50
-
51
-
52
-
53
-
54
-
55
-
56
-
57
-
58
-
59
-
60
-
61
-
62
-
63
-
64
-
65
-
66
-
67
-
68
-
69
-
70
-
71
-
72
-
73
-
74
-
75
-
76
-
77
-
78
-
79
-
80
-
81
-
82
-
83
-
84
-
85
-
86
-
87
-
88
-
89
-
90
-
91
-
92
-
93
-
94
-
95
-
96
-
97
-
98
-
99
-
100
-
101
-
102
-
103
-
104
-
105
-
106
-
107
-
108
-
109
-
110
-
111
-
112
-
113
-
114
-
115
-
116
-
117
-
118
-
119
-
120
-
121
-
122
-
123
-
124
 |
 |