Cisco 6513 Installation Guide - Page 195
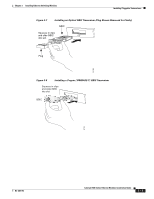
Inserting an SFP Transceiver into a Transceiver Socket, Step 3
 |
View all Cisco 6513 manuals
Add to My Manuals
Save this manual to your list of manuals |
Page 195 highlights
Chapter 3 Installing Ethernet Switching Modules Installing Pluggable Transceivers Step 3 Insert the SFP transceiver into the socket and slide it in until you feel the SFP transceiver connector snap into place in the socket connector. (See Figure 3-13.) a. On SFP transceivers equipped with bale clasps, you must remove the dust plugs from the optical bores in order to pivot the bale clasp down (unlocked position). b. Pivot the bale clasp down (unlocked position). c. Slide the SFP transceiver completely into the module port socket until the SFP transceiver connector is fully seated. d. Pivot the bale clasp fully up to lock the SFP transceiver in the socket. e. Immediately replace the dust plug in the optical bores until you are ready to install the network interface cables. Figure 3-13 Inserting an SFP Transceiver into a Transceiver Socket 94126 Step 4 You are now ready to attach the network interface cables to the SFP transceiver. See the "Attaching the Network Interface Cables" section on page 3-22 for instructions. OL-6265-03 Catalyst 6500 Series Ethernet Modules Installation Guide 3-17
-
 1
1 -
2
-
3
-
4
-
5
-
6
-
7
-
8
-
9
-
10
-
11
-
12
-
13
-
14
-
15
-
16
-
17
-
18
-
19
-
20
-
21
-
22
-
23
-
24
-
25
-
26
-
27
-
28
-
29
-
30
-
31
-
32
-
33
-
34
-
35
-
36
-
37
-
38
-
39
-
40
-
41
-
42
-
43
-
44
-
45
-
46
-
47
-
48
-
49
-
50
-
51
-
52
-
53
-
54
-
55
-
56
-
57
-
58
-
59
-
60
-
61
-
62
-
63
-
64
-
65
-
66
-
67
-
68
-
69
-
70
-
71
-
72
-
73
-
74
-
75
-
76
-
77
-
78
-
79
-
80
-
81
-
82
-
83
-
84
-
85
-
86
-
87
-
88
-
89
-
90
-
91
-
92
-
93
-
94
-
95
-
96
-
97
-
98
-
99
-
100
-
101
-
102
-
103
-
104
-
105
-
106
-
107
-
108
-
109
-
110
-
111
-
112
-
113
-
114
-
115
-
116
-
117
-
118
-
119
-
120
-
121
-
122
-
123
-
124
-
125
-
126
-
127
-
128
-
129
-
130
-
131
-
132
-
133
-
134
-
135
-
136
-
137
-
138
-
139
-
140
-
141
-
142
-
143
-
144
-
145
-
146
-
147
-
148
-
149
-
150
-
151
-
152
-
153
-
154
-
155
-
156
-
157
-
158
-
159
-
160
-
161
-
162
-
163
-
164
-
165
-
166
-
167
-
168
-
169
-
170
-
171
-
172
-
173
-
174
-
175
-
176
-
177
-
178
-
179
-
180
-
181
-
182
-
183
-
184
-
185
-
186
-
187
-
188
-
189
-
 190
190 -
 191
191 -
 192
192 -
 193
193 -
 194
194 -
 195
195 -
 196
196 -
 197
197 -
 198
198 -
 199
199 -
 200
200 -
201
-
202
-
203
-
204
-
205
-
206
-
207
-
208
-
209
-
210
-
211
-
212
-
213
-
214
-
215
-
216
-
217
-
218
-
219
-
220
-
221
-
222
-
223
-
224
-
225
-
226
-
227
-
228
-
229
-
230
-
231
-
232
-
233
-
234
-
235
-
236
-
237
-
238
-
239
-
240
-
241
-
242
-
243
-
244
-
245
-
246
-
247
-
248
-
249
-
250
-
251
-
252
-
253
-
254
 |
 |
