Cisco IE-3000-8TC Installation Guide - Page 161
Configuring the Switch with the CLI-Based Setup Program, Accessing the CLI from the Console Port
 |
View all Cisco IE-3000-8TC manuals
Add to My Manuals
Save this manual to your list of manuals |
Page 161 highlights
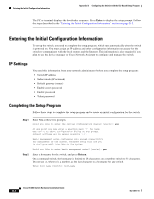
D A P P E N D I X Configuring the Switch with the CLI-Based Setup Program This appendix provides a command-line interface (CLI)-based setup procedure for a standalone switch. For information about setting up the switch by using Express Setup, see the Cisco IE 3000 Switch Getting Started Guide. Before connecting the switch to a power source, review the safety warnings in Chapter 2, "Switch Installation." For installation procedures for mounting your switch, connecting to the switch ports, or connecting to the small form-factor pluggable (SFP) modules, see Chapter 2, "Switch Installation." Accessing the CLI from the Console Port You can access the CLI on a configured or unconfigured switch by connecting the console port of the switch to your PC or workstation and accessing the switch through a terminal emulation program. To connect to the console port, follow these steps: 1. Using the supplied RJ-45-to-DB-9 adapter cable, insert the RJ-45 connector into the console port on the switch front panel (Figure 1-1) and to the PC or terminal port. 2. Start the terminal-emulation program on the PC or terminal. The terminal-emulation software, frequently a PC application such as Hyperterminal or ProcommPlus, makes communication between the switch and your PC or terminal possible. 3. Start a terminal-emulation session. 4. Configure the baud rate and character format of the PC or terminal to match these console port default characteristics: - 9600 bits per second - 8 data bits - 1 stop bit - No parity - None (flow control) 5. Power on the switch as described in the switch getting started guide and in the "Verifying Switch Operation" section on page 2-11. OL-13017-01 Cisco IE 3000 Switch Hardware Installation Guide D-1
-
 1
1 -
2
-
3
-
4
-
5
-
6
-
7
-
8
-
9
-
10
-
11
-
12
-
13
-
14
-
15
-
16
-
17
-
18
-
19
-
20
-
21
-
22
-
23
-
24
-
25
-
26
-
27
-
28
-
29
-
30
-
31
-
32
-
33
-
34
-
35
-
36
-
37
-
38
-
39
-
40
-
41
-
42
-
43
-
44
-
45
-
46
-
47
-
48
-
49
-
50
-
51
-
52
-
53
-
54
-
55
-
56
-
57
-
58
-
59
-
60
-
61
-
62
-
63
-
64
-
65
-
66
-
67
-
68
-
69
-
70
-
71
-
72
-
73
-
74
-
75
-
76
-
77
-
78
-
79
-
80
-
81
-
82
-
83
-
84
-
85
-
86
-
87
-
88
-
89
-
90
-
91
-
92
-
93
-
94
-
95
-
96
-
97
-
98
-
99
-
100
-
101
-
102
-
103
-
104
-
105
-
106
-
107
-
108
-
109
-
110
-
111
-
112
-
113
-
114
-
115
-
116
-
117
-
118
-
119
-
120
-
121
-
122
-
123
-
124
-
125
-
126
-
127
-
128
-
129
-
130
-
131
-
132
-
133
-
134
-
135
-
136
-
137
-
138
-
139
-
140
-
141
-
142
-
143
-
144
-
145
-
146
-
147
-
148
-
149
-
150
-
151
-
152
-
153
-
154
-
155
-
 156
156 -
 157
157 -
 158
158 -
 159
159 -
 160
160 -
 161
161 -
 162
162 -
 163
163 -
 164
164 -
 165
165 -
 166
166 -
167
-
168
-
169
-
170
 |
 |
