Cisco IE-3000-8TC Installation Guide - Page 57
Removing the Switch from a DIN Rail or a Rack, Step 1
 |
View all Cisco IE-3000-8TC manuals
Add to My Manuals
Save this manual to your list of manuals |
Page 57 highlights
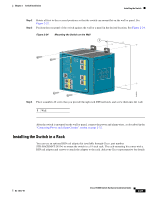
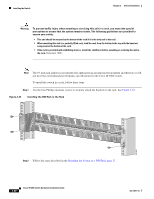
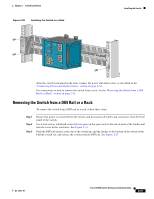
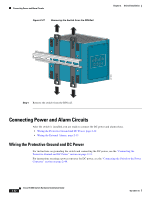
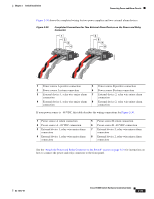
Chapter 2 Switch Installation Figure 2-26 . Installing the Switch on a Rack Installing the Switch 201831 After the switch is mounted in the rack, connect the power and alarm wires, as described in the "Connecting Power and Alarm Circuits" section on page 2-32. For instructions on how to remove the switch from a rack, see the "Removing the Switch from a DIN Rail or a Rack" section on page 2-31. Removing the Switch from a DIN Rail or a Rack To remove the switch from a DIN rail or a rack, follow these steps: Step 1 Step 2 Step 3 Ensure that power is removed from the switch, and disconnect all cables and connectors from the front panel of the switch. Use a tool such as a flathead screw driver to press in the space next to the tab on each of the latches and turn the screw driver clockwise. See Figure 2-19. Push the DIN rail latches at the top of the switch up, and the latches at the bottom of the switch down. Pull the switch out, and release the switch from the DIN rail. See Figure 2-27. OL-13017-01 Cisco IE 3000 Switch Hardware Installation Guide 2-31
-
 1
1 -
2
-
3
-
4
-
5
-
6
-
7
-
8
-
9
-
10
-
11
-
12
-
13
-
14
-
15
-
16
-
17
-
18
-
19
-
20
-
21
-
22
-
23
-
24
-
25
-
26
-
27
-
28
-
29
-
30
-
31
-
32
-
33
-
34
-
35
-
36
-
37
-
38
-
39
-
40
-
41
-
42
-
43
-
44
-
45
-
46
-
47
-
48
-
49
-
50
-
51
-
 52
52 -
 53
53 -
 54
54 -
 55
55 -
 56
56 -
 57
57 -
 58
58 -
 59
59 -
 60
60 -
 61
61 -
 62
62 -
63
-
64
-
65
-
66
-
67
-
68
-
69
-
70
-
71
-
72
-
73
-
74
-
75
-
76
-
77
-
78
-
79
-
80
-
81
-
82
-
83
-
84
-
85
-
86
-
87
-
88
-
89
-
90
-
91
-
92
-
93
-
94
-
95
-
96
-
97
-
98
-
99
-
100
-
101
-
102
-
103
-
104
-
105
-
106
-
107
-
108
-
109
-
110
-
111
-
112
-
113
-
114
-
115
-
116
-
117
-
118
-
119
-
120
-
121
-
122
-
123
-
124
-
125
-
126
-
127
-
128
-
129
-
130
-
131
-
132
-
133
-
134
-
135
-
136
-
137
-
138
-
139
-
140
-
141
-
142
-
143
-
144
-
145
-
146
-
147
-
148
-
149
-
150
-
151
-
152
-
153
-
154
-
155
-
156
-
157
-
158
-
159
-
160
-
161
-
162
-
163
-
164
-
165
-
166
-
167
-
168
-
169
-
170
 |
 |
