D-Link DFL-300 User Manual - Page 105
Adding a new External To DMZ Policy, Step 1, Source Address, External, Address, Destination Address
 |
UPC - 790069240751
View all D-Link DFL-300 manuals
Add to My Manuals
Save this manual to your list of manuals |
Page 105 highlights
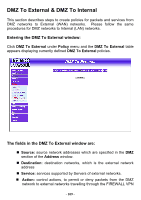
Adding a new External To DMZ Policy: Step 1: Click the New Entry button and the Add New Policy window will appear. Step 2: Source Address: Select names of the external networks from the drop down list. The drop down list contains the names of all external networks defined in the External section of the Address menu. To create a new source address, please go to the Internal section under the Address menu. Destination Address: Select the name of the DMZ network from the drop down list. The drop down list contains the names of the DMZ network created in the Address menu. It will also contain Mapped IP addresses from the Virtual Server menu that were created for the DMZ network. To create a new destination address, please go to the Virtual Server menu. (Please refer to the sections entitled Address and Virtual Server for details) Service: Select a service from drop down list. The drop down list will contain services defined in the Custom or Group section under the Service menu. These are services/application that are allowed to pass from the External network to the DMZ network. Choose ANY for all services. To add or modify these services, please go to the Service menu. (Please refer to the section - 105 -
-
 1
1 -
2
-
3
-
4
-
5
-
6
-
7
-
8
-
9
-
10
-
11
-
12
-
13
-
14
-
15
-
16
-
17
-
18
-
19
-
20
-
21
-
22
-
23
-
24
-
25
-
26
-
27
-
28
-
29
-
30
-
31
-
32
-
33
-
34
-
35
-
36
-
37
-
38
-
39
-
40
-
41
-
42
-
43
-
44
-
45
-
46
-
47
-
48
-
49
-
50
-
51
-
52
-
53
-
54
-
55
-
56
-
57
-
58
-
59
-
60
-
61
-
62
-
63
-
64
-
65
-
66
-
67
-
68
-
69
-
70
-
71
-
72
-
73
-
74
-
75
-
76
-
77
-
78
-
79
-
80
-
81
-
82
-
83
-
84
-
85
-
86
-
87
-
88
-
89
-
90
-
91
-
92
-
93
-
94
-
95
-
96
-
97
-
98
-
99
-
 100
100 -
 101
101 -
 102
102 -
 103
103 -
 104
104 -
 105
105 -
 106
106 -
 107
107 -
 108
108 -
 109
109 -
 110
110 -
111
-
112
-
113
-
114
-
115
-
116
-
117
-
118
-
119
-
120
-
121
-
122
-
123
-
124
-
125
-
126
-
127
-
128
-
129
-
130
-
131
-
132
-
133
-
134
-
135
-
136
-
137
-
138
-
139
-
140
-
141
-
142
-
143
-
144
-
145
-
146
-
147
-
148
-
149
-
150
-
151
-
152
-
153
-
154
-
155
-
156
-
157
-
158
-
159
-
160
-
161
-
162
-
163
-
164
-
165
-
166
-
167
-
168
-
169
-
170
-
171
-
172
-
173
-
174
-
175
-
176
-
177
-
178
-
179
 |
 |
