Dell Force10 E1200i Installing and Maintaining the E1200i System - Page 28
Fan Tray, Table 6-1., Fan Tray Safety Labels
 |
View all Dell Force10 E1200i manuals
Add to My Manuals
Save this manual to your list of manuals |
Page 28 highlights
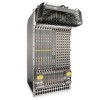
www.dell.com | support.dell.com Figure 6-2. Fan Tray screw latch Install the fan trays after the chassis is installed securely in the equipment rack. Access the fan tray slots from the rear side of the chassis. To ensure proper temperature and airflow control, all six fan trays must be installed before you supply power to the system. You will need a #2 Phillips screwdriver to tighten the screws that secure the fan trays to the chassis. A fan tray can be installed in any fan tray slot. To install fan trays: Step Task 1 Unpack the fan tray. 2 Prior to inserting a fan tray, fully turn its screw latch counter-clockwise (with flathead screwdriver) until the fan tray latching mechanism fully retracts into the fan tray (see Figure 6-2). 3 Grip the fan tray handle. Slide the connector end of each fan tray into the slot until it stops and the handle end is flush with the chassis rear. 4 Secure the fan trays into place by turning the screw latch clockwise. Table 6-1 is an illustration of the fan tray safety labels: Prevent exposure and contact with hazardous voltages. Do not attempt to operate this system without the safety cover provided with each PEM. Table 6-1. Fan Tray Safety Labels Label Location Fan tray faceplate 28 | Installing Fan Trays
-
 1
1 -
2
-
3
-
4
-
5
-
6
-
7
-
8
-
9
-
10
-
11
-
12
-
13
-
14
-
15
-
16
-
17
-
18
-
19
-
20
-
21
-
22
-
 23
23 -
 24
24 -
 25
25 -
 26
26 -
 27
27 -
 28
28 -
 29
29 -
 30
30 -
 31
31 -
 32
32 -
 33
33 -
34
-
35
-
36
-
37
-
38
-
39
-
40
-
41
-
42
-
43
-
44
-
45
-
46
-
47
-
48
-
49
-
50
-
51
-
52
-
53
-
54
-
55
-
56
-
57
-
58
-
59
-
60
-
61
-
62
-
63
-
64
-
65
-
66
-
67
-
68
-
69
-
70
-
71
-
72
-
73
-
74
-
75
-
76
-
77
-
78
-
79
-
80
-
81
-
82
-
83
-
84
-
85
-
86
-
87
-
88
-
89
-
90
-
91
-
92
-
93
-
94
 |
 |
