Dell Force10 E1200i Installing and Maintaining the E1200i System - Page 59
Remove an AC Power Supply in a non-redundant installation, Removing and Replacing DC Power Supplies
 |
View all Dell Force10 E1200i manuals
Add to My Manuals
Save this manual to your list of manuals |
Page 59 highlights
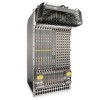
Remove an AC Power Supply in a non-redundant installation Step Task 1 Unplug the network interface cables connected to the line card or RPM. 2 Activate the disconnect switch at the Main power source or disconnect the AC cord at the remote power source. 3 Grip the handle and squeeze the thumb latch. 4 Slide the Power Supply out of the slot. 5 If you are replacing the Power Supply, go to Installing AC Power Supplies on page 29. Remove an AC Power Supply in a redundant installation Step Task Power Supplies On/Standby Switch AC-Cord Retainer Safety Cover WARNING - HIGH LEAKAGE CURRENT. EARTH CONNECTION ESSENTIAL BEFORE CONNECTING SUPPLY. / / COURANT DE FUITE ELEVE. RACCORDEMENT \ A LA TERRE INDISPENSABLE AVANT LE / RACCORDEMENT AU RESEAU. This retainer must be in place during normal operation. Do not remove except for servicing AC Power Plugs 1 Tilt the AC-cord Retainer Safety cover approximately 15o and gently slide the cover away from the chassis. 2 Grip the handle and squeeze the thumb latch. 3 Slide the Power Supply out of the slot. 4 If you are replacing the Power Supply, go to Installing AC Power Supplies on page 29. Removing and Replacing DC Power Supplies If you are operating your E1200 DC chassis with redundant Power Supplies, you can install, remove, or replace a Power Supply without affecting system operation. If you are operating your E1200 DC system with only one Power Supply (the minimum), you must completely power off the system. NOTE: If there is a Power Supply failure (Power Supply LED is not lit or major alarm LED is lit), the entire Power Supply Module must be replaced. There are no field serviceable parts inside the Power Supply unit. Removing and Replacing Components | 59
-
 1
1 -
2
-
3
-
4
-
5
-
6
-
7
-
8
-
9
-
10
-
11
-
12
-
13
-
14
-
15
-
16
-
17
-
18
-
19
-
20
-
21
-
22
-
23
-
24
-
25
-
26
-
27
-
28
-
29
-
30
-
31
-
32
-
33
-
34
-
35
-
36
-
37
-
38
-
39
-
40
-
41
-
42
-
43
-
44
-
45
-
46
-
47
-
48
-
49
-
50
-
51
-
52
-
53
-
 54
54 -
 55
55 -
 56
56 -
 57
57 -
 58
58 -
 59
59 -
 60
60 -
 61
61 -
 62
62 -
 63
63 -
 64
64 -
65
-
66
-
67
-
68
-
69
-
70
-
71
-
72
-
73
-
74
-
75
-
76
-
77
-
78
-
79
-
80
-
81
-
82
-
83
-
84
-
85
-
86
-
87
-
88
-
89
-
90
-
91
-
92
-
93
-
94
 |
 |
