Dell Force10 E1200i Installing and Maintaining the E1200i System - Page 49
RPM Ports and Cables, RPM Ports, Connecting the Console and Auxiliary Ports
 |
View all Dell Force10 E1200i manuals
Add to My Manuals
Save this manual to your list of manuals |
Page 49 highlights
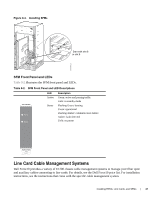
10 RPM Ports and Cables This chapter describes standard RPM cables and adapter pin assignments for the E1200i AC and DC systems. It contains the following sections: • RPM Ports • Cable and Adapter Pin Assignments • Accessing the 10/100 Ethernet Management Port This section provides the following: • RPM Ports • Cable and Adapter Pin Assignments • Accessing the 10/100 Ethernet Management Port RPM Ports There are three ports on the RPM. They are labeled and described as: • Console. A Universal Asynchronous Receiver/Transmitter (UART) port with an RJ-45 jack, is used for system configuration and monitoring. Modem connections are not supported on this port. • Auxiliary. A UART port with an RJ-45 jack, allows modem access to the E1200 system from a remote location. • 10/100 Ethernet. A 10/100 Ethernet port is the Management port, which is a channel to download images and manage the system, as well as FTP and Telnet operations. You must provide a RJ-45 Ethernet cable to connect to the Ethernet receptacle. Connecting the Console and Auxiliary Ports NOTE: Attach an ESD-preventive wrist strap and connect the leash to the ESD connection on the front of the E1200 chassis. Always wear an ESD-preventive wrist or foot-heel ground strap when handling components. NOTE: Always wear an ESD-preventive wrist or foot-ground strap when handling components. The console and auxiliary ports are asynchronous serial ports. If you connect a device to these ports, it must be capable of asynchronous transmission. Your terminal or terminal emulation mode must be set to VT100 with the following settings: • 9600 baud rate (to avoid autobaud input, the default is set to a 9600 bps baud rate) • No parity RPM Ports and Cables | 49
-
 1
1 -
2
-
3
-
4
-
5
-
6
-
7
-
8
-
9
-
10
-
11
-
12
-
13
-
14
-
15
-
16
-
17
-
18
-
19
-
20
-
21
-
22
-
23
-
24
-
25
-
26
-
27
-
28
-
29
-
30
-
31
-
32
-
33
-
34
-
35
-
36
-
37
-
38
-
39
-
40
-
41
-
42
-
43
-
 44
44 -
 45
45 -
 46
46 -
 47
47 -
 48
48 -
 49
49 -
 50
50 -
 51
51 -
 52
52 -
 53
53 -
 54
54 -
55
-
56
-
57
-
58
-
59
-
60
-
61
-
62
-
63
-
64
-
65
-
66
-
67
-
68
-
69
-
70
-
71
-
72
-
73
-
74
-
75
-
76
-
77
-
78
-
79
-
80
-
81
-
82
-
83
-
84
-
85
-
86
-
87
-
88
-
89
-
90
-
91
-
92
-
93
-
94
 |
 |
