Dell OpenManage Network Manager Web Client Guide 5.2 - Page 239
OS Image, Description, Version, Device Driver, Image Type, Select Targets for Deployment
 |
View all Dell OpenManage Network Manager manuals
Add to My Manuals
Save this manual to your list of manuals |
Page 239 highlights
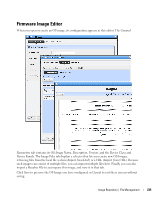
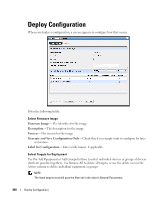
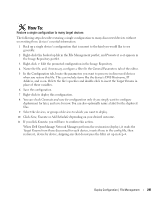
How To: Deploy Firmware To deploy firmware, follow these steps: 1 Make sure you have an FTP / TFTP server correctly configured. See File Management on page 223. 2 Right click a device in Managed Resources or the groups or Image Repository pages and select File Management > Deploy. 3 The Deploy Firmware screen appears. You can Select OS Image in the top panel, and configure deployment with the following fields: OS Image-Select an image. It must already have been uploaded in the Image Repository. Description-A text description of the image. Version-The image version. Device Driver-The device driver associated with this image. Image Type-A read-only reminder of the type of image. Select Targets for Deployment-Select targets for deploying the image. This defaults to the device right-clicked in Managed Resources to initiate this action, or devices that match the selected file you want to deploy. You can then click the Add Equipment button (again, restricted to devices that match the deploy file's type). You can also remove devices from the target list with the Remove All button. Notice the Status column in the table of targets shows whether the OS deployment is supported or not. NOTE: You can also select devices, then change the OS selection so a potential mismatch will occur. This will likely trigger rejection of the deployment by the device, but is not a recommended experiment. Device Options-The appearance of the Device Options panel, at the bottom of this screen, depends on the device selected in the Targets panel. These vendor-specific fields let you fine-tune the deployment. 4 Click one of the buttons at the bottom of the screen to initiate the next backup action. Add Schedule opens the scheduling screen to let you automate the backup you have configured on a specified date, time, or repetition. See Schedule Actions on page 186. Execute performs the backup immediately. The Results tab in this screen opens, displaying the message traffic between Dell OpenManage Network Manager and the device(s). See Audit Trail Portlet on page 93. Save preserves this configuration without scheduling or executing it. Close closes this screen without saving the configured backup. Deploy Firmware | File Management 239
-
 1
1 -
2
-
3
-
4
-
5
-
6
-
7
-
8
-
9
-
10
-
11
-
12
-
13
-
14
-
15
-
16
-
17
-
18
-
19
-
20
-
21
-
22
-
23
-
24
-
25
-
26
-
27
-
28
-
29
-
30
-
31
-
32
-
33
-
34
-
35
-
36
-
37
-
38
-
39
-
40
-
41
-
42
-
43
-
44
-
45
-
46
-
47
-
48
-
49
-
50
-
51
-
52
-
53
-
54
-
55
-
56
-
57
-
58
-
59
-
60
-
61
-
62
-
63
-
64
-
65
-
66
-
67
-
68
-
69
-
70
-
71
-
72
-
73
-
74
-
75
-
76
-
77
-
78
-
79
-
80
-
81
-
82
-
83
-
84
-
85
-
86
-
87
-
88
-
89
-
90
-
91
-
92
-
93
-
94
-
95
-
96
-
97
-
98
-
99
-
100
-
101
-
102
-
103
-
104
-
105
-
106
-
107
-
108
-
109
-
110
-
111
-
112
-
113
-
114
-
115
-
116
-
117
-
118
-
119
-
120
-
121
-
122
-
123
-
124
-
125
-
126
-
127
-
128
-
129
-
130
-
131
-
132
-
133
-
134
-
135
-
136
-
137
-
138
-
139
-
140
-
141
-
142
-
143
-
144
-
145
-
146
-
147
-
148
-
149
-
150
-
151
-
152
-
153
-
154
-
155
-
156
-
157
-
158
-
159
-
160
-
161
-
162
-
163
-
164
-
165
-
166
-
167
-
168
-
169
-
170
-
171
-
172
-
173
-
174
-
175
-
176
-
177
-
178
-
179
-
180
-
181
-
182
-
183
-
184
-
185
-
186
-
187
-
188
-
189
-
190
-
191
-
192
-
193
-
194
-
195
-
196
-
197
-
198
-
199
-
200
-
201
-
202
-
203
-
204
-
205
-
206
-
207
-
208
-
209
-
210
-
211
-
212
-
213
-
214
-
215
-
216
-
217
-
218
-
219
-
220
-
221
-
222
-
223
-
224
-
225
-
226
-
227
-
228
-
229
-
230
-
231
-
232
-
233
-
 234
234 -
 235
235 -
 236
236 -
 237
237 -
 238
238 -
 239
239 -
 240
240 -
 241
241 -
 242
242 -
 243
243 -
 244
244 -
245
-
246
-
247
-
248
-
249
-
250
-
251
-
252
-
253
-
254
-
255
-
256
-
257
-
258
-
259
-
260
-
261
-
262
-
263
-
264
-
265
-
266
-
267
-
268
-
269
-
270
-
271
-
272
-
273
-
274
-
275
-
276
-
277
-
278
-
279
-
280
-
281
-
282
-
283
-
284
-
285
-
286
-
287
-
288
-
289
-
290
-
291
-
292
-
293
-
294
-
295
-
296
-
297
-
298
-
299
-
300
-
301
-
302
-
303
-
304
-
305
-
306
-
307
-
308
-
309
-
310
-
311
-
312
-
313
-
314
-
315
-
316
-
317
-
318
-
319
-
320
-
321
-
322
-
323
-
324
-
325
-
326
-
327
-
328
-
329
-
330
-
331
-
332
-
333
-
334
-
335
-
336
-
337
-
338
-
339
-
340
-
341
-
342
-
343
-
344
-
345
-
346
-
347
-
348
-
349
-
350
-
351
-
352
-
353
-
354
-
355
-
356
-
357
-
358
-
359
-
360
-
361
-
362
-
363
-
364
-
365
-
366
-
367
-
368
-
369
-
370
-
371
-
372
-
373
-
374
-
375
-
376
-
377
-
378
-
379
-
380
 |
 |