Dell PowerEdge R920 Dell PowerEdge R920 System Owners Manual - Page 114
NDC riser I/O riser 1, iDRAC7 version 1.40.40 User's, Guide
 |
View all Dell PowerEdge R920 manuals
Add to My Manuals
Save this manual to your list of manuals |
Page 114 highlights
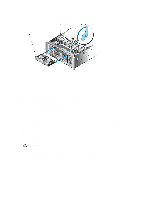
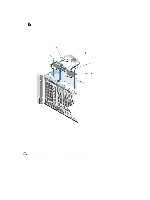
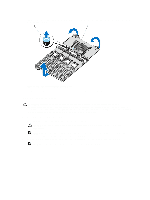
4. Install the following: a) power supply bay unit with PDBs (2) b) power supply(s) c) NDC riser (I/O riser 1) d) expansion-card risers, expansion cards/integrated storage controller e) processor heat sinks/heat sink blanks, as applicable f) processors/processor blanks, as applicable g) fan tray h) memory riser and fan cage i) memory risers (8) j) cooling fans (6) k) cable management tray l) SAS backplane m) internal USB key (if installed) n) optical drive 5. Reconnect the cables to the system board, hard-drive backplane, control panel board, and the optical drive cable (if applicable). NOTE: Ensure that the cables inside the system are routed along the chassis wall and secured using the shimstock pieces. 6. Close the system. 7. Reconnect the system to its electrical outlet and turn the system on, including any attached peripherals. 8. Import your new or existing iDRAC7 Enterprise license. For more information, see iDRAC7 version 1.40.40 User's Guide, at dell.com/support/manuals. 114
-
 1
1 -
2
-
3
-
4
-
5
-
6
-
7
-
8
-
9
-
10
-
11
-
12
-
13
-
14
-
15
-
16
-
17
-
18
-
19
-
20
-
21
-
22
-
23
-
24
-
25
-
26
-
27
-
28
-
29
-
30
-
31
-
32
-
33
-
34
-
35
-
36
-
37
-
38
-
39
-
40
-
41
-
42
-
43
-
44
-
45
-
46
-
47
-
48
-
49
-
50
-
51
-
52
-
53
-
54
-
55
-
56
-
57
-
58
-
59
-
60
-
61
-
62
-
63
-
64
-
65
-
66
-
67
-
68
-
69
-
70
-
71
-
72
-
73
-
74
-
75
-
76
-
77
-
78
-
79
-
80
-
81
-
82
-
83
-
84
-
85
-
86
-
87
-
88
-
89
-
90
-
91
-
92
-
93
-
94
-
95
-
96
-
97
-
98
-
99
-
100
-
101
-
102
-
103
-
104
-
105
-
106
-
107
-
108
-
 109
109 -
 110
110 -
 111
111 -
 112
112 -
 113
113 -
 114
114 -
 115
115 -
 116
116 -
 117
117 -
 118
118 -
 119
119 -
120
-
121
-
122
-
123
-
124
-
125
-
126
-
127
-
128
-
129
-
130
-
131
-
132
-
133
-
134
-
135
-
136
-
137
-
138
-
139
-
140
-
141
-
142
-
143
-
144
-
145
-
146
-
147
-
148
-
149
-
150
-
151
-
152
-
153
-
154
-
155
-
156
-
157
-
158
 |
 |
