Dell PowerEdge R920 Dell PowerEdge R920 System Owners Manual - Page 60
Installing The Optical Drive, Cooling Fans, Removing A Cooling Fan
 |
View all Dell PowerEdge R920 manuals
Add to My Manuals
Save this manual to your list of manuals |
Page 60 highlights
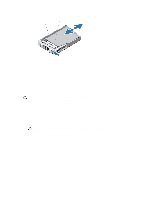
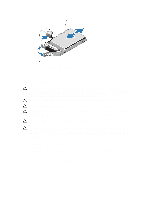
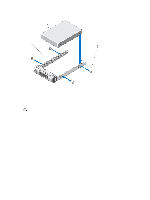
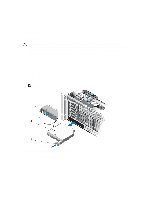
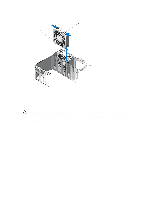
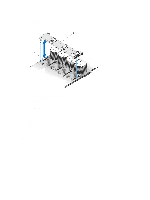
Installing The Optical Drive CAUTION: Many repairs may only be done by a certified service technician. You should only perform troubleshooting and simple repairs as authorized in your product documentation, or as directed by the online or telephone service and support team. Damage due to servicing that is not authorized by Dell is not covered by your warranty. Read and follow the safety instructions that came with the product. NOTE: Installing an optical drive or optical blank to the optical sled does not require any tools. Follow the artwork printed on the optical sled. 1. Align the optical drive sled with the optical drive slot on the front of chassis. 2. Slide the optical drive sled into the slot until the optical drive connector engages with the SATA connector. 3. Close the system. 4. If applicable, install the front bezel. 5. Reconnect the system to its electrical outlet and turn the system on, including any attached peripherals. Cooling Fans Your system supports six hot-swappable cooling fans that are mounted in a memory riser and fan cage. These fans provide cooling for the processors, expansion cards, and memory modules. Individual fans are connected to the fan tray located below the fan cage. The fan tray is connected through a single 12x2 connector to the system board. NOTE: In the event of a failure, excessive temperature, or a problem with a particular fan, the fan number is referenced by the ESM, allowing you to easily identify and replace the particular fan by noting the fan numbers on the cooling fan assembly. WARNING: Do not place any physical obstructions in the front or rear of the chassis. This may cause a decrease in airflow, resulting in an over-heating condition. Removing A Cooling Fan WARNING: Opening or removing the system cover when the system is on may expose you to a risk of electric shock. Exercise utmost care while removing or installing cooling fans. WARNING: Do not operate the system without the cooling fans or the cover. CAUTION: Many repairs may only be done by a certified service technician. You should only perform troubleshooting and simple repairs as authorized in your product documentation, or as directed by the online or telephone service and support team. Damage due to servicing that is not authorized by Dell is not covered by your warranty. Read and follow the safety instructions that came with the product. CAUTION: The cooling fans are hot-swappable. To maintain proper cooling while the system is on, replace only one fan at a time. NOTE: The procedure for removing each fan is identical. 1. Open the system. 2. Press the tabs on the top of the fan inward toward each other and lift the cooling fan out of the fan cage. The cooling fan slides out after it disengages from the connector on the fan tray. 60
-
 1
1 -
2
-
3
-
4
-
5
-
6
-
7
-
8
-
9
-
10
-
11
-
12
-
13
-
14
-
15
-
16
-
17
-
18
-
19
-
20
-
21
-
22
-
23
-
24
-
25
-
26
-
27
-
28
-
29
-
30
-
31
-
32
-
33
-
34
-
35
-
36
-
37
-
38
-
39
-
40
-
41
-
42
-
43
-
44
-
45
-
46
-
47
-
48
-
49
-
50
-
51
-
52
-
53
-
54
-
 55
55 -
 56
56 -
 57
57 -
 58
58 -
 59
59 -
 60
60 -
 61
61 -
 62
62 -
 63
63 -
 64
64 -
 65
65 -
66
-
67
-
68
-
69
-
70
-
71
-
72
-
73
-
74
-
75
-
76
-
77
-
78
-
79
-
80
-
81
-
82
-
83
-
84
-
85
-
86
-
87
-
88
-
89
-
90
-
91
-
92
-
93
-
94
-
95
-
96
-
97
-
98
-
99
-
100
-
101
-
102
-
103
-
104
-
105
-
106
-
107
-
108
-
109
-
110
-
111
-
112
-
113
-
114
-
115
-
116
-
117
-
118
-
119
-
120
-
121
-
122
-
123
-
124
-
125
-
126
-
127
-
128
-
129
-
130
-
131
-
132
-
133
-
134
-
135
-
136
-
137
-
138
-
139
-
140
-
141
-
142
-
143
-
144
-
145
-
146
-
147
-
148
-
149
-
150
-
151
-
152
-
153
-
154
-
155
-
156
-
157
-
158
 |
 |