Dell PowerEdge R920 Dell PowerEdge R920 System Owners Manual - Page 48
Installing A Memory Riser, Removing and Installing the Memory Riser
 |
View all Dell PowerEdge R920 manuals
Add to My Manuals
Save this manual to your list of manuals |
Page 48 highlights
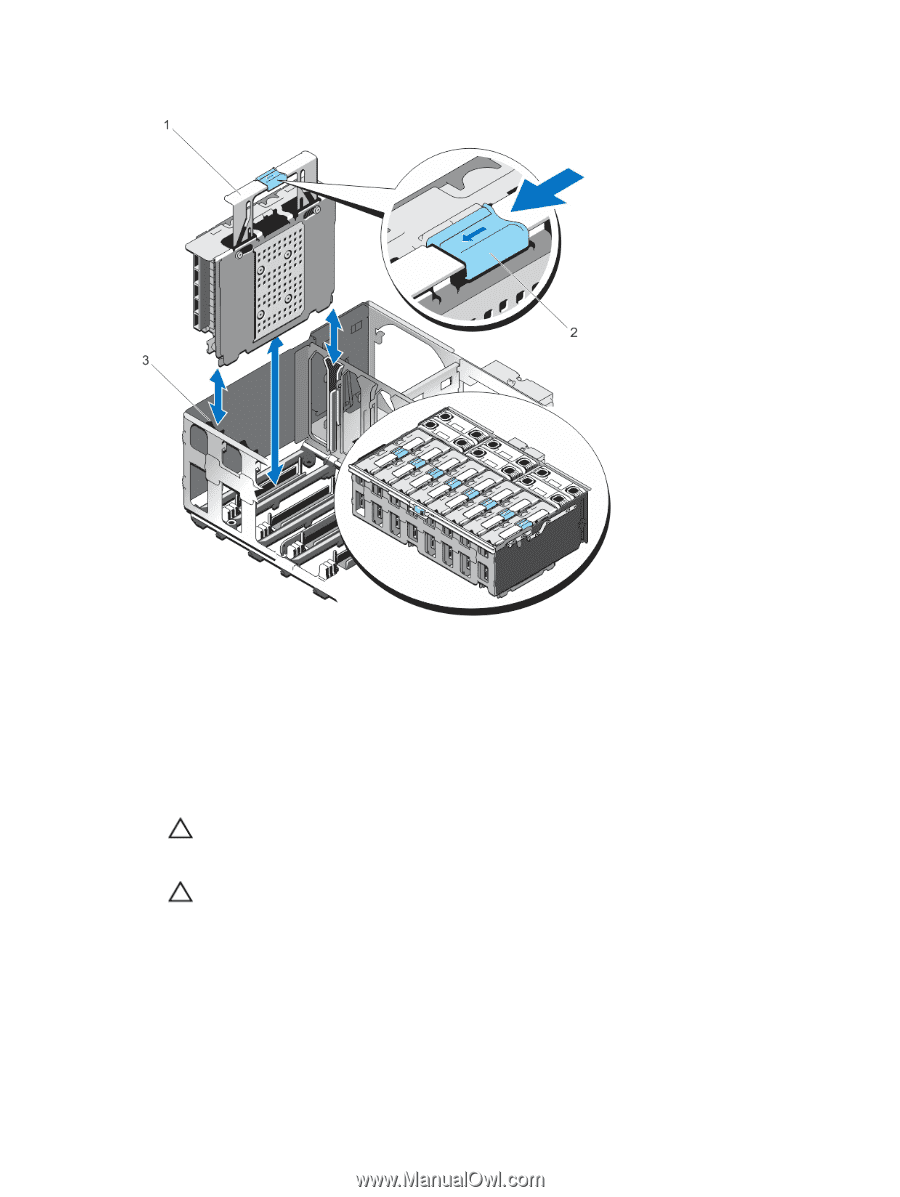
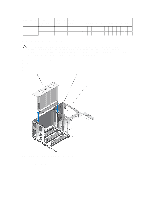
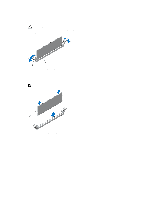
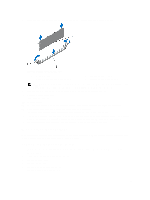
Figure 16. Removing and Installing the Memory Riser 1. memory riser handle 3. memory riser guide 2. memory riser handle lock Installing A Memory Riser 1. Turn off the system, including any attached peripherals, and disconnect the system from the electrical outlet. 2. Open the system. 3. If applicable, remove the memory-riser blank and orange protective cap on the memory riser connector. CAUTION: Before installing the memory riser, you must ensure that the memory module socket ejectors are in the locked position. Also ensure cables from the hard drive backplane are placed in the cable latch and closed. CAUTION: Use the memory riser handle, while installing and removing the memory risers. Handling the memory riser without using the handle may cause injury. 4. Hold the memory riser by the handle and align it with the memory-riser guide. Check for the Airflow direction arrow on the memory riser. 5. Hold by the handle, insert the memory riser firmly into the memory-riser guide until it is fully seated in the connector on the system board. 48
-
 1
1 -
2
-
3
-
4
-
5
-
6
-
7
-
8
-
9
-
10
-
11
-
12
-
13
-
14
-
15
-
16
-
17
-
18
-
19
-
20
-
21
-
22
-
23
-
24
-
25
-
26
-
27
-
28
-
29
-
30
-
31
-
32
-
33
-
34
-
35
-
36
-
37
-
38
-
39
-
40
-
41
-
42
-
 43
43 -
 44
44 -
 45
45 -
 46
46 -
 47
47 -
 48
48 -
 49
49 -
 50
50 -
 51
51 -
 52
52 -
 53
53 -
54
-
55
-
56
-
57
-
58
-
59
-
60
-
61
-
62
-
63
-
64
-
65
-
66
-
67
-
68
-
69
-
70
-
71
-
72
-
73
-
74
-
75
-
76
-
77
-
78
-
79
-
80
-
81
-
82
-
83
-
84
-
85
-
86
-
87
-
88
-
89
-
90
-
91
-
92
-
93
-
94
-
95
-
96
-
97
-
98
-
99
-
100
-
101
-
102
-
103
-
104
-
105
-
106
-
107
-
108
-
109
-
110
-
111
-
112
-
113
-
114
-
115
-
116
-
117
-
118
-
119
-
120
-
121
-
122
-
123
-
124
-
125
-
126
-
127
-
128
-
129
-
130
-
131
-
132
-
133
-
134
-
135
-
136
-
137
-
138
-
139
-
140
-
141
-
142
-
143
-
144
-
145
-
146
-
147
-
148
-
149
-
150
-
151
-
152
-
153
-
154
-
155
-
156
-
157
-
158
 |
 |