Dell PowerEdge R920 Dell PowerEdge R920 System Owners Manual - Page 55
Installing The Memory Riser And Fan Cage, Hard Drives, Removing A 2.5 Inch Hard-Drive Blank
 |
View all Dell PowerEdge R920 manuals
Add to My Manuals
Save this manual to your list of manuals |
Page 55 highlights
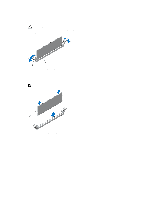
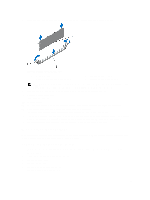
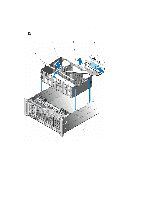
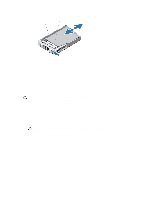
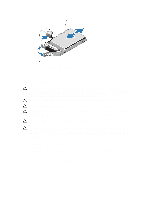
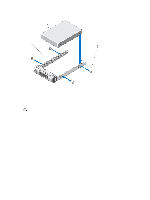
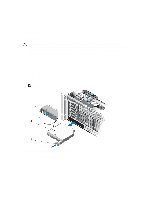
Installing The Memory Riser And Fan Cage NOTE: Before installing the memory riser and fan cage, ensure there are no loose cables from the hard-drive backplane. If the cables are not latched, the cage will not seat firmly into the chassis. 1. Lift the cage using the handle and align the memory riser and fan cage with the guides on the side of the chassis. 2. Using the handle, lower the memory riser and fan cage into the system until it is firmly seated on top of the fan tray on the system board. 3. Slide back the cage handle to its position, so that the handle lock snaps in locked position. 4. Install memory risers. 5. If applicable, install the memory-riser blanks. 6. Install cooling fans. 7. Close the system. 8. Reconnect the system to its electrical outlet and turn the system on, including any attached peripherals. Hard Drives All hard drives connect to the system board through the hard-drive backplane. Hard drives are supplied in hotswappable hard-drive carriers that fit in the hard-drive slots. CAUTION: Before attempting to remove or install a hard drive while the system is running, see the documentation for the storage controller card to ensure that the host adapter is configured correctly to support hot-swap hard drive removal and insertion. CAUTION: Do not turn off or reboot your system while the hard drive is being formatted. Doing so can cause a hard drive failure. NOTE: Use only hard drives that have been tested and approved for use with the hard-drive backplane. When you format a hard drive, allow enough time for the formatting to be completed. Be aware that high-capacity hard drives can take a number of hours to format. Removing A 2.5 Inch Hard-Drive Blank CAUTION: To maintain proper system cooling, all empty hard-drive slots must have hard-drive blanks installed. 1. If installed, remove the front bezel. 2. Press the release button and slide the hard-drive blank out until it is free of the hard-drive slot. 55
-
 1
1 -
2
-
3
-
4
-
5
-
6
-
7
-
8
-
9
-
10
-
11
-
12
-
13
-
14
-
15
-
16
-
17
-
18
-
19
-
20
-
21
-
22
-
23
-
24
-
25
-
26
-
27
-
28
-
29
-
30
-
31
-
32
-
33
-
34
-
35
-
36
-
37
-
38
-
39
-
40
-
41
-
42
-
43
-
44
-
45
-
46
-
47
-
48
-
49
-
 50
50 -
 51
51 -
 52
52 -
 53
53 -
 54
54 -
 55
55 -
 56
56 -
 57
57 -
 58
58 -
 59
59 -
 60
60 -
61
-
62
-
63
-
64
-
65
-
66
-
67
-
68
-
69
-
70
-
71
-
72
-
73
-
74
-
75
-
76
-
77
-
78
-
79
-
80
-
81
-
82
-
83
-
84
-
85
-
86
-
87
-
88
-
89
-
90
-
91
-
92
-
93
-
94
-
95
-
96
-
97
-
98
-
99
-
100
-
101
-
102
-
103
-
104
-
105
-
106
-
107
-
108
-
109
-
110
-
111
-
112
-
113
-
114
-
115
-
116
-
117
-
118
-
119
-
120
-
121
-
122
-
123
-
124
-
125
-
126
-
127
-
128
-
129
-
130
-
131
-
132
-
133
-
134
-
135
-
136
-
137
-
138
-
139
-
140
-
141
-
142
-
143
-
144
-
145
-
146
-
147
-
148
-
149
-
150
-
151
-
152
-
153
-
154
-
155
-
156
-
157
-
158
 |
 |
