Dell PowerEdge R920 Dell PowerEdge R920 System Owners Manual - Page 38
Cable Management Tray, Removing The Cable Management Tray
 |
View all Dell PowerEdge R920 manuals
Add to My Manuals
Save this manual to your list of manuals |
Page 38 highlights
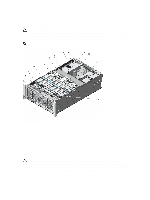
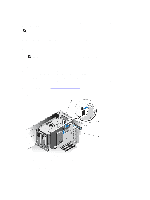
Cable Management Tray The cable management tray is located above the processor heat sinks. It is used to route and manage the cables connecting the storage and expansion cards to various connectors on the backplane. NOTE: Cable management tray also facilitates in maintaining the proper cooling of the system. It helps control airflow to the processors and the expansion-cards on risers, when the risers are installed. Removing The Cable Management Tray 1. Turn off the system, including any attached peripherals, and disconnect the system from the electrical outlet. 2. Open the system. 3. Remove the memory risers. See Removing a Memory Riser. 4. Remove the cooling fans. See Removing A Cooling Fan. 5. Remove the memory riser and fan cage. See Removing the Memory Riser and Fan cage. 6. To open the cable tray cover, press the release tab. 7. Remove the cables routed through the cable tray. 8. Press down on the cable tray hooks to free them of the slots on the side of the chassis wall. 9. Lift the cable tray out of the system. Figure 13. Removing and Installing the Cable Management Tray 1. cable tray slot (4) 2. 3. cable tray cover 4. 5. cables (routed) cable tray hook (4) cable tray cover release tab 38
-
 1
1 -
2
-
3
-
4
-
5
-
6
-
7
-
8
-
9
-
10
-
11
-
12
-
13
-
14
-
15
-
16
-
17
-
18
-
19
-
20
-
21
-
22
-
23
-
24
-
25
-
26
-
27
-
28
-
29
-
30
-
31
-
32
-
 33
33 -
 34
34 -
 35
35 -
 36
36 -
 37
37 -
 38
38 -
 39
39 -
 40
40 -
 41
41 -
 42
42 -
 43
43 -
44
-
45
-
46
-
47
-
48
-
49
-
50
-
51
-
52
-
53
-
54
-
55
-
56
-
57
-
58
-
59
-
60
-
61
-
62
-
63
-
64
-
65
-
66
-
67
-
68
-
69
-
70
-
71
-
72
-
73
-
74
-
75
-
76
-
77
-
78
-
79
-
80
-
81
-
82
-
83
-
84
-
85
-
86
-
87
-
88
-
89
-
90
-
91
-
92
-
93
-
94
-
95
-
96
-
97
-
98
-
99
-
100
-
101
-
102
-
103
-
104
-
105
-
106
-
107
-
108
-
109
-
110
-
111
-
112
-
113
-
114
-
115
-
116
-
117
-
118
-
119
-
120
-
121
-
122
-
123
-
124
-
125
-
126
-
127
-
128
-
129
-
130
-
131
-
132
-
133
-
134
-
135
-
136
-
137
-
138
-
139
-
140
-
141
-
142
-
143
-
144
-
145
-
146
-
147
-
148
-
149
-
150
-
151
-
152
-
153
-
154
-
155
-
156
-
157
-
158
 |
 |
