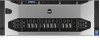
Dell PowerEdge R920 Dell PowerEdge R920 System Owners Manual - Page 35
Opening The System, Opening and Closing the System
 |
View all Dell PowerEdge R920 manuals
Add to My Manuals
Save this manual to your list of manuals |
Page 35 highlights
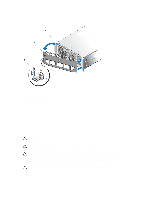
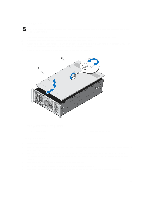
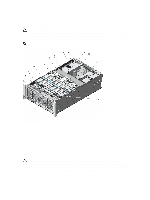
Opening The System NOTE: It is recommended that you always use a static mat and static strap while working on components in the interior of the system. 1. Turn off the system and attached peripherals, and disconnect the system from the electrical outlet. 2. Rotate the latch release lock counter clockwise to the unlocked position. 3. Lift the latch on top of the system cover and slide the cover toward the back of the system, so that the front hooks and the hook-slots on the back edge of the cover are out of the chassis. 4. Grasp the cover on both sides and lift the cover away from the system. Figure 10. Opening and Closing the System 1. system cover 2. latch and release lock Closing The System 1. Lift the latch on the cover. 2. Place the cover onto the chassis and offset the cover slightly back so that it clears the chassis hooks and lays flush on the chassis. 3. Slide the cover toward the front of the system so that the chassis hooks on the back edge of the system fit the corresponding slots on the cover and the hooks on the front edge of the cover fit the corresponding slots on the chassis. 4. Push down the latch to move the cover into the closed position. 5. Rotate the latch release lock in a clockwise direction to secure the cover. 6. Reconnect the system to its electrical outlet and turn the system on, including any attached peripherals. 35
-
 1
1 -
2
-
3
-
4
-
5
-
6
-
7
-
8
-
9
-
10
-
11
-
12
-
13
-
14
-
15
-
16
-
17
-
18
-
19
-
20
-
21
-
22
-
23
-
24
-
25
-
26
-
27
-
28
-
29
-
 30
30 -
 31
31 -
 32
32 -
 33
33 -
 34
34 -
 35
35 -
 36
36 -
 37
37 -
 38
38 -
 39
39 -
 40
40 -
41
-
42
-
43
-
44
-
45
-
46
-
47
-
48
-
49
-
50
-
51
-
52
-
53
-
54
-
55
-
56
-
57
-
58
-
59
-
60
-
61
-
62
-
63
-
64
-
65
-
66
-
67
-
68
-
69
-
70
-
71
-
72
-
73
-
74
-
75
-
76
-
77
-
78
-
79
-
80
-
81
-
82
-
83
-
84
-
85
-
86
-
87
-
88
-
89
-
90
-
91
-
92
-
93
-
94
-
95
-
96
-
97
-
98
-
99
-
100
-
101
-
102
-
103
-
104
-
105
-
106
-
107
-
108
-
109
-
110
-
111
-
112
-
113
-
114
-
115
-
116
-
117
-
118
-
119
-
120
-
121
-
122
-
123
-
124
-
125
-
126
-
127
-
128
-
129
-
130
-
131
-
132
-
133
-
134
-
135
-
136
-
137
-
138
-
139
-
140
-
141
-
142
-
143
-
144
-
145
-
146
-
147
-
148
-
149
-
150
-
151
-
152
-
153
-
154
-
155
-
156
-
157
-
158
 |
 |
