Epson C3400 Technical Reference Guide TRG - Page 192
Maintenance And Utilities] tab, Import/Export Settings, Post-Printing Verification Settings
 |
View all Epson C3400 manuals
Add to My Manuals
Save this manual to your list of manuals |
Page 192 highlights
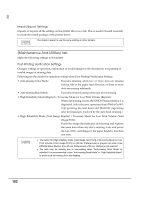
Import/Export Settings Imports or exports all the settings on the printer driver as a file. This is used for Install Assistant to create the install package of the printer driver. This makes it easier to use the same settings in other printers. [Maintenance And Utilities] tab Make the following settings to the printer. Post-Printing Verification Settings Changes settings of operation, registration of invalid images to the documents, test printing of invalid images at missing dots. Following are the modes for operation setting when Post-Printing Verification Settings. • Anti-missing Color Mode: Executes cleaning when two or more dots are missing side by side in the paper feed direction, or three or more dots are missing arbitrarily. • Anti-missing Read Mode: Executes a head cleaning when any dot is missing. • High Reliability Mode (Reprint) / Economy Mode for Low Print Volume (Reprint): When dot missing occurs, the EPSON Status Monitor 3 is displayed. Select the next operation from [Restart printing] (printing the next data) and [Reprint] (reprinting after dot missing is resolved by the auto head cleaning.) • High Reliability Mode (Void Image Reprint) / Economy Mode for Low Print Volume (Void Image Print): Prints the image that indicates dot missing and reprints the same data when any dot is missing. Cuts and prints the top of the void images if the paper height is less than one inch. • The button for [High reliability mode (Void Image Test Print)] or [Economy Mode for Low Print Volume (Void Image Print)] on [Driver Preferences] is grayed out when [Use EPSON Status Monitor 3] on [Driver Preferences] of [Driver Utilities] is not selected. • The dots may be missing due to mis-reading when "Anti-missing Color Mode" is selected. It is recommended to use "Anti-missing Read Mode" or "High Reliability Mode" to avoid such dot missing from mis-reading. 192
-
 1
1 -
2
-
3
-
4
-
5
-
6
-
7
-
8
-
9
-
10
-
11
-
12
-
13
-
14
-
15
-
16
-
17
-
18
-
19
-
20
-
21
-
22
-
23
-
24
-
25
-
26
-
27
-
28
-
29
-
30
-
31
-
32
-
33
-
34
-
35
-
36
-
37
-
38
-
39
-
40
-
41
-
42
-
43
-
44
-
45
-
46
-
47
-
48
-
49
-
50
-
51
-
52
-
53
-
54
-
55
-
56
-
57
-
58
-
59
-
60
-
61
-
62
-
63
-
64
-
65
-
66
-
67
-
68
-
69
-
70
-
71
-
72
-
73
-
74
-
75
-
76
-
77
-
78
-
79
-
80
-
81
-
82
-
83
-
84
-
85
-
86
-
87
-
88
-
89
-
90
-
91
-
92
-
93
-
94
-
95
-
96
-
97
-
98
-
99
-
100
-
101
-
102
-
103
-
104
-
105
-
106
-
107
-
108
-
109
-
110
-
111
-
112
-
113
-
114
-
115
-
116
-
117
-
118
-
119
-
120
-
121
-
122
-
123
-
124
-
125
-
126
-
127
-
128
-
129
-
130
-
131
-
132
-
133
-
134
-
135
-
136
-
137
-
138
-
139
-
140
-
141
-
142
-
143
-
144
-
145
-
146
-
147
-
148
-
149
-
150
-
151
-
152
-
153
-
154
-
155
-
156
-
157
-
158
-
159
-
160
-
161
-
162
-
163
-
164
-
165
-
166
-
167
-
168
-
169
-
170
-
171
-
172
-
173
-
174
-
175
-
176
-
177
-
178
-
179
-
180
-
181
-
182
-
183
-
184
-
185
-
186
-
 187
187 -
 188
188 -
 189
189 -
 190
190 -
 191
191 -
 192
192 -
 193
193 -
 194
194 -
 195
195 -
 196
196 -
 197
197 -
198
-
199
-
200
-
201
-
202
-
203
-
204
-
205
-
206
-
207
-
208
-
209
-
210
-
211
-
212
-
213
-
214
-
215
-
216
-
217
-
218
-
219
-
220
-
221
-
222
-
223
-
224
-
225
-
226
-
227
-
228
-
229
-
230
-
231
-
232
-
233
-
234
-
235
-
236
-
237
-
238
-
239
-
240
-
241
-
242
 |
 |
