Epson C3400 Technical Reference Guide TRG - Page 63
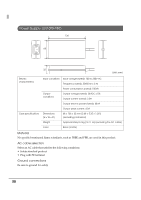
Flow of Setup, Connecting the Power Supply Unit PS-180
 |
View all Epson C3400 manuals
Add to My Manuals
Save this manual to your list of manuals |
Page 63 highlights
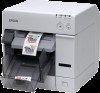
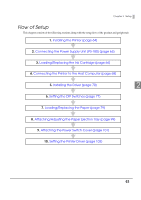
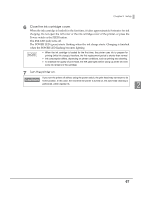
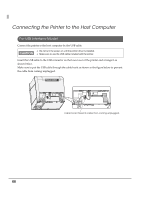
Chapter 2 Setup Flow of Setup This chapter consists of the following sections along with the setup flow of the product and peripherals. 1. Installing the Printer (page 64) 2. Connecting the Power Supply Unit (PS-180) (page 65) 3. Loading/Replacing the Ink Cartridge (page 66) 4. Connecting the Printer to the Host Computer (page 68) 5. Installing the Driver (page 70) 2 6. Setting the DIP Switches (page 77) 7. Loading/Replacing the Paper (page 79) 8. Attaching/Adjusting the Paper Ejection Tray (page 99) 9. Attaching the Power Switch Cover (page 101) 10. Setting the Printer Driver (page 103) 63
-
 1
1 -
2
-
3
-
4
-
5
-
6
-
7
-
8
-
9
-
10
-
11
-
12
-
13
-
14
-
15
-
16
-
17
-
18
-
19
-
20
-
21
-
22
-
23
-
24
-
25
-
26
-
27
-
28
-
29
-
30
-
31
-
32
-
33
-
34
-
35
-
36
-
37
-
38
-
39
-
40
-
41
-
42
-
43
-
44
-
45
-
46
-
47
-
48
-
49
-
50
-
51
-
52
-
53
-
54
-
55
-
56
-
57
-
 58
58 -
 59
59 -
 60
60 -
 61
61 -
 62
62 -
 63
63 -
 64
64 -
 65
65 -
 66
66 -
 67
67 -
 68
68 -
69
-
70
-
71
-
72
-
73
-
74
-
75
-
76
-
77
-
78
-
79
-
80
-
81
-
82
-
83
-
84
-
85
-
86
-
87
-
88
-
89
-
90
-
91
-
92
-
93
-
94
-
95
-
96
-
97
-
98
-
99
-
100
-
101
-
102
-
103
-
104
-
105
-
106
-
107
-
108
-
109
-
110
-
111
-
112
-
113
-
114
-
115
-
116
-
117
-
118
-
119
-
120
-
121
-
122
-
123
-
124
-
125
-
126
-
127
-
128
-
129
-
130
-
131
-
132
-
133
-
134
-
135
-
136
-
137
-
138
-
139
-
140
-
141
-
142
-
143
-
144
-
145
-
146
-
147
-
148
-
149
-
150
-
151
-
152
-
153
-
154
-
155
-
156
-
157
-
158
-
159
-
160
-
161
-
162
-
163
-
164
-
165
-
166
-
167
-
168
-
169
-
170
-
171
-
172
-
173
-
174
-
175
-
176
-
177
-
178
-
179
-
180
-
181
-
182
-
183
-
184
-
185
-
186
-
187
-
188
-
189
-
190
-
191
-
192
-
193
-
194
-
195
-
196
-
197
-
198
-
199
-
200
-
201
-
202
-
203
-
204
-
205
-
206
-
207
-
208
-
209
-
210
-
211
-
212
-
213
-
214
-
215
-
216
-
217
-
218
-
219
-
220
-
221
-
222
-
223
-
224
-
225
-
226
-
227
-
228
-
229
-
230
-
231
-
232
-
233
-
234
-
235
-
236
-
237
-
238
-
239
-
240
-
241
-
242
 |
 |

Chapter 2
Setup
63
2
Flow of Setup
Th
i
s chap
t
er co
n
s
i
s
t
s of
t
he follow
ing
sec
ti
o
n
s alo
ng
w
it
h
t
he se
tu
p flow of
t
he prod
u
c
t
a
n
d per
i
pherals.
3.
Loading/Replacing the Ink Cartridge (page 66)
7.
Loading/Replacing the Paper (page 79)
6.
Setting the DIP Switches (page 77)
4.
Connecting the Printer to the Host Computer (page 68)
5.
Installing the Driver (page 70)
2.
Connecting the Power Supply Unit (PS-180) (page 65)
8.
Attaching/Adjusting the Paper Ejection Tray (page 99)
1.
Installing the Printer (page 64)
9.
Attaching the Power Switch Cover (page 101)
10.
Setting the Printer Driver (page 103)