Epson ES-500W Users Guide - Page 130
Scanned Image is Cropped, Resetting the Epson Scan 2 Settings, Crop Margins for Size Auto
 |
View all Epson ES-500W manuals
Add to My Manuals
Save this manual to your list of manuals |
Page 130 highlights
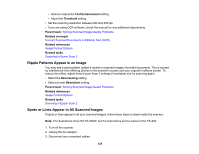
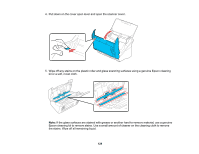
Caution: Do not spray glass cleaner directly on the scanning surfaces. Be careful not to place too much force on the glass. 6. Close the scanner cover. 7. Plug in the AC adapter. Parent topic: Solving Scanned Image Quality Problems Related tasks Cleaning Inside Your Scanner Scanned Image is Cropped If the edges of a scanned image are cropped, try the following solutions: • Select Auto Detect as the Document Size setting in Epson Scan 2, Document Capture Pro, or Document Capture. • In Epson Scan 2, select the Main Settings tab. Select Document Size > Settings and then adjust the cropping area shown in the Crop Margins for Size "Auto" setting. • Document Capture Pro (Windows): Select Detailed Settings from the Scan window. Select Document Size > Settings and then adjust the cropping area shown in the Crop Margins for Size "Auto" setting. • Document Capture (OS X): Click the Scan button and select Detailed Settings from the Scan window. Select Document Size > Settings and then adjust the cropping area shown in the Crop Margins for Size "Auto" setting. Parent topic: Solving Scanned Image Quality Problems Resetting the Epson Scan 2 Settings If you continue to experience image quality problems after trying all possible solutions, you may need to reset the Epson Scan 2 Settings using the Epson Scan 2 Utility. 1. Do one of the following to start the Epson Scan 2 Utility: • Windows 10: Click and select All apps > EPSON > Epson Scan 2 Utility. • Windows 8.x: Navigate to the Apps screen and select Epson Scan 2 Utility. • Windows (other versions): Click or Start, and select All Programs or Programs. Select EPSON > Epson Scan 2 > Epson Scan 2 Utility. 130
-
 1
1 -
2
-
3
-
4
-
5
-
6
-
7
-
8
-
9
-
10
-
11
-
12
-
13
-
14
-
15
-
16
-
17
-
18
-
19
-
20
-
21
-
22
-
23
-
24
-
25
-
26
-
27
-
28
-
29
-
30
-
31
-
32
-
33
-
34
-
35
-
36
-
37
-
38
-
39
-
40
-
41
-
42
-
43
-
44
-
45
-
46
-
47
-
48
-
49
-
50
-
51
-
52
-
53
-
54
-
55
-
56
-
57
-
58
-
59
-
60
-
61
-
62
-
63
-
64
-
65
-
66
-
67
-
68
-
69
-
70
-
71
-
72
-
73
-
74
-
75
-
76
-
77
-
78
-
79
-
80
-
81
-
82
-
83
-
84
-
85
-
86
-
87
-
88
-
89
-
90
-
91
-
92
-
93
-
94
-
95
-
96
-
97
-
98
-
99
-
100
-
101
-
102
-
103
-
104
-
105
-
106
-
107
-
108
-
109
-
110
-
111
-
112
-
113
-
114
-
115
-
116
-
117
-
118
-
119
-
120
-
121
-
122
-
123
-
124
-
 125
125 -
 126
126 -
 127
127 -
 128
128 -
 129
129 -
 130
130 -
 131
131 -
 132
132 -
 133
133 -
 134
134 -
 135
135 -
136
-
137
-
138
-
139
-
140
-
141
-
142
-
143
-
144
-
145
-
146
-
147
-
148
-
149
-
150
-
151
 |
 |
