Epson ES-500W Users Guide - Page 62
See the Help information in Document Capture Pro or Document Capture for details., Windows
 |
View all Epson ES-500W manuals
Add to My Manuals
Save this manual to your list of manuals |
Page 62 highlights
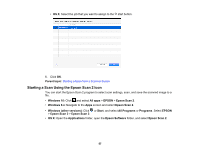
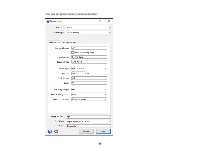
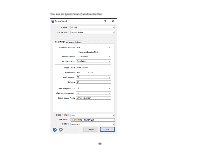
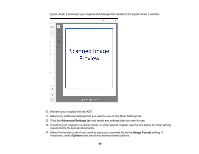
2. Click the Scan icon. You see a window like this: Note: If you want to use a scan job that you created instead, select it from the Job list in the Document Capture Pro or Document Capture window, click the Start Job button, and skip the rest of these steps. 3. Select any displayed scan settings you want to use. Note: See the Help information in Document Capture Pro or Document Capture for details. 4. If you want to select detailed scan settings, do one of the following: • Windows: Click Detailed Settings. Select any displayed scan settings you want to use and click Preview to see a preview of your scan in the Epson Scan 2 window, then click Save. 62
-
 1
1 -
2
-
3
-
4
-
5
-
6
-
7
-
8
-
9
-
10
-
11
-
12
-
13
-
14
-
15
-
16
-
17
-
18
-
19
-
20
-
21
-
22
-
23
-
24
-
25
-
26
-
27
-
28
-
29
-
30
-
31
-
32
-
33
-
34
-
35
-
36
-
37
-
38
-
39
-
40
-
41
-
42
-
43
-
44
-
45
-
46
-
47
-
48
-
49
-
50
-
51
-
52
-
53
-
54
-
55
-
56
-
 57
57 -
 58
58 -
 59
59 -
 60
60 -
 61
61 -
 62
62 -
 63
63 -
 64
64 -
 65
65 -
 66
66 -
 67
67 -
68
-
69
-
70
-
71
-
72
-
73
-
74
-
75
-
76
-
77
-
78
-
79
-
80
-
81
-
82
-
83
-
84
-
85
-
86
-
87
-
88
-
89
-
90
-
91
-
92
-
93
-
94
-
95
-
96
-
97
-
98
-
99
-
100
-
101
-
102
-
103
-
104
-
105
-
106
-
107
-
108
-
109
-
110
-
111
-
112
-
113
-
114
-
115
-
116
-
117
-
118
-
119
-
120
-
121
-
122
-
123
-
124
-
125
-
126
-
127
-
128
-
129
-
130
-
131
-
132
-
133
-
134
-
135
-
136
-
137
-
138
-
139
-
140
-
141
-
142
-
143
-
144
-
145
-
146
-
147
-
148
-
149
-
150
-
151
 |
 |

62
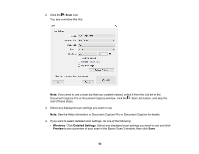
2.
Click the
Scan
icon.
You see a window like this:
Note:
If you want to use a scan job that you created instead, select it from the Job list in the
Document Capture Pro or Document Capture window, click the
Start Job button, and skip the
rest of these steps.
3.
Select any displayed scan settings you want to use.
Note:
See the Help information in Document Capture Pro or Document Capture for details.
4.
If you want to select detailed scan settings, do one of the following:
•
Windows
: Click
Detailed Settings
. Select any displayed scan settings you want to use and click
Preview
to see a preview of your scan in the Epson Scan 2 window, then click
Save
.