Epson ES-500W Users Guide - Page 51
Network Interface Unit Control Panel, Connecting the Network Interface Unit, Reset, Parent topic
 |
View all Epson ES-500W manuals
Add to My Manuals
Save this manual to your list of manuals |
Page 51 highlights
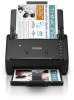
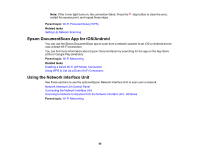
Network Interface Unit Control Panel 1 power button (turns the unit on and off) 2 LCD screen (displays status, operations, and error messages) 3 settings button (selects product settings, network settings, and maintenance options) 4 Reset button (returns the LCD to the default screen) 5 Stop button (cancels scanning) 6 OK button and arrows (use the arrows to highlight an option and the OK button to select it) 7 start button (starts scanning when networking is enabled) Parent topic: Using the Network Interface Unit Connecting the Network Interface Unit See the documentation that came with the optional Epson Network Interface Unit for instructions on connecting it to your scanner. After connecting the Network Interface Unit, you need to set up your scanner for network scanning. See the link below. Parent topic: Using the Network Interface Unit Related tasks Setting Up Network Scanning 51
-
 1
1 -
2
-
3
-
4
-
5
-
6
-
7
-
8
-
9
-
10
-
11
-
12
-
13
-
14
-
15
-
16
-
17
-
18
-
19
-
20
-
21
-
22
-
23
-
24
-
25
-
26
-
27
-
28
-
29
-
30
-
31
-
32
-
33
-
34
-
35
-
36
-
37
-
38
-
39
-
40
-
41
-
42
-
43
-
44
-
45
-
 46
46 -
 47
47 -
 48
48 -
 49
49 -
 50
50 -
 51
51 -
 52
52 -
 53
53 -
 54
54 -
 55
55 -
 56
56 -
57
-
58
-
59
-
60
-
61
-
62
-
63
-
64
-
65
-
66
-
67
-
68
-
69
-
70
-
71
-
72
-
73
-
74
-
75
-
76
-
77
-
78
-
79
-
80
-
81
-
82
-
83
-
84
-
85
-
86
-
87
-
88
-
89
-
90
-
91
-
92
-
93
-
94
-
95
-
96
-
97
-
98
-
99
-
100
-
101
-
102
-
103
-
104
-
105
-
106
-
107
-
108
-
109
-
110
-
111
-
112
-
113
-
114
-
115
-
116
-
117
-
118
-
119
-
120
-
121
-
122
-
123
-
124
-
125
-
126
-
127
-
128
-
129
-
130
-
131
-
132
-
133
-
134
-
135
-
136
-
137
-
138
-
139
-
140
-
141
-
142
-
143
-
144
-
145
-
146
-
147
-
148
-
149
-
150
-
151
 |
 |
