Epson ES-500W Users Guide - Page 93
Scanning from the ADF with the Flatbed Scanner Dock Attached, Scanner Glass, Parent topic
 |
View all Epson ES-500W manuals
Add to My Manuals
Save this manual to your list of manuals |
Page 93 highlights
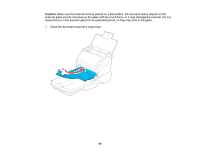
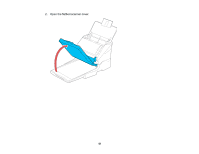
Note: Place your original 0.1 inch (2.5 mm) from the top and side edges of the scanner glass as shown in order to avoid cropping. If you are scanning multiple photos at once, place them at least 0.8 inch (20 mm) apart from each other. 4. Close the flatbed scanner cover gently to keep your original in place. If you are scanning a book or other thick document, close the scanner cover and hold it down as you scan. 5. Start Epson Scan 2. 6. Select Scanner Glass as the Document Source. 7. Select other settings, as necessary. 8. Click Scan. Parent topic: Scanning from the Flatbed Scanner Dock Related tasks Scanning from the ADF with the Flatbed Scanner Dock Attached Scanning in Epson Scan 2 Scanning from the ADF with the Flatbed Scanner Dock Attached Depending on the length of your originals, you may need to adjust the position of the input tray, output tray, and stopper when scanning from the document scanner's ADF with the optional flatbed scanner dock attached. For originals shorter then A5 (8.2 inches [210 mm] long): • Open the document scanner's input tray, pull out the output tray and output tray extension, and open the stopper. 93
-
 1
1 -
2
-
3
-
4
-
5
-
6
-
7
-
8
-
9
-
10
-
11
-
12
-
13
-
14
-
15
-
16
-
17
-
18
-
19
-
20
-
21
-
22
-
23
-
24
-
25
-
26
-
27
-
28
-
29
-
30
-
31
-
32
-
33
-
34
-
35
-
36
-
37
-
38
-
39
-
40
-
41
-
42
-
43
-
44
-
45
-
46
-
47
-
48
-
49
-
50
-
51
-
52
-
53
-
54
-
55
-
56
-
57
-
58
-
59
-
60
-
61
-
62
-
63
-
64
-
65
-
66
-
67
-
68
-
69
-
70
-
71
-
72
-
73
-
74
-
75
-
76
-
77
-
78
-
79
-
80
-
81
-
82
-
83
-
84
-
85
-
86
-
87
-
 88
88 -
 89
89 -
 90
90 -
 91
91 -
 92
92 -
 93
93 -
 94
94 -
 95
95 -
 96
96 -
 97
97 -
 98
98 -
99
-
100
-
101
-
102
-
103
-
104
-
105
-
106
-
107
-
108
-
109
-
110
-
111
-
112
-
113
-
114
-
115
-
116
-
117
-
118
-
119
-
120
-
121
-
122
-
123
-
124
-
125
-
126
-
127
-
128
-
129
-
130
-
131
-
132
-
133
-
134
-
135
-
136
-
137
-
138
-
139
-
140
-
141
-
142
-
143
-
144
-
145
-
146
-
147
-
148
-
149
-
150
-
151
 |
 |
