Epson PictureMate Charm - PM 225 User's Guide - Page 19
Printing a Proof Sheet, Reducing Red-Eye, Fixing Photos, Utility, Print, Setup, Advanced Settings
 |
View all Epson PictureMate Charm - PM 225 manuals
Add to My Manuals
Save this manual to your list of manuals |
Page 19 highlights
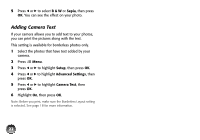
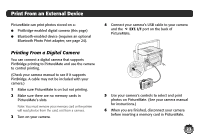
Printing a Proof Sheet You can print small thumbnail images of all the photos on your memory card, 20 images per page. 1 After inserting a card, press Menu. 2 Press l or r to highlight Utility, then press OK. 3 Press l or r to highlight Print Proof Sheet, then press OK. 4 Press l or r to highlight Yes (to clear previous photo settings), then press OK to continue. 5 Press Print to start printing. Note: If you have selected photos by date, only the selected photos are printed. Reducing Red-Eye When you take photos of people, they sometimes appear to have red eyes. You can use Fix Red-Eye to help eliminate this problem. Note: Fix Red-Eye may not correct red eyes in all photos, and printing will be slower when you use this feature. 1 Select a photo with the red-eye problem. 2 Press Menu. 3 Press l or r to highlight Setup, then press OK. 4 Press l or r to highlight Advanced Settings, then press OK. 5 Press l or r to highlight Fix Red-Eye, then press OK. 6 Press l or r to highlight On, then press OK. Fixing Photos PictureMate lets you correct the color and improve the image quality of your photos without using a computer. The Fix Photo setting, which is selected by default, improves your photos' colors and increases contrast and sharpness. It may correct images that are too dark, too light, or backlit. You can select the following types of enhancement: Standard, People, Landscape, or Night Scene. If your camera supports PRINT Image Matching® (P.I.M.) or Exif Print, the printer's P.I.M. setting automatically adjusts your photos for the best results. 19
-
 1
1 -
2
-
3
-
4
-
5
-
6
-
7
-
8
-
9
-
10
-
11
-
12
-
13
-
 14
14 -
 15
15 -
 16
16 -
 17
17 -
 18
18 -
 19
19 -
 20
20 -
 21
21 -
 22
22 -
 23
23 -
 24
24 -
25
-
26
-
27
-
28
-
29
-
30
-
31
-
32
-
33
-
34
-
35
-
36
-
37
-
38
-
39
-
40
-
41
-
42
-
43
-
44
-
45
-
46
-
47
-
48
-
49
-
50
-
51
-
52
-
53
-
54
-
55
-
56
-
57
-
58
-
59
-
60
-
61
-
62
-
63
-
64
-
65
-
66
-
67
-
68
-
69
-
70
-
71
-
72
-
73
-
74
-
75
-
76
-
77
-
78
-
79
-
80
-
81
-
82
-
83
-
84
-
85
-
86
-
87
-
88
-
89
-
90
-
91
-
92
-
93
-
94
-
95
-
96
-
97
 |
 |
