Epson PictureMate Charm - PM 225 User's Guide - Page 38
× 6 in, × 6 in Borderless, Print Settings, Enhance Fine Details, Sepia, Black & White
 |
View all Epson PictureMate Charm - PM 225 manuals
Add to My Manuals
Save this manual to your list of manuals |
Page 38 highlights
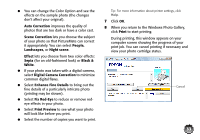
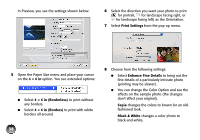
In Preview, you see the settings shown below: 6 Select the direction you want your photo to print ( for portrait, for landscape facing right, or for landscape facing left) as the Orientation. 7 Select Print Settings from the pop-up menu. 5 Open the Paper Size menu and place your cursor on the 4 × 6 in option. You see extended options: ● Select 4 × 6 in (Borderless) to print without any borders. ● Select 4 × 6 in (Borders) to print with white borders all around. 38 8 Choose from the following settings: ● Select Enhance Fine Details to bring out the fine details of a particularly intricate photo (printing may be slower). ● You can change the Color Option and see the effects on the sample photo (the changes don't affect your original). Sepia changes the colors to brown for an oldfashioned look. Black & White changes a color photo to black-and-white.
-
 1
1 -
2
-
3
-
4
-
5
-
6
-
7
-
8
-
9
-
10
-
11
-
12
-
13
-
14
-
15
-
16
-
17
-
18
-
19
-
20
-
21
-
22
-
23
-
24
-
25
-
26
-
27
-
28
-
29
-
30
-
31
-
32
-
 33
33 -
 34
34 -
 35
35 -
 36
36 -
 37
37 -
 38
38 -
 39
39 -
 40
40 -
 41
41 -
 42
42 -
 43
43 -
44
-
45
-
46
-
47
-
48
-
49
-
50
-
51
-
52
-
53
-
54
-
55
-
56
-
57
-
58
-
59
-
60
-
61
-
62
-
63
-
64
-
65
-
66
-
67
-
68
-
69
-
70
-
71
-
72
-
73
-
74
-
75
-
76
-
77
-
78
-
79
-
80
-
81
-
82
-
83
-
84
-
85
-
86
-
87
-
88
-
89
-
90
-
91
-
92
-
93
-
94
-
95
-
96
-
97
 |
 |
