Epson PictureMate Charm - PM 225 User's Guide - Page 71
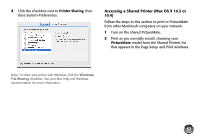
Accessing a Network Printer, icon. The Add Printer Wizard opens.
 |
View all Epson PictureMate Charm - PM 225 manuals
Add to My Manuals
Save this manual to your list of manuals |
Page 71 highlights
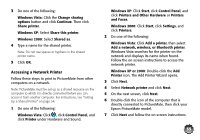
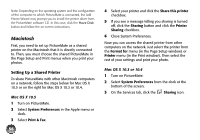
3 Do one of the following: Windows Vista: Click the Change sharing options button and click Continue. Then click Share printer. Windows XP: Select Share this printer. Windows 2000: Select Shared as. 4 Type a name for the shared printer. Note: Do not use spaces or hyphens in the shared printer name. 5 Click OK. Accessing a Network Printer Follow these steps to print to PictureMate from other computers on a network. Note: PictureMate must be set up as a shared resource on the computer to which it is directly connected before you can access it from another computer. For instructions, see "Setting Up a Shared Printer" on page 54. 1 Do one of the following: Windows Vista: Click , click Control Panel, and click Printer under Hardware and Sound. Windows XP: Click Start, click Control Panel, and click Printers and Other Hardware or Printers and Faxes. Windows 2000: Click Start, click Settings, and click Printers. 2 Do one of the following: Windows Vista: Click Add a printer, then select Add a network, wireless, or Bluetooth printer. Windows Vista searches for the printer on the network and displays its name when found. Follow the on-screen instructions to access the network printer. Windows XP or 2000: Double-click the Add Printer icon. The Add Printer Wizard opens. 3 Click Next. 4 Select Network printer and click Next. 5 On the next screen, click Next. 6 Double-click the icon of the computer that is directly connected to PictureMate, then click your Epson PictureMate model. 7 Click Next and follow the on-screen instructions. 55
-
 1
1 -
2
-
3
-
4
-
5
-
6
-
7
-
8
-
9
-
10
-
11
-
12
-
13
-
14
-
15
-
16
-
17
-
18
-
19
-
20
-
21
-
22
-
23
-
24
-
25
-
26
-
27
-
28
-
29
-
30
-
31
-
32
-
33
-
34
-
35
-
36
-
37
-
38
-
39
-
40
-
41
-
42
-
43
-
44
-
45
-
46
-
47
-
48
-
49
-
50
-
51
-
52
-
53
-
54
-
55
-
56
-
57
-
58
-
59
-
60
-
61
-
62
-
63
-
64
-
65
-
 66
66 -
 67
67 -
 68
68 -
 69
69 -
 70
70 -
 71
71 -
 72
72 -
 73
73 -
 74
74 -
 75
75 -
 76
76 -
77
-
78
-
79
-
80
-
81
-
82
-
83
-
84
-
85
-
86
-
87
-
88
-
89
-
90
-
91
-
92
-
93
-
94
-
95
-
96
-
97
 |
 |
