Epson PictureMate Charm - PM 225 User's Guide - Page 41
Sepia, Black & White, Print, PictureMate, Print Center, Delete, Resume, Status, Utility
 |
View all Epson PictureMate Charm - PM 225 manuals
Add to My Manuals
Save this manual to your list of manuals |
Page 41 highlights
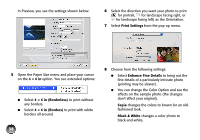
● You can change the Color Option and see the effects on the sample photo (the changes don't affect your original). Sepia changes the colors to brown for an oldfashioned look. Black & White changes a color photo to black-and-white. ● Borderless prints are automatically expanded. If too much of your photo edges are cut off, set the Expansion slider to Min. If you see a white edge on your photo, select Mid or Max. Note: iPhoto expands two sides of an image to the maximum print area, so you may see small borders in iPhoto prints. 10 Click Print. 11 To monitor the progress of your print job, click the PictureMate or Print Center icon when it appears in the dock. If you clicked the Print Center icon, double-click your PictureMate model. 12 From this window, you can do the following: ● To cancel printing, click the print job and click Delete. ● To pause printing, click the print job and click Hold. ● To resume printing, click a print job marked "Hold" and click Resume. ● If multiple print jobs are listed and you want one to print before the other(s), select the job and click the Status arrow to move it up. ● To check photo cartridge status, click Utility, then select EPSON Status Monitor. 13 When you're finished, close the window to exit. 41
-
 1
1 -
2
-
3
-
4
-
5
-
6
-
7
-
8
-
9
-
10
-
11
-
12
-
13
-
14
-
15
-
16
-
17
-
18
-
19
-
20
-
21
-
22
-
23
-
24
-
25
-
26
-
27
-
28
-
29
-
30
-
31
-
32
-
33
-
34
-
35
-
 36
36 -
 37
37 -
 38
38 -
 39
39 -
 40
40 -
 41
41 -
 42
42 -
 43
43 -
 44
44 -
 45
45 -
 46
46 -
47
-
48
-
49
-
50
-
51
-
52
-
53
-
54
-
55
-
56
-
57
-
58
-
59
-
60
-
61
-
62
-
63
-
64
-
65
-
66
-
67
-
68
-
69
-
70
-
71
-
72
-
73
-
74
-
75
-
76
-
77
-
78
-
79
-
80
-
81
-
82
-
83
-
84
-
85
-
86
-
87
-
88
-
89
-
90
-
91
-
92
-
93
-
94
-
95
-
96
-
97
 |
 |
