Epson PowerLite 54c User Manual - Page 78
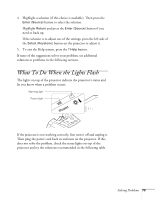
Only part of the computer image is displayed., The image isn't rectangular, but trapezoid-shaped. - 74c
 |
View all Epson PowerLite 54c manuals
Add to My Manuals
Save this manual to your list of manuals |
Page 78 highlights
78 Solving Problems Only part of the computer image is displayed. ■ You may need to adjust the Position setting in the Image menu. See page 49 for more information. ■ If you changed the Aspect Ratio setting for a different source, you may need to change it back to 4:3. See page 50 for instructions. ■ Make sure your computer's resolution setting is correct. Ideally, it should be 1024 × 768 (for the PowerLite 74c) or 800 × 600 (for the PowerLite 54c) to match the projector's native resolution. If this option isn't available, select one of the other compatible video formats listed on page 88. ■ Windows: Right-click the desktop, select Properties, click the Settings tab, and select a different resolution. ■ Macintosh OS X: On the Apple menu, choose System Preferences, then click Display. Select a different resolution. ■ Macintosh OS 9.x: On the Apple menu, choose Control Panels, then click Monitors or Monitors and Sound. Select a different resolution. ■ You also may need to modify existing presentation files if you created them for a different resolution. See your software documentation for specific information. ■ If you used the E-Zoom feature, press Esc on the remote control to cancel zooming and return to full screen size. The image isn't rectangular, but trapezoid-shaped. ■ Make sure the projector isn't placed off to one side of the screen, at an angle, or the image won't be rectangular. Place it directly in front of the center of the screen, facing the screen squarely. ■ If you've tilted the projector upward, the image will be broader at the top. Turn on Auto Keystone correction as described on page 52 or hold down the or side of the Keystone button on top of the projector until the image is rectangular.
-
 1
1 -
2
-
3
-
4
-
5
-
6
-
7
-
8
-
9
-
10
-
11
-
12
-
13
-
14
-
15
-
16
-
17
-
18
-
19
-
20
-
21
-
22
-
23
-
24
-
25
-
26
-
27
-
28
-
29
-
30
-
31
-
32
-
33
-
34
-
35
-
36
-
37
-
38
-
39
-
40
-
41
-
42
-
43
-
44
-
45
-
46
-
47
-
48
-
49
-
50
-
51
-
52
-
53
-
54
-
55
-
56
-
57
-
58
-
59
-
60
-
61
-
62
-
63
-
64
-
65
-
66
-
67
-
68
-
69
-
70
-
71
-
72
-
 73
73 -
 74
74 -
 75
75 -
 76
76 -
 77
77 -
 78
78 -
 79
79 -
 80
80 -
 81
81 -
 82
82 -
 83
83 -
84
-
85
-
86
-
87
-
88
-
89
-
90
-
91
-
92
-
93
-
94
-
95
-
96
-
97
-
98
-
99
-
100
-
101
-
102
-
103
-
104
-
105
-
106
 |
 |