Fagor Premium Pressure Cooker 8-quart User Manual - Page 21
Beans Program
 |
View all Fagor Premium Pressure Cooker manuals
Add to My Manuals
Save this manual to your list of manuals |
Page 21 highlights
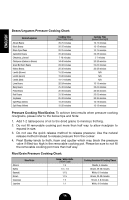
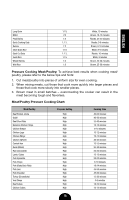
ENGLISH Beans Program Dry beans traditionally can take a long time to make, but with the electric pressure cooker you will no longer need to pre-soak the beans overnight. Simply load your removable cooking pot with all ingredients and you will have perfectly cooked beans in no time. 1. Place the removable cooking pot into the unit. 2. Place all ingredients as needed into the removable cooking pot. 3. Place the lid on the cooker; align the protruding pin on the handle with the condensation collector (open lock symbol), and turn it counterclockwise until the locking pin clicks into place. Turn the pressure regulator knob to PRESSURE when using the bean program. 4. Choose the desired cooking mode by pressing the BEANS button on the control panel. 5. Set the desired cooking time by pressing the + or - buttons or to fast advance, hold the + or - button down till you reach the desired cooking time. The longest cooking time, when pressure cooking, is 99 minutes. 6. To set the delay timer, select the TIME DELAY button and use the + or - buttons to adjust when it should begin cooking. 7. Press the START/STOP button to set the unit. The circles on the panel will begin to light up one at a time, indicating that heat is beginning to form. When the indicator light on the BEANS button goes solid red and all three circles go solid red, this means proper temperature has been reached and cook time begins. If you forget to select a desired cooking time or forget to press the START/STOP button, the unit will beep twice and the digital display will read --:-- after 30 seconds. 8. The unit will begin to count down in one minute increments after the unit reaches proper temperature for high pressure cooking. 9. When the cooking time is up, the unit will beep and automatically go into KEEP WARM mode until you press the START/STOP button to cancel the program. 19
-
 1
1 -
2
-
3
-
4
-
5
-
6
-
7
-
8
-
9
-
10
-
11
-
12
-
13
-
14
-
15
-
 16
16 -
 17
17 -
 18
18 -
 19
19 -
 20
20 -
 21
21 -
 22
22 -
 23
23 -
 24
24 -
 25
25 -
 26
26 -
27
-
28
-
29
-
30
-
31
-
32
-
33
-
34
-
35
-
36
-
37
-
38
-
39
-
40
-
41
-
42
-
43
-
44
-
45
-
46
-
47
-
48
-
49
-
50
-
51
-
52
-
53
-
54
-
55
-
56
-
57
-
58
-
59
-
60
-
61
-
62
-
63
-
64
-
65
-
66
-
67
-
68
-
69
-
70
-
71
-
72
-
73
-
74
-
75
-
76
-
77
-
78
-
79
-
80
-
81
-
82
-
83
-
84
-
85
-
86
-
87
-
88
-
89
-
90
-
91
-
92
-
93
-
94
-
95
-
96
-
97
-
98
-
99
-
100
-
101
-
102
-
103
-
104
-
105
-
106
-
107
-
108
-
109
-
110
-
111
-
112
 |
 |
