Garmin D2 Mach 1 Owners Manual PDF - Page 46
Using the Odometer, Deleting History, Watch Face Settings, Glances
 |
View all Garmin D2 Mach 1 manuals
Add to My Manuals
Save this manual to your list of manuals |
Page 46 highlights
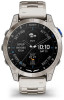
Using the Odometer The odometer automatically records the total distance traveled, elevation gained, and time in activities. 1 From the watch face, hold MENU. 2 Select History > Totals > Odometer. 3 Press UP or DOWN to view odometer totals. Deleting History 1 From the watch face, hold MENU. 2 Select History > Options. 3 Select an option: • Select Delete All Activities to delete all activities from the history. • Select Reset Totals to reset all distance and time totals. NOTE: This does not delete any saved activities. Appearance You can customize the appearance of the watch face and the quick access features in the glance loop and controls menu. Watch Face Settings You can customize the appearance of the watch face by selecting the layout, colors, and additional data. You can also download custom watch faces from the Connect IQ store. Default Watch Face WARNING This watch is not intended to provide primary flight information and is to be used for supplemental purposes only. When engaged, this feature provides guidance to your favorite or nearest airport and suggests a runway for landing based on current wind conditions. Such guidance is for informational purposes only and does not guarantee that the airport or the suggested runway is suitable for the landing of your aircraft. You must still use good piloting judgment in safely operating and landing your aircraft. Your D2 Mach 1 watch displays aviation information on the default watch face. You can hold the watch face data to open the glance or feature. METAR information from your favorite or nearest airport (Selecting a Favorite Airport, page 8). UTC hand. References the 24-hour time markings on the watch. Digital clock that can be customized to display your local time, the time at your favorite airport, UTC, or a specific time zone (Customizing the Watch Face, page 38). Runway information at your favorite or nearest airport, including the best runway for landing based on current winds. The arrow indicates the wind relative to the runway. Customizing the Watch Face Before you can activate a Connect IQ watch face, you must install a watch face from the Connect IQ store (Connect IQ Features, page 67). You can customize the watch face information and appearance, or activate an installed Connect IQ watch face. 1 From the watch face, hold MENU. 2 Select Watch Face. 3 Press UP or DOWN to preview the watch face options. 4 Select Add New to create a custom digital or analog watch face. 5 Press START. 6 Select an option: • To activate the watch face, select Apply. • To change the style of the numbers for the analog watch face, select Dial. • To change the style of the hands for the analog watch face, select Hands. • To change the style of the numbers for the digital watch face, select Layout. • To change the style of the seconds for the digital watch face, select Seconds. • To change the data that appears on the watch face, select Data. • To add or change an accent color for the watch face, select Accent Color. • To change the color of the data that appears on the watch face, select Data Color. • To change the source of digital time that appears on the default watch face, select Digital Clock. • To change the source of the weather data that appears on the default watch face, select Weather. • To remove the watch face, select Delete. Glances Your watch comes preloaded with glances that provide quick information (Viewing the Glance Loop, page 40). Some glances require a Bluetooth connection to a compatible phone. 38 Appearance
-
 1
1 -
2
-
3
-
4
-
5
-
6
-
7
-
8
-
9
-
10
-
11
-
12
-
13
-
14
-
15
-
16
-
17
-
18
-
19
-
20
-
21
-
22
-
23
-
24
-
25
-
26
-
27
-
28
-
29
-
30
-
31
-
32
-
33
-
34
-
35
-
36
-
37
-
38
-
39
-
40
-
 41
41 -
 42
42 -
 43
43 -
 44
44 -
 45
45 -
 46
46 -
 47
47 -
 48
48 -
 49
49 -
 50
50 -
 51
51 -
52
-
53
-
54
-
55
-
56
-
57
-
58
-
59
-
60
-
61
-
62
-
63
-
64
-
65
-
66
-
67
-
68
-
69
-
70
-
71
-
72
-
73
-
74
-
75
-
76
-
77
-
78
-
79
-
80
-
81
-
82
-
83
-
84
-
85
-
86
-
87
-
88
-
89
-
90
-
91
-
92
-
93
-
94
-
95
-
96
-
97
-
98
-
99
-
100
-
101
-
102
-
103
-
104
 |
 |
