Garmin D2 Mach 1 Owners Manual PDF - Page 9
Getting Started, Device Overview, Using the Watch
 |
View all Garmin D2 Mach 1 manuals
Add to My Manuals
Save this manual to your list of manuals |
Page 9 highlights
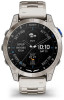
Introduction WARNING See the Important Safety and Product Information guide in the product box for product warnings and other important information. Always consult your physician before you begin or modify any exercise program. Getting Started When using your watch the first time, you should complete these tasks to set it up and get to know the basic features. 1 Press LIGHT to turn on the watch (Device Overview, page 1). 2 Follow the on-screen instructions to complete the initial setup. During the initial setup, you can pair your phone with your watch to receive notifications, sync your activities, and more (Pairing Your Phone, page 64). If you are upgrading from a compatible watch, you can migrate your watch settings, saved courses, and more when you pair your new D2 Mach 1 watch with your phone. 3 Charge the watch (Charging the Watch, page 78). 4 Start an activity (Starting an Activity, page 9). Device Overview UP·MENU • Press to scroll through the glance loop and menus. • Hold to view the menu. DOWN • Press to scroll through the glance loop and menus. • Hold to view the watch face from any screen. START·STOP • Press to choose an option in a menu. • Press to view the activity list and start or stop an activity. • Hold to navigate to an aviation waypoint. BACK·LAP • Press to return to the previous screen. • Press to record a lap, rest, or transition during a multisport activity. • Hold to view the nearest airports from any screen. Enabling and Disabling the Touchscreen • Hold LIGHT, and select . • Hold MENU, select System > Touch, and select an option. TIP: To quickly enable or disable the touchscreen, you can assign a hot key shortcut to the hold function of the buttons (Customizing the Hot Keys, page 78). Touchscreen • Tap to choose an option in a menu. • Hold the watch face data to open the glance or feature. NOTE: This feature is not available on all watch faces. • Swipe up or down to scroll through the glance loop and menus. • Swipe right to return to the previous screen. • Cover the screen with your palm to return to the watch face and turn down the screen brightness. LIGHT • Press to turn on the device. • Press to illuminate the screen. • Quickly press twice to turn on the flashlight. • Hold to view the controls menu. Using the Watch • Hold LIGHT to view the controls menu (Controls, page 49). The controls menu provides quick access to frequently used functions, such as turning on do not disturb mode, saving a location, and turning the watch off. • From the watch face, press UP or DOWN to scroll through the glance loop (Glances, page 38). • From the watch face, press START to start an activity or open an app (Activities and Apps, page 8). • Hold MENU to customize the watch face (Customizing the Watch Face, page 38), adjust settings (System Settings, page 76), pair wireless sensors (Pairing Your Wireless Sensors, page 58), and more. Clearing User Data with the Kill Switch Feature The Kill Switch feature quickly removes all saved userentered data and resets all settings to the factory default values. 1 Customize a button or button combination for the Kill Switch feature (Customizing the Hot Keys, page 78). 2 Hold the button or button combination you customized to activate the Kill Switch feature. TIP: You can press any button to cancel the Kill Switch feature during a 10-second countdown. After 10 seconds, the watch deletes all user-entered data. Introduction 1
-
 1
1 -
2
-
3
-
 4
4 -
 5
5 -
 6
6 -
 7
7 -
 8
8 -
 9
9 -
 10
10 -
 11
11 -
 12
12 -
 13
13 -
 14
14 -
15
-
16
-
17
-
18
-
19
-
20
-
21
-
22
-
23
-
24
-
25
-
26
-
27
-
28
-
29
-
30
-
31
-
32
-
33
-
34
-
35
-
36
-
37
-
38
-
39
-
40
-
41
-
42
-
43
-
44
-
45
-
46
-
47
-
48
-
49
-
50
-
51
-
52
-
53
-
54
-
55
-
56
-
57
-
58
-
59
-
60
-
61
-
62
-
63
-
64
-
65
-
66
-
67
-
68
-
69
-
70
-
71
-
72
-
73
-
74
-
75
-
76
-
77
-
78
-
79
-
80
-
81
-
82
-
83
-
84
-
85
-
86
-
87
-
88
-
89
-
90
-
91
-
92
-
93
-
94
-
95
-
96
-
97
-
98
-
99
-
100
-
101
-
102
-
103
-
104
 |
 |
