Garmin Tacx NEO Bike Smart Trainer Owners Manual - Page 25
USB chargers, Virtual shifters, Brakes, Train without mains power, Transportation wheels
 |
View all Garmin Tacx NEO Bike Smart Trainer manuals
Add to My Manuals
Save this manual to your list of manuals |
Page 25 highlights
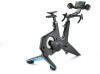
3. USB chargers Two USB chargers (B4) on the underside of the display allow you to power up your tablet, smartphone or other device. Simply plug the cable into the USB-port. When the bike is not connected to the mains, it will power device only when you're cycling. You'll notice the device charging after 10 seconds. 4. Virtual shifters The Virtual shifters (C8 and C9) can be used to shift gears when training with software or stand alone in the simulation mode. In power(erg) or resistance mode, they are disabled. Gear up with the big shifter (C8) or down with the small shifter (C9). Use the left shifters to change the gears on the front, and the right shifters to change the gears of the cassette. EN You can change the gear ratio via the Tacx Utility app: 1. Open the Tacx Utility app. 2. Connect the NEO Bike (via Bluetooth). 3. Go to Device settings in the main menu and change the setting of the Virtual gears to your preference. 4. Close the app and continue with your training. The shifters are also used to change the training mode and terms on the display, as described on page 18. 5. Brakes The shifters also feature (virtual) brakes (C7). The NEO Bike will continue "rolling" when you stop pedalling for a while, just like outdoors. On a descent, it'll continue rolling. By pressing the brakes, it will slowly come to a stop. 6. Train without mains power You can opt to train with or without mains power. With mains power the ride feel will be more realistic. Without mains power, the bike won't be able to simulate a descent and the USB chargers won't function. All other features, like Road feel and communication with your tablet, will remain functioning and are powered by your cycling movement. 7. Transportation wheels You'll find small wheels on the back of the NEO Bike (A8) allowing you to easily move it. After moving the trainer, please make sure to level the bike with the adjustable feet (A5), as instructed on page 12 before using it again. - 23 -
-
 1
1 -
2
-
3
-
4
-
5
-
6
-
7
-
8
-
9
-
10
-
11
-
12
-
13
-
14
-
15
-
16
-
17
-
18
-
19
-
 20
20 -
 21
21 -
 22
22 -
 23
23 -
 24
24 -
 25
25 -
 26
26 -
 27
27 -
 28
28 -
 29
29 -
 30
30 -
31
-
32
-
33
-
34
-
35
-
36
-
37
-
38
-
39
-
40
-
41
-
42
-
43
-
44
-
45
-
46
-
47
-
48
-
49
-
50
-
51
-
52
-
53
-
54
-
55
-
56
-
57
-
58
-
59
-
60
-
61
-
62
-
63
-
64
-
65
-
66
-
67
-
68
-
69
-
70
-
71
-
72
-
73
-
74
-
75
-
76
-
77
-
78
-
79
-
80
-
81
-
82
-
83
-
84
-
85
-
86
-
87
-
88
-
89
-
90
-
91
-
92
-
93
-
94
-
95
-
96
-
97
-
98
-
99
-
100
-
101
-
102
-
103
-
104
-
105
-
106
-
107
-
108
-
109
-
110
-
111
-
112
-
113
-
114
-
115
-
116
-
117
-
118
-
119
-
120
-
121
-
122
-
123
-
124
-
125
-
126
-
127
-
128
-
129
-
130
-
131
-
132
-
133
-
134
-
135
-
136
-
137
-
138
-
139
-
140
-
141
-
142
-
143
-
144
-
145
-
146
-
147
-
148
-
149
-
150
-
151
-
152
-
153
-
154
-
155
-
156
-
157
-
158
-
159
-
160
-
161
-
162
-
163
-
164
-
165
-
166
-
167
-
168
-
169
-
170
-
171
-
172
-
173
-
174
-
175
-
176
-
177
-
178
-
179
-
180
-
181
-
182
-
183
-
184
-
185
-
186
-
187
-
188
-
189
-
190
-
191
-
192
-
193
-
194
-
195
-
196
-
197
-
198
-
199
-
200
-
201
-
202
-
203
-
204
-
205
-
206
-
207
-
208
-
209
-
210
-
211
-
212
-
213
-
214
-
215
-
216
-
217
-
218
-
219
-
220
-
221
-
222
-
223
-
224
-
225
-
226
-
227
-
228
-
229
-
230
-
231
-
232
-
233
-
234
-
235
-
236
-
237
-
238
-
239
-
240
-
241
-
242
-
243
-
244
-
245
-
246
-
247
-
248
-
249
-
250
-
251
-
252
-
253
-
254
-
255
-
256
-
257
-
258
-
259
-
260
-
261
-
262
-
263
-
264
-
265
-
266
-
267
-
268
-
269
-
270
-
271
-
272
-
273
-
274
-
275
-
276
-
277
-
278
-
279
-
280
-
281
-
282
-
283
-
284
-
285
-
286
-
287
-
288
-
289
-
290
-
291
-
292
-
293
-
294
-
295
-
296
-
297
-
298
-
299
-
300
-
301
-
302
-
303
-
304
-
305
-
306
-
307
-
308
-
309
-
310
-
311
-
312
-
313
-
314
-
315
-
316
-
317
-
318
-
319
-
320
-
321
-
322
-
323
-
324
-
325
-
326
-
327
-
328
-
329
-
330
-
331
-
332
-
333
-
334
-
335
-
336
-
337
-
338
-
339
-
340
-
341
-
342
-
343
-
344
-
345
-
346
-
347
-
348
-
349
-
350
-
351
-
352
-
353
-
354
-
355
-
356
-
357
-
358
-
359
-
360
-
361
-
362
-
363
-
364
-
365
-
366
-
367
-
368
 |
 |
