HTC 8525 User Manual - Page 60
Schedule synchronization with Exchange Server - update
 |
UPC - 813380010480
View all HTC 8525 manuals
Add to My Manuals
Save this manual to your list of manuals |
Page 60 highlights
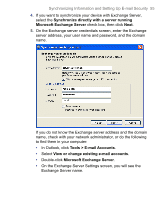
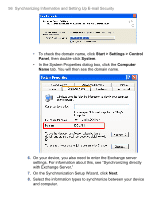
60 Synchronizing Information and Setting Up E-mail Security To synchronize directly with Exchange Server 1. In ActiveSync on your device, tap Menu > Configure Server. If you have not yet set up synchronization with Exchange Server, this appears as Add Server Source. 2. In Server address, enter the name of the server running Exchange Server, and tap Next. 3. Enter your user name, password, and domain, and tap Next. To change the rules for resolving synchronization conflicts, tap Advanced. 4. Select the check boxes for the types of information items that you want to synchronize with Exchange Server. 5. To change available synchronization settings, select the type of information, and tap Settings. 6. Tap Finish. Schedule synchronization with Exchange Server You can schedule information to be synchronized automatically between your device and the Exchange Server, or schedule synchronization at regular time intervals. Choose between these two methods, depending on your e-mail volume and which method you think is more cost-effective. To receive e-mail and synchronize other information instantly Direct Push technology (push e-mail feature) enables you to receive new e-mails on your device as soon as they arrive in your Inbox on the Exchange Server. With this feature, items such as contacts, calendar and tasks are also immediately updated onto your device when these items have been changed or new entries have been added on the Exchange Server. To make Direct Push work, you need to have a GPRS, EDGE or UMTS/HSDPA connection on your device. The Direct Push feature works for your device only if it is connected to a private network (corporate network) that is using Microsoft Exchange Server with Service Pack 2 (SP2) with Exchange ActiveSync. You need to perform a full synchronization between your device and the Exchange Server first before Direct Push can be enabled.
-
 1
1 -
2
-
3
-
4
-
5
-
6
-
7
-
8
-
9
-
10
-
11
-
12
-
13
-
14
-
15
-
16
-
17
-
18
-
19
-
20
-
21
-
22
-
23
-
24
-
25
-
26
-
27
-
28
-
29
-
30
-
31
-
32
-
33
-
34
-
35
-
36
-
37
-
38
-
39
-
40
-
41
-
42
-
43
-
44
-
45
-
46
-
47
-
48
-
49
-
50
-
51
-
52
-
53
-
54
-
 55
55 -
 56
56 -
 57
57 -
 58
58 -
 59
59 -
 60
60 -
 61
61 -
 62
62 -
 63
63 -
 64
64 -
 65
65 -
66
-
67
-
68
-
69
-
70
-
71
-
72
-
73
-
74
-
75
-
76
-
77
-
78
-
79
-
80
-
81
-
82
-
83
-
84
-
85
-
86
-
87
-
88
-
89
-
90
-
91
-
92
-
93
-
94
-
95
-
96
-
97
-
98
-
99
-
100
-
101
-
102
-
103
-
104
-
105
-
106
-
107
-
108
-
109
-
110
-
111
-
112
-
113
-
114
-
115
-
116
-
117
-
118
-
119
-
120
-
121
-
122
-
123
-
124
-
125
-
126
-
127
-
128
-
129
-
130
-
131
-
132
-
133
-
134
-
135
-
136
-
137
-
138
-
139
-
140
-
141
-
142
-
143
-
144
-
145
-
146
-
147
-
148
-
149
-
150
-
151
-
152
-
153
-
154
-
155
-
156
-
157
-
158
-
159
-
160
-
161
-
162
-
163
-
164
-
165
-
166
-
167
-
168
-
169
-
170
-
171
-
172
-
173
-
174
-
175
-
176
-
177
-
178
-
179
-
180
-
181
-
182
-
183
-
184
-
185
-
186
-
187
-
188
-
189
-
190
-
191
-
192
-
193
-
194
-
195
-
196
-
197
-
198
-
199
-
200
-
201
-
202
-
203
-
204
-
205
-
206
-
207
-
208
 |
 |
