HTC P3300 User Manual - Page 21
Starting Up, Charge the battery, Low battery, Turn your device on and off
 |
View all HTC P3300 manuals
Add to My Manuals
Save this manual to your list of manuals |
Page 21 highlights
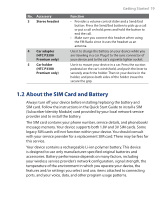
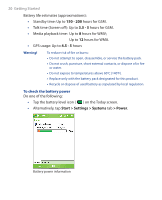
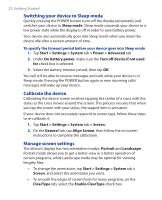
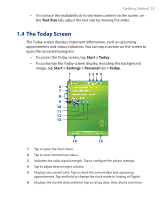
Getting Started 21 Charge the battery New batteries are shipped partially charged. Before you start using your device, it is recommended that you install and charge the battery. Some batteries perform best after several full charge/discharge cycles. You can charge the battery in two ways: • Connecting your device directly to an external power source. • Connecting your device to a PC via the provided USB Sync cable. Warning! • Do not remove the battery from the device while you are charging it using the AC or car adapter. • As a safety precaution, the battery stops charging when it overheats. Low battery When the low-battery warning appears, do the following: • Immediately save your current data. • Synchronize with your PC or connect the power adapter to charge the battery. • Turn off your device. 1.3 Starting Up Turn your device on and off To turn on your device, press the POWER button. When you turn on your device for the first time, a Quick Start Wizard will guide you through the calibration process and the setup of regional settings, date and time, password, Outlook e-mail, and POP3/IMAP4 e-mail accounts. For more information about touch screen calibration, see "Calibrate the device". For information about setting up Outlook e-mail and POP3/IMAP4 e-mail accounts, see Chapter 7. To turn off your device, press and hold the POWER button for a few seconds. A message will then be displayed, prompting you whether or not to turn off the device completely.
-
 1
1 -
2
-
3
-
4
-
5
-
6
-
7
-
8
-
9
-
10
-
11
-
12
-
13
-
14
-
15
-
 16
16 -
 17
17 -
 18
18 -
 19
19 -
 20
20 -
 21
21 -
 22
22 -
 23
23 -
 24
24 -
 25
25 -
 26
26 -
27
-
28
-
29
-
30
-
31
-
32
-
33
-
34
-
35
-
36
-
37
-
38
-
39
-
40
-
41
-
42
-
43
-
44
-
45
-
46
-
47
-
48
-
49
-
50
-
51
-
52
-
53
-
54
-
55
-
56
-
57
-
58
-
59
-
60
-
61
-
62
-
63
-
64
-
65
-
66
-
67
-
68
-
69
-
70
-
71
-
72
-
73
-
74
-
75
-
76
-
77
-
78
-
79
-
80
-
81
-
82
-
83
-
84
-
85
-
86
-
87
-
88
-
89
-
90
-
91
-
92
-
93
-
94
-
95
-
96
-
97
-
98
-
99
-
100
-
101
-
102
-
103
-
104
-
105
-
106
-
107
-
108
-
109
-
110
-
111
-
112
-
113
-
114
-
115
-
116
-
117
-
118
-
119
-
120
-
121
-
122
-
123
-
124
-
125
-
126
-
127
-
128
-
129
-
130
-
131
-
132
-
133
-
134
-
135
-
136
-
137
-
138
-
139
-
140
-
141
-
142
-
143
-
144
-
145
-
146
-
147
-
148
-
149
-
150
-
151
-
152
-
153
-
154
-
155
-
156
-
157
-
158
-
159
-
160
-
161
-
162
-
163
-
164
-
165
-
166
-
167
-
168
-
169
-
170
-
171
-
172
-
173
-
174
-
175
-
176
-
177
-
178
-
179
-
180
-
181
-
182
-
183
-
184
-
185
-
186
-
187
-
188
-
189
-
190
-
191
-
192
-
193
-
194
-
195
-
196
-
197
-
198
-
199
-
200
-
201
-
202
-
203
-
204
-
205
-
206
-
207
-
208
 |
 |
