HTC Touch Pro Verizon Hotfix to enhance the security mechanism of Bluetooth se - Page 63
E-mail Setup Wizard - review
 |
View all HTC Touch Pro Verizon manuals
Add to My Manuals
Save this manual to your list of manuals |
Page 63 highlights
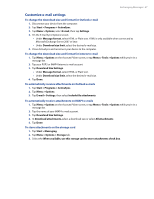
Exchanging Messages 63 6.5 E-mail Setup Wizard Windows Mobile's E-mail Setup wizard walks you through the process of setting up your e-mail account. It has an Auto Setup feature which can automatically set up your e-mail account based on the e-mail address and password that you enter, if your e-mail provider settings are preconfigured on your device. If the settings are not found on your device, Auto Setup then attempts to retrieve the settings online for which you may be charged when your device connects to the Internet and downloads them. If it cannot find the e-mail settings online, you need to enter them manually. Note For more information about setting up your company Outlook e-mail account, see Chapter 7. Set up an Internet e-mail account Set up a POP3 or IMAP4 e-mail account on your device if you have an e-mail account from an Internet service provider (ISP) or other e-mail service provider, or a Web-based account such as Gmail, Yahoo! Mail Plus, or AOL. You can also add a work account that you access using a VPN server connection as a POP3/IMAP4 account. 1. Add a new e-mail account. See "Add an e-mail account" for instructions. 2. Enter your E-mail address and the Password for your e-mail account and select the Save password option. Tap Next. 3. If e-mail provider settings are found preconfigured on your device, the E-mail Setup wizard shows a successful message. Tap Next. If the settings are not found on your device, select the Try to get e-mail settings automatically from the Internet checkbox to find and download e-mail server settings from the Internet and then tap Next. 4. Enter Your name and the Account display name and then tap Next. Note If the E-mail Setup wizard was unsuccessful in finding and downloading settings from the Internet, select Internet e-mail from the Your e-mail provider list on the next screen. You will be asked to enter e-mail server settings. See "To specify e-mail server settings" for details. 5. In the Automatic Send/Receive list, choose how often you want e-mail messages to be automatically sent and downloaded on your device. Note Tap Review all download settings to select download options, set the e-mail format as HTML or plain text, and more. For more information, see "To customize download and format settings." 6. Tap Finish. To specify e-mail server settings If Auto Setup is unsuccessful, contact your ISP or e-mail provider for the Incoming mail server and Outgoing mail server settings so you can enter them on your device. Other options that you can select include the following: • Select the Outgoing server requires authentication check box, if required by your provider. • If the outgoing e-mail server requires a different user name and password for sending e-mail, clear the Use the same user name and password for sending e-mail check box. You will be prompted to enter this information. • Tap Advanced Server Settings, then select the Require SSL check boxes if your e-mail provider uses an SSL connection for more secured e-mail. From the Network connection list, select the data connection that you use for connecting to the Internet.
-
 1
1 -
2
-
3
-
4
-
5
-
6
-
7
-
8
-
9
-
10
-
11
-
12
-
13
-
14
-
15
-
16
-
17
-
18
-
19
-
20
-
21
-
22
-
23
-
24
-
25
-
26
-
27
-
28
-
29
-
30
-
31
-
32
-
33
-
34
-
35
-
36
-
37
-
38
-
39
-
40
-
41
-
42
-
43
-
44
-
45
-
46
-
47
-
48
-
49
-
50
-
51
-
52
-
53
-
54
-
55
-
56
-
57
-
 58
58 -
 59
59 -
 60
60 -
 61
61 -
 62
62 -
 63
63 -
 64
64 -
 65
65 -
 66
66 -
 67
67 -
 68
68 -
69
-
70
-
71
-
72
-
73
-
74
-
75
-
76
-
77
-
78
-
79
-
80
-
81
-
82
-
83
-
84
-
85
-
86
-
87
-
88
-
89
-
90
-
91
-
92
-
93
-
94
-
95
-
96
-
97
-
98
-
99
-
100
-
101
-
102
-
103
-
104
-
105
-
106
-
107
-
108
-
109
-
110
-
111
-
112
-
113
-
114
-
115
-
116
-
117
-
118
-
119
-
120
-
121
-
122
-
123
-
124
-
125
-
126
-
127
-
128
-
129
-
130
-
131
-
132
-
133
-
134
-
135
-
136
-
137
-
138
-
139
-
140
-
141
-
142
-
143
-
144
-
145
-
146
-
147
-
148
-
149
-
150
-
151
-
152
 |
 |