HP 1012 HP LaserJet 1010/1012/1015 Printer - Software Technical Reference - Page 27
To install printer software for all other Windows operating systems - troubleshooting
 |
View all HP 1012 manuals
Add to My Manuals
Save this manual to your list of manuals |
Page 27 highlights
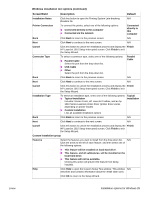
Note ENWW 10 Double-click the WinNT folder. 11 Double-click the PCL 5e driver folder. 12 Click hp130025.inf to select the INF file. 13 Click Open. 14 In the Install from Disk dialog box, click OK. 15 Click Next. 16 Choose the printer name (this is optional), and the default printer options. Click Next. 17 Select whether the printer will be shared, and click Next. 18 Select Yes, print a test page, and click Finish to complete the driver installation. To install printer software for all other Windows operating systems 1 Close all programs. 2 Place the HP LaserJet 1010 series printer software CD-ROM into the CD-ROM drive. 3 Wait for autorun to begin the software installation. If the Welcome screen does not open, click Start on the Windows task bar, click Run, type Z:\hpsetup (where Z is your CD-ROM drive letter), and then click OK. 4 Read the information on the Welcome screen, and then click install printer. 5 Read the software licensing agreement, and then click Next. 6 Select the printer connection method, and then click Next. 7 Select the connector type, and then click Next. 8 Select the installation type, and then click Next. 9 To accept the default printer name and default printer, click Next, or type a new name and select a different default printer, and then click Next. 10 Select a shared printer option, and then click Next. 11 In the text box, type a location and comment (optional), and then click Next. 12 Click Install to install the software. 13 Connect the printer to the computer. New Hardware Found messages are not visible in Windows XP. 14 On-screen check boxes allow you to print a printer driver test page, read release notes, check for Web updates, and register the printer online. The print a driver test page check box is selected by default. You can accept one or all of these settings, and then click Finish. The following options are available: • To print a test page, a dialog box asks if the test page printed correctly. Click Yes to close the dialog box and finish the installation, or click Troubleshoot (or click No in Windows 98 SE and Windows Me) to launch the Windows print-troubleshooting tool. • If you chose to read release notes, select the read release notes check box. • To check for Web updates, select the check for web updates check box. • If you chose to register the printer online, your browser launches and displays the online registration screen at http://www.hp.com. Follow the on-screen directions to register your printer. Installation options for Windows 27
-
 1
1 -
2
-
3
-
4
-
5
-
6
-
7
-
8
-
9
-
10
-
11
-
12
-
13
-
14
-
15
-
16
-
17
-
18
-
19
-
20
-
21
-
 22
22 -
 23
23 -
 24
24 -
 25
25 -
 26
26 -
 27
27 -
 28
28 -
 29
29 -
 30
30 -
 31
31 -
 32
32 -
33
-
34
-
35
-
36
-
37
-
38
-
39
-
40
-
41
-
42
-
43
-
44
-
45
-
46
-
47
-
48
-
49
-
50
-
51
-
52
-
53
-
54
-
55
-
56
-
57
-
58
-
59
-
60
-
61
-
62
-
63
-
64
-
65
-
66
-
67
-
68
-
69
-
70
-
71
-
72
-
73
-
74
-
75
-
76
-
77
-
78
-
79
-
80
-
81
-
82
-
83
-
84
-
85
-
86
-
87
-
88
-
89
-
90
-
91
-
92
-
93
-
94
-
95
-
96
-
97
-
98
-
99
-
100
-
101
-
102
-
103
-
104
-
105
-
106
-
107
-
108
-
109
-
110
-
111
-
112
-
113
-
114
 |
 |
