HP 3050 HP LaserJet 3050/3052/3055/3390/3392 All-in-One - Software Technical R - Page 185
Flip s Up, Print on Both Sides Manually, Print on Both Sides, Finishing
 |
UPC - 882780147096
View all HP 3050 manuals
Add to My Manuals
Save this manual to your list of manuals |
Page 185 highlights
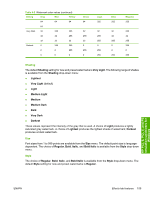
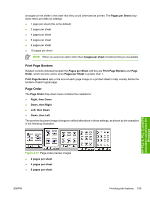
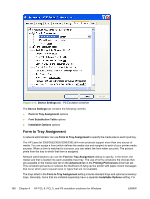
4. Gather the printed pages, keep the printed side facing down, and straighten the stack. 5. Place the stack of media in tray 1again. The printed side should be facing down with the top edge feeding into the all-in-one first. 6. On the computer screen, click OK and then wait for the second side to print. Manually printing on both sides (HP LaserJet 3390/3392 all-in-one) To manually print on both sides of the paper, you must send the paper through the printer twice. You can print by using the media output bin or the straight-through output path. HP recommends that you use the media output bin for lightweight paper and use the straight-through output path for any heavy media or media that curls excessively when printed. Follow these steps to print on both sides manually: 1. Insert enough paper into one of the trays to accommodate the print job. If you are loading special paper such as letterhead, load it in one of the following ways: ● For tray 1, load the letterhead paper with the front side up, bottom-edge leading first. ● For all other trays, load the letterhead paper with the front side down, and the top edge toward the back of the tray. 2. In the print driver, select the Print on Both Sides (Manually) option and send the job to print. 3. After the job finishes printing, remove any blank paper from tray 1. Insert the printed stack into the tray that is specified on the HP LaserJet all-in-one control panel. Load the paper with the printed side up, and the bottom-edge feeding into the all-in-one first. Follow the instructions in the pop-up window that appears before feeding the output stack for printing the second half of the job. 4. Press Enter to continue printing. Flip Pages Up Select the Flip Pages Up check box, which is enabled only when Print on Both Sides is selected, to specify the duplex-binding option. By default, the Flip Pages Up check box is not selected. The following table demonstrates the results of selecting this box, depending on the paper orientation that you select on the Finishing tab. Table 4-3 Page orientation Orientation (Finishing tab) Portrait Landscape Flip Pages Up selected Short-edge binding Long-edge binding Flip Pages Up not selected Long-edge binding Short-edge binding When Print on Both Sides is selected, the document preview image changes to show a spiral binding along either the left edge or the top edge of the page. In addition, a folded-over corner appears in the lower-right portion of the preview image, indicating that printing occurs on the back side. An arrow on the folded-over corner points in the direction that the pages would be flipped if they were bound together. Short-side binding is for print jobs with pages that read by flipping over like the pages of a calendar. Long-side binding is for print jobs with pages that read by turning like the pages of a book. HP PCL 6, PCL 5, and PS emulation unidrivers for Windows ENWW Finishing tab features 163
-
 1
1 -
2
-
3
-
4
-
5
-
6
-
7
-
8
-
9
-
10
-
11
-
12
-
13
-
14
-
15
-
16
-
17
-
18
-
19
-
20
-
21
-
22
-
23
-
24
-
25
-
26
-
27
-
28
-
29
-
30
-
31
-
32
-
33
-
34
-
35
-
36
-
37
-
38
-
39
-
40
-
41
-
42
-
43
-
44
-
45
-
46
-
47
-
48
-
49
-
50
-
51
-
52
-
53
-
54
-
55
-
56
-
57
-
58
-
59
-
60
-
61
-
62
-
63
-
64
-
65
-
66
-
67
-
68
-
69
-
70
-
71
-
72
-
73
-
74
-
75
-
76
-
77
-
78
-
79
-
80
-
81
-
82
-
83
-
84
-
85
-
86
-
87
-
88
-
89
-
90
-
91
-
92
-
93
-
94
-
95
-
96
-
97
-
98
-
99
-
100
-
101
-
102
-
103
-
104
-
105
-
106
-
107
-
108
-
109
-
110
-
111
-
112
-
113
-
114
-
115
-
116
-
117
-
118
-
119
-
120
-
121
-
122
-
123
-
124
-
125
-
126
-
127
-
128
-
129
-
130
-
131
-
132
-
133
-
134
-
135
-
136
-
137
-
138
-
139
-
140
-
141
-
142
-
143
-
144
-
145
-
146
-
147
-
148
-
149
-
150
-
151
-
152
-
153
-
154
-
155
-
156
-
157
-
158
-
159
-
160
-
161
-
162
-
163
-
164
-
165
-
166
-
167
-
168
-
169
-
170
-
171
-
172
-
173
-
174
-
175
-
176
-
177
-
178
-
179
-
 180
180 -
 181
181 -
 182
182 -
 183
183 -
 184
184 -
 185
185 -
 186
186 -
 187
187 -
 188
188 -
 189
189 -
 190
190 -
191
-
192
-
193
-
194
-
195
-
196
-
197
-
198
-
199
-
200
-
201
-
202
-
203
-
204
-
205
-
206
-
207
-
208
-
209
-
210
-
211
-
212
-
213
-
214
-
215
-
216
-
217
-
218
-
219
-
220
-
221
-
222
-
223
-
224
-
225
-
226
-
227
-
228
-
229
-
230
-
231
-
232
-
233
-
234
-
235
-
236
-
237
-
238
-
239
-
240
-
241
-
242
-
243
-
244
-
245
-
246
-
247
-
248
-
249
-
250
-
251
-
252
-
253
-
254
-
255
-
256
-
257
-
258
-
259
-
260
-
261
-
262
-
263
-
264
-
265
-
266
-
267
-
268
-
269
-
270
-
271
-
272
-
273
-
274
-
275
-
276
-
277
-
278
-
279
-
280
-
281
-
282
-
283
-
284
-
285
-
286
-
287
-
288
-
289
-
290
-
291
-
292
-
293
-
294
-
295
-
296
-
297
-
298
-
299
-
300
-
301
-
302
-
303
-
304
-
305
-
306
-
307
-
308
-
309
-
310
-
311
-
312
-
313
-
314
-
315
-
316
-
317
-
318
-
319
-
320
-
321
-
322
-
323
-
324
-
325
-
326
-
327
-
328
-
329
-
330
-
331
-
332
-
333
-
334
-
335
-
336
-
337
-
338
-
339
-
340
-
341
-
342
-
343
-
344
-
345
-
346
-
347
-
348
-
349
-
350
-
351
-
352
-
353
-
354
-
355
-
356
-
357
-
358
-
359
-
360
-
361
-
362
-
363
-
364
-
365
-
366
-
367
-
368
-
369
-
370
-
371
-
372
-
373
-
374
-
375
-
376
-
377
-
378
-
379
-
380
 |
 |